
Extra-large images are usually obtained by stitching multiple FOVs together. If a single image (e.g. one ND2 frame) is too big to be loaded to RAM in one piece, you will be prompt to select a mode in which to open it:
(requires: Local Option)
A multi-resolution image will be generated out of the original. Such an image can be processed in the same way as a common image. See About Multi-Resolution Images.
Only a thumbnail of the image will be loaded to the RAM. When zooming-in to view image details, the image data of the particular portion of the image will be loaded to RAM progressively (piece by piece). This mode is suitable only for viewing because many image processing functions get disabled in this mode.
In case you need to process the image in full resolution, a smooth solution is to split it into tiles and create a multi-point ND2 file out of it. Please see Splitting Large Images.
Note
On NIS-Elements start-up, the MaxMemoryImageSize parameter is set, based on the Computer\HKEY_LOCAL_MACHINE\SOFTWARE\Laboratory Imaging\Platform\USERNAME\Platform.INI\Configuration\DocuSet.MaxImageSizePercentOfRAM64 registry entry, where the default value is set to 25% of the RAM memory. Images fitting in this memory limit open in normal mode, whereas images exceeding this limit are opened in the progressive mode. This value can be altered in runtime using the SetMaxMemoryImageSize macro function (set as image size in bytes).
(requires: Local Option)
A multi-resolution image is an ND2 file which contains not only the original full-resolution image, but also the same image saved in a reduced resolution. Once the multi-resolution image is created, then:
When opened in the Downsampled mode, processing functions can be applied to the reduced resolution. The image shall be then saved as a new file. If you overwrite the original file, you will loose the full-resolution data.
Loads faster when displayed in the Volume View (ND Views) because the reduced resolution is used to render the volume data. It makes sense to create multi-resolution Z-stack images for images with one side longer than 1024px.
Properties of Multi-Resolution Images
File size is Increased by approximately 1/3 of the original.
(requires: Local Option)
There are the following ways to create a multi-resolution image:
Open JOBS editor e.g. by the
 HCA/JOBS > JOBS > Create New JOB command.
In the window which appears, select Generate Multi-Resolution (ND2 file format must be selected).
Use the
View > Organizer Layout  command to enter Organizer.
Browse for a folder containing the image you would like to make multi-resolution.
Select one or more images, right-click the selection to display a context menu and select Generate Multi-Resolution...
If the image to be opened exceeds the available RAM, a window appears.
Click the button to create the multi-resolution image and open the highest resolution which fits the RAM.
Then, all ND2 images captured by this particular JOB will contain multiple resolutions.
You can split an existing large image to tiles easily.
Open the large image to be split.
Run the
Image > Split Image command. A dialog window appears.Set split options:
Split to separate files - output formatSelect the output format (ND2 or TIFF). A separate file will be saved for each tile. Define Output folder and Prefix where the files will be saved.
Create multipoint ND DocumentOnly one multi-point ND2 file will be created and opened after the split.
Set measurement frame after splittingThe measurement frame will be turned ON after the split in order to exclude overlapping areas. This is to prevent distortion of data in case of measurement.
Tile Size, Number of tilesDefine width and height of a single tile in pixels or set the number of columns and rows to which to split.
OverlapSet overlap value of neighboring tiles either in % or the current calibration units (presumably µm). Overlap up to 50% of the tile size is allowed, higher values are reduced to the maximum.
Select a color to fill empty spaces which will appear the total area of tiles exceeds the image. Use to prevent the empty spaces.
If you do not require the tiles to have exact size, click . The system will arrange/resize the tiles automatically so that the whole image is covered precisely.
Click .
At some point - after some processing is applied - you may want to re-create the large image. Use the
Image > ND Processing > Stitch Multipoint to Large Image command to do so.
If two images have matching XY coordinates you can locate the exact position in one image inside the other. This would be the case especially after using the Image > Split Image command. Right click the location within the first multi-point image and select  Find this Point in Paired Document from the context menu. The point in the paired document will flash. Or, select Find and Mark this Point in Paired Document to keep the point visible after flashing.
If you do this right after splitting the large image (the two images are “paired”), the system displays it and highlights the XY position by a flashing cross. If it is not clear to the system which images shall be paired (e.g. three or more images with matching coordinates are open), the user will be prompted to select the second image to the pair.
Some NIS-Elements functions for creating large images by stitching multiple image frames enables the user to select a stitching method. Select the one you serves better your purpose:
Linearly blends the overlapping image parts.
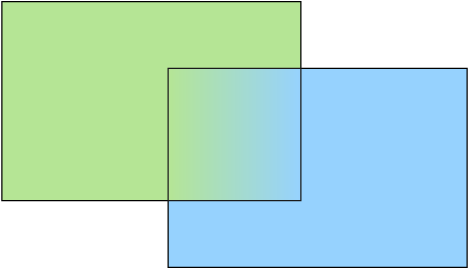
Figure 354. Stitching via Blending (pixel intensity is changed in the overlapped region).
Image details are blended on a narrow range whereas the background, pixelated noise and blurred areas are blended on a wider range.

Figure 355. Linear blending (left) vs. Multi-band blending (right).
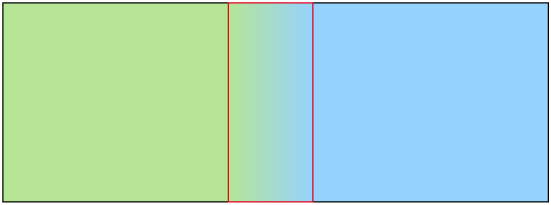
Figure 356. Wide range blending used for noise and background areas.
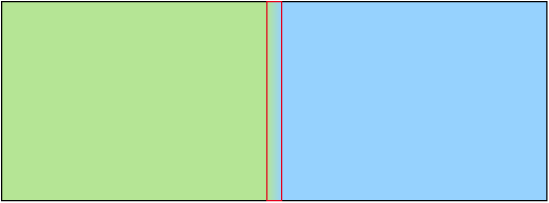
Figure 357. Narrow range blending used for sharp and detailed areas.
This method computes a contour where two overlapping images are least different. Then the images are stitched copying this contour.

Figure 358. Stitching via Optimal path (pixel intensity is preserved).
This method works by locating the centers of the two images and drawing a line between them. A perpendicular line is constructed at the midpoint of this connecting line. Each pixel is then assigned to the image whose center it is closer to relative to this perpendicular divider. The result is a sharp boundary between the two images.
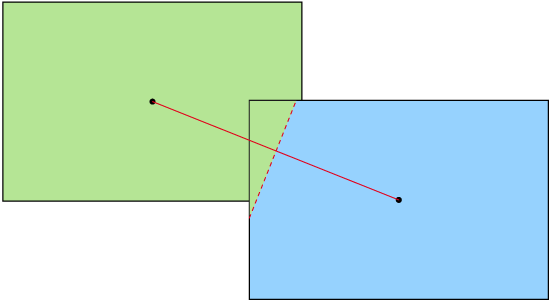
Figure 359. Stitching via Nearest.
This method randomly overlaps the images without any blending (sharp boundaries).
Figure 360. Stitching via Overlap.
A huge sequence of separate files on a disk can be processed as a single ND2 file without actually converting it to the ND2 format. This approach can save the user a lot of time. A textual (JSON) file is created next to the image data, the software then reads it as if it was an ND2 image. The basic procedure is this:
Run the
File > Import/Export > Create JSON File Sequence Description command.Browse for the folder containing the sequence of images. Adjust the options and click the button to save the JSON file.
Use the
File > Open  and browse for the JSON file. The image sequence will open.
Note
A command-line utility called “makelimjsonfile.exe” can be also used to create the JSON file. You will find it in the software installation folder.