
The dimensions can be combined together creating an N-dimensional image as the result:
Run the
 Applications > 6D > Define/Run ND Acquisition
  command.
The following control panel appears:
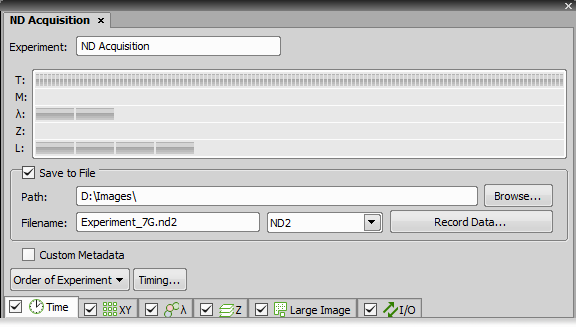
Figure 295.
Select one or more dimensions (tabs) which should be included in the resulting ND2 file. Above the tabs, there is a preview of how the ND2 file structure will look like.
Press the Order of Experiment button and select the item which defines the desired order of loops in the ND2 file.
Set the parameters of each dimension acquisition.
Select whether to save directly to a file or just to keep it in the memory to be saved afterwards. To do so, check Save to File and set the path where the files are saved, enter the file name and choose a file format.
Click the Run now button to start the acquisition.
Note
When the experiment is finished, a window may appear saying “Please wait. Finishing ND experiment, writing image data to the hard disk”. The Cancel button within this window enables you to abort saving of the file. Only the data which has already been physically written to the resulting ND2 file will be available (this also concerns the Recorded Data).
The button works similar to the button, but the acquisition uses Z intensity correction defined within the View > Acquisition Controls > Z Intensity Correction  window.
An image can be captured and saved manually after the experiment is finished, or it can be saved to hard disk “on the fly”:
The ND2 file contains various Recorded Data which carry e.g. acquisition times of single frames. Some of them can be recorded optionally:
Press the Record Data button. The following window appears:
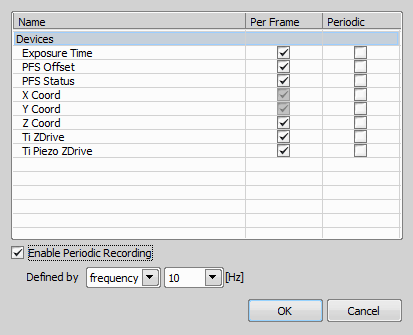
Figure 296.
Select whether to record the data for each frame (Per Frame) or with a certain Frequency or Time.
The data to be recorded shall be check-marked.
To view the recorded data of an opened ND2 file, invoke the
File > Image Properties command and switch to the Recorded Data tab.
Certain hardware settings can speed up ND Acquisition. Please see:
Nikon Ti-E microscope owners: Ti Recipe - acquisition speed up by parallel device movement.
NIDAQ board owners: Using speed up with NIDAQ board .
This button shows the window with expected acquisition duration, total number of frames and number of timelapse frames.
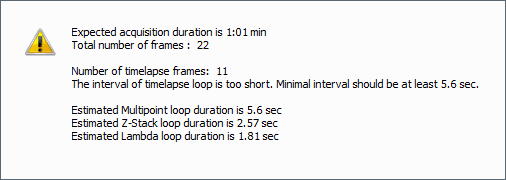
Figure 297. Experiment Timing window
The following window appears while the experiment is running:
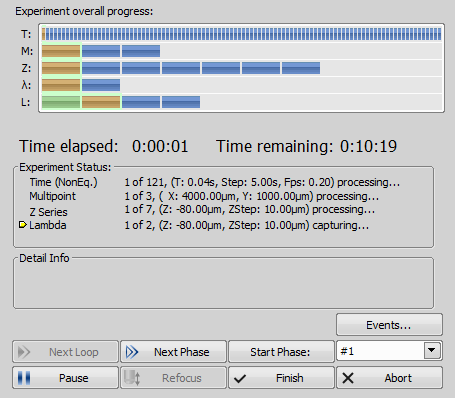
Figure 298.
The window displays the experiment overall progress, time elapsed from start of the experiment, estimated remaining time, remaining free space on the disk where the captured ND2 file is being saved, and detailed messages about the experiment work-flow such as: “waiting for next loop”, “stage moving” etc.
You can control the running experiment by the following buttons:
When the time interval of one time loop is long enough, the system captures all the included dimensions and waits for the scheduled beginning of the next loop. In such case the Next Loop button becomes enabled and you can click it to start the next time loop ahead of the schedule.
After you press this button, the experiment jumps to the beginning of the next time Phase after the current loop is finished.
Use this button to start the time phase selected in the combo box. Select the phase first and press the Start Phase button.
The experiment can be paused by the Pause button. Let it go on by pressing the same button.
If there is a need to focus manually, press the Refocus button. It pauses the ND experiment and runs Live camera signal.
This button stops the experiment and saves captured data.
Use this button to stop the experiment without saving the captured data.
If a remarkable event occurs during the experiment, the user can press a shortcut key and the information will be saved to the resulting ND2 file. You can define the key-shortcuts after you press the button.
See Special Options.
Modifying ROIs During ND Acquisition
Note that there are several options available on the context menu over a ROI during ND acquisition. ROIs can be duplicated, deleted, or moved during the acquisition.
You can for example delete or move a stimulation ROI(s) in reaction to specimen behavior.