

Figure 322. A T/Z/multi-channel image with a few selected loops (highlighted green)
When an ND2 file is opened, its structure is pictured at the bottom of the image window.
There is a time line with all captured images indicated by gray markers. The blue-highlighted marker indicates the currently observed image frame. You can browse the ND2 file by clicking inside the time line.
Below the time line, loops of each dimension are indicated by blue rectangles.
Loops can be selected by mouse while holding Ctrl or Shift keys and are highlighted green.
Note
In case of a simple single channel time-lapse ND2 image, one time loop = one image frame = one blue rectangle.
In the T/Z/MCH ND2 image (displayed above), one time loop contains several Z loops and each Z loop contains 3 color channels.
Note
ND2 files may contain a very large number of frames. It may be useful to omit some of the frames from the selection. See Selection Context Menu.
Each dimension can be browsed frame-by-frame or you can use the playback controls on the right side.
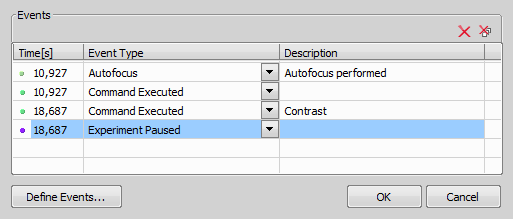
User events can be pinned to any frame of an ND2 image in order to highlight a remarkable scene or action. Use the buttons in the event bar to insert, browse and manage them. Please see Events.
In specific cases the ND2 file control bar looks differently.
If the number of channels exceeds 10, the image is considered to be a spectral image and a lambda dimension is displayed instead of the standard channel tabs.

Figure 323. T/Z/multi-channel image containing 11 channels and the time line hidden

Figure 324. HDR multi-exposure image

Figure 325. Multi-channel image containing 11 channels
Playback Controls
 Stop Playing
 Previous Position (Left),
  Next Position (Right)
 First Frame,
  Last Frame
 Decrease Playing Speed,
  Increase Playing Speed
 Home Position
Selection Context Menu
Right-click a loop (blue rectangle) to display the selection context menu. There are the following commands:
Note
The placeholder X is the name of the current (clicked) dimension, i.e.: T, Z, M, ...
X Selects all frames within the current dimension. The Select Every option is reset to Every automatically.
X Opens a dialog where the user can define a range of frames to be selected.
Every Nth frame of the selection is used. First make a selection of frames either by mouse (while holding down Shift or Ctrl) or select all frames using the Select All Frames command or the  button. Then choose the Select Every option. Selection is changed to every Nth frame of your previous frame selection.
X When one of these commands is called, a new image file is created containing only the selected/deselected frames.
Selects the clicked frame and de-selects all other frames of the current dimension.
Tips
Detailed info about dimensions will be displayed after you click the leftmost button of the control bar (T>, Z>, ...).
Place the cursor over one of the dimensions. A tool-tip which displays statistics of the dimension appears.
Playing options
Right-click the speed bar to display the following context menu and select the playing mode.
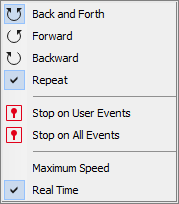
Figure 326.
 Back and Forth,
  Forward,
  Backward
 Defines the direction how the image sequence will be played.
Sets the repetitive infinite playback.
 Stop on User Events
 When you select this option and then press the  Play Sequence button, a dialog window appears once the first user event is reached. The dialog window displays information about the reached user event. Use the Continue button to continue playing to the next event, or press the Stop button to stop the playback at the current frame. Within the window, you can also select the Do not ask again in this session (Always stop) option. Playing will then stop automatically on every user event but the window will not be shown.
Stop on All Events Works as the stop function described above but stops the sequence on all types of events (events inserted from a macro, autofocus, stimulation, pause, etc.).
This command corresponds to the  button described above.
This command corresponds to the  button described above.
User events can be pinned to any of the frames of the image in order to highlight remarkable scenes or actions. There are a number of event types. Some of them are inserted automatically during acquisition, others must be defined by the user.
Event and Selection Controls
 Insert
 This button inserts an event marker to the current frame. You can change the default event in the event settings window ( ).
).
 Move to Previous Event,
  Move to Next Event
 Click these arrows to browse through the frames where only user events occur.
 User Event Selection
 This button selects frames of the ND2 file according to the Event Play Properties - right click this button and pick the Event Selection Range command from the context menu to view/modify them. A simple window appears. Define the number of frames/seconds which will be selected around each event. This command keeps the Select Every option (see above) turned on. To disable it, use the  button first.
Event Settings Opens a window where you can change properties of user events. See Special Options.
Disable Selection Press this button to deselect all frames of the ND2 file.
See more about inserting events during image acquisition in Special Options.
There are several views which can display the ND2 files in various ways. Some views are available for some dimensions only. If a view is available for two or three dimensions of the ND2 file, a pull-down menu appears in the top image toolbar. There you can select the dimension to be displayed.
Note
When you switch the view, a new image window opens by default. This behavior can be changed within the  Edit > Options
  command window so that only one view of an image will be opened at a time.
 Main View
 Slices View
 This view displays orthogonal XY, XZ, and YZ projections of the image sequence. (Requires Z or T dimension)
See also: View > Image > ND View > Tiled View  .
.
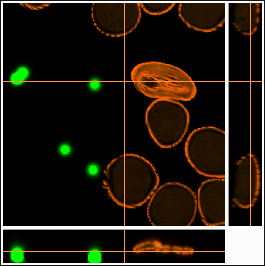
Figure 328. Slices View
 Volume View
 This view creates a 3D model of the acquired object. (Requires Z dimension)
See: Volume Viewer for more information.
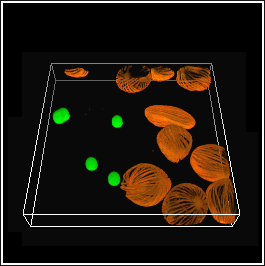
Figure 329. Volume View
Tiled View This view displays frames of the selected dimension arranged one next to other. (Requires Z, T or XY dimension)
One or two dimensions can be viewed at a time.
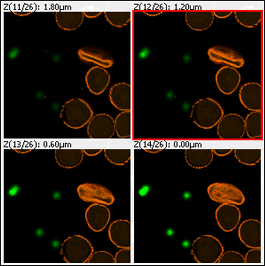
Figure 330. Tiled View
 Show Maximum Intensity Projection,
  Show Minimum Intensity Projection
 These projections analyse all frames of one dimension and pick pixels with the maximum/minimum intensity values. These pixels are used in the resulting image. (Requires Z or T dimension)
Figure 331. Main View, Max/Min Intensity Projection View
Information about current frame of an ND2 document or live image can be displayed using the Show ND Information command from the image contextual menu. It displays information about current frame of the ND2 document or live image. All possible information (metadata) are displayed by default.
You can edit which information is displayed in the Label Properties dialog window. Right click the ND2 information field and select ND Info Properties.... Select displayed features from the Available ND information area and use the button to insert them into the ND information text scheme area which defines the visible information. Use Format options tools to specify the data format (e.g. numeric precision, date format, etc.) and adjust the text appearance in the Text Box tab. Always show Acq. Time forbids removing the Acquisition Time information from the ND information text box.
To view the physical zoom of your image (how many times the image is magnified on your monitor compared to the real dimensions of the calibrated sample), click on Show Physical Zoom in the context menu over your image. The magnification is placed as an overlay information in the corner of your image.
Synchronizer enables parallel viewing (browsing) of two or more ND2 images. It automatically synchronizes view of all documents added to the list. Run View > Visualization Controls > Synchronizer  :
:
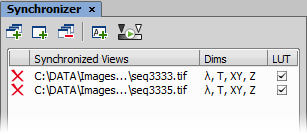
Figure 332.
Open at least two ND2 files you would like to observe.
Use the Add All Views
 button to add them to the synchronizer table, or:
 In case there are more images opened which you do not want to add, use the Add Current View
 button on each of the images.
You can also select the Add New Views Automatically
 button to have all newly opened ND2 files synchronized.
Or, there is the
 button placed in the toolbar of each image and the Synchronize LUTs option can be selected in the nearby pull-down menu.
The names of all added images appear in the Synchronizer window.
All documents added to the Synchronizer are automatically being synchronized as follows:
Set one of the selected images active.
Any action regarding the view (Z position, displayed frame, zoom, magnifier used etc.) is performed on the synchronized images as well as on the active one.
Besides synchronization of dimensions, you can also synchronize LUTs settings of the images by checking the LUT check box. LUTs synchronization works only between LUT-compatible images (images must have the same number of channels etc.). If the images are not LUT compatible, only the Keep Auto Scale and AutoScale actions are synchronized.
You can select the Enable LUTs synchronization by default
 button. All newly added documents will have the option to synchronize LUTs selected by default.
To remove an image from synchronizer, click the reset button
 placed before its name. To remove all images from synchronizer, press the Remove All Views
  button.