
NIS-Elements being a multi-purpose imaging system can be used as a handy tool to study objects, live organisms, processes, etc. The universal ND2 (N-dimensional) file format is what makes this possible. One ND2 file can contain multiple images organized according to what type of acquisition they came from. There are the following acquisition types:
Note
Each acquisition type gives a name to the corresponding dimension of the resulting ND2 file. For example, we can speak about two-dimensional TZ ND2 file, which means the file contains the Time-lapse dimension and the Z-series dimension.
A sequence of images can be captured over a period of time and create a time-lapse image. See Time-lapse Acquisition.
Images from different coordinates of the XY stage can be acquired. See Multi-point Acquisition.
Several techniques utilize Z-stacks of images. Such Z-stack can be for example converted to a 3D model of the specimen. See Z-series Acquisition.
Fluorescence signals can be captured selectively using excitation an emission filters, each of them creating a different color channel. See Multi-channel Acquisition.
(requires: ND (6 dimensions))
When the area of interest exceeds the camera field of view, you can capture a large image composed of multiple image frames and let it be stitched by an automatic algorithm. See Large-image Acquisition.
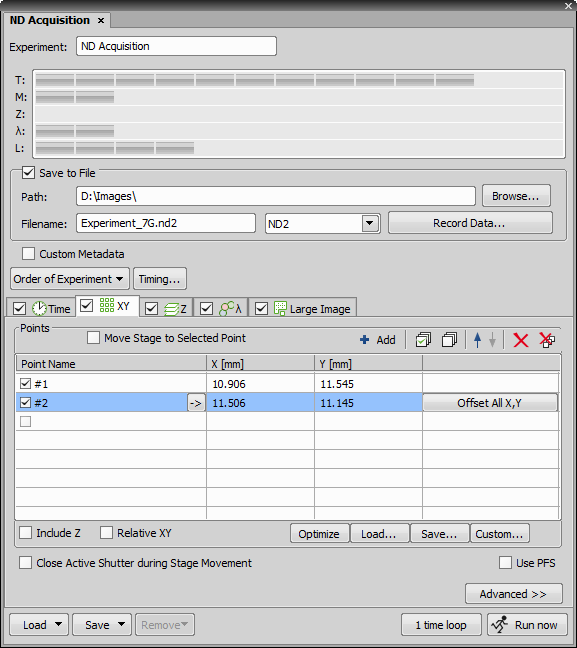
Figure 270. ND Acquisition window
An ND2 file can be created (captured) either containing one dimension or combining several of them.
Single-dimensional documents can be created automatically (using motorized accessories) or manually using commands from the Acquire menu.
To create a multi-dimensional image, use the
 Applications > 6D > Define/Run ND Acquisition
  command.
The following options can be applied to all types of ND experiments:
Please see Save to File.
Specifies the name of the file to be saved and switches the file format from an ND2 file to a single or multipage TIFF. For TIFF saving settings please see General.
Check this option to add custom metadata to the image(s) being captured. Select the metadata set from the drop-down menu and the metadata items present in the set are automatically listed below.
For information about creating and editing custom metadata please see Custom Metadata.
Please see Recorded Data.
Select the auto-focus method that best meets your needs. The Define button displays a window where you can define parameters of the selected focusing method. The focusing methods are the same as in the main menu, although their settings are independent.
Equals the method set by the Devices > Fast Auto Focus Setup command.
Equal the methods set by the Devices > Auto Focus Setup command.
The active shutter can be closed between single image acquisitions. Just select this option. Typically, this option is used to reduce the photo-bleaching effect on live cells.
You can define a command (or a macro) to be run in various stages of the experiment. See Executing macro commands during ND acquisition.
(requires: ND (6 dimensions)) and (requires: Analog IO device)
An ND2 experiment can control some accessory devices and can be controlled by another accessory devices at the same time. This can be achieved by sending/receiving Analog/TTL signals through an NIDAQ card. If the NIDAQ PCI card is installed, an extra tab called I/O appears within the ND experiment window.
(requires: JOBS)
If this option is checked, acquisition uses the global Z intensity correction defined within the View > Acquisition Controls > Z Intensity Correction  window.
To create or edit existing metadata, check the Custom Metadata checkbox in your ND experiment and click . The following dialog window appears.
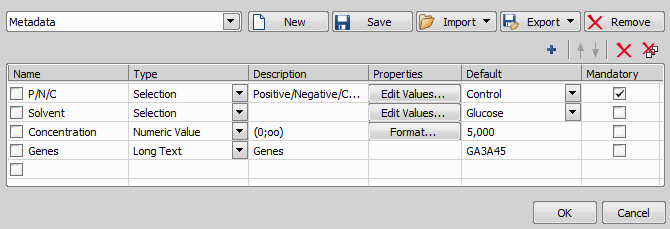
Figure 271.
To create a new custom metadata set - click on  New and give it a name. Click
  Add New and name your first metadata item. Add as many metadata items as you like and confirm their definition by clicking .
To edit an existing metadata set, simply change parameters of the items in the table.
You can save the whole metadata set as a .xml file by clicking  Export. To import your saved metadata set, use
  Import. To delete the current metadata set, click
  Remove.
Note
The created metadata can be changed after acquisition in the image properties dialog ( File > Image Properties).
One or more macro functions can be run before or after the current phase of the experiment.
Select the when to run the command. For example, select the Execute Command before Capture option.
Click on the drop-down menu on the right and select Command List.... This will call the
Macro > Command command and display the list of all available macro functions.Select a function from the list and confirm it by the button.
Note
To run a macro, use the Run macro... command from the drop-down menu and browse for the macro file saved on a disk. This way the RunMacro function will be inserted with the path to the macro file as its parameter.
Note
Image processing macro commands are not executed during the acquisition.
The following options can be applied to time, multipoint and multichannel sequences in ND experiments:

(requires: Incubator NIS Special No.8)
Adds a new incubation phase into the sequence (Time-lapse acquisition only). For more information please see Special Options.
 Add
Add Select All
 Clear Selection
 Move Up,
  Move Down
 Remove All