(requires: AX MP)
Select the AX MP DUX lightpath in the
 Acquisition
  panel.
Open the Experiment Setup window by the
 Exp. Settings button.
Two types of presets can be created here.
DUX Spectral(requires: DUX-VB)
Analogy to the Spectral presets if IR lasers and DUX detector are used.
Click the button and proceed as described in the sections:
Save the Preset
When everything is set, click on the button, type a name of the new preset to the window and confirm it by .
Click the button to close the window.
Note
If the assignment of filters was changed, a confirmation dialog appears (Changing of Filters in the NDD detector).
(requires: AX MP)
Select the AX MP NDD lightpath in the
Acquisition panel.Open the Experiment Setup window by the
Exp. Settings button.Specify fluorescent dyes
Similarly as in a multi-channel preset, add the dyes which represent the wavelengths which will be acquired.
Click the button next to the list of NDD imaging presets.
Search for the dyes and add them to the preset.
Click to close the window.
The software assesses your selection of dyes and creates the preset with reasonable options selected.
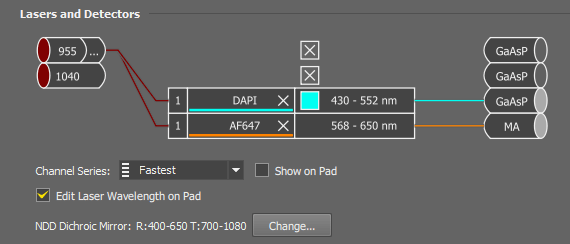
Figure 199. DAPI+FITC NDD experiment defaults
You can adjust them arbitrarily:
Save the Preset
When everything is set, click on the button, type a name of the new preset to the window and confirm it by .
Click the button to close the window.
Note
If the assignment of filters was changed, a confirmation dialog appears (Changing of Filters in the NDD detector).
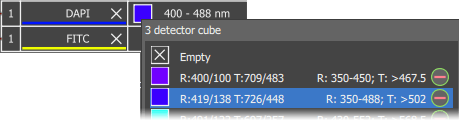
 Filter cubes
(requires: AX MP) and (requires: NSPARC)
Select the AX MP NSPARC lightpath in the
Acquisition panel.Open the Experiment Setup window by the
Exp. Settings button.Specify fluorescent dyes
Similarly as in a multi-channel preset, add the dyes which represent the wavelengths which will be acquired.
Click the button next to the list of MP NSPARC presets.
Search for the dyes and add them to the preset.
Click to close the window.
The software assesses your selection of dyes and creates the preset with reasonable options selected.

Figure 201. FITC+TRITC NSPARC experiment defaults
Save the Preset
When everything is set, click on the button, type a name of the new preset to the window and confirm it by .
Click the button to close the window.
(requires: AX MP)
Every time, the assignment of filters in the NDD detector is changed (e.g. if you select a different experiment setup in the Experiment), the following window appears which requires the user to change the filters safely.

Figure 202. NDD filter change - confirmation dialog
To change filters in the NDD detector safely: