
NIS-Elements offers several ways to open an image file, using either:
 File > Open
  command
 To invoke the Open dialog box where you can select the file to be opened, run the File > Open command. This command is also called when you click the Open button on the main toolbar.
An image can be opened by double clicking its filename within Organizer. Run the View > Organizer Layout  command F10 to switch to the Organizer. See Organizer.
You can quickly access the last opened images using the File > Recent Files menu.
These commands enable you to continuously open the subsequent images from a particular directory or a database table. The File > Open/Save Next > Open Previous, File > Open/Save Next > Open Next, File > Open/Save Next > Open First, File > Open/Save Next > Open Last commands may be used.
The Auto Capture Folder is a control panel that can be displayed by calling the View > Acquisition Controls > Auto Capture Folder command. It displays images within a selected folder. To change the folder click the  button in the top left corner of the control panel and browse for another folder. Any image of this folder can be opened by a double-click.
During installation, NIS-Elements creates file associations to files that are considered its native format for storing images (JP2, ND2). The JP2 and ND2 files can be then opened to NIS-Elements by double clicking their names within any file manager.
Commands for managing the opened images are grouped in the Window menu. The recently opened files are listed in its bottom part. The currently displayed image is indicated by the selected radio button. To change the current image, select it from the list or use the Next or the Previous commands (represented by Ctrl + Tab and Ctrl + Shift + Tab shortcuts).
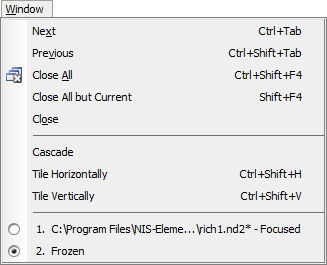
Figure 312.
Image windows can be also arranged automatically using the Window > Tile Horizontally or the Window > Tile Vertically command. This will change the size and position of the opened documents and they will be arranged next to each other in the selected direction.
Options for the File > Open/Save Next > Open Next Command
This window enables you to configure the File > Open/Save Next > Open Next command properties. Run the Edit > Options  command and switch to the Open Next tab.
Specifies the directory with files to open.
Filters the files to open by the image format.
This pull-down menu enables you to select one of the image properties as the ordering criterion. The button toggles the alphabetical order.
Filters the files to open by prefix. You can click  to show advanced filtering options window. The
  button turns the advanced filter on/off.
Defines the name of the file that will be automatically opened after pressing OK. You can see its name on the right side of the box while navigating through the folder using the arrow buttons.
These options are the same as the ones described above but for a database.
Pressing this button restores the default settings of this window. All your changes will be lost.
NIS-Elements offers several ways to save an image file, using either:
File > Save  command
 Saves changes in the current image. If the current image is new (was never saved before), the File > Save As command is called instead.
File > Save As command Saves the current image and lets the user specify the destination folder, format and file name. See File > Save As.
File > Open/Save Next > Save Next  command
 This command saves the current image (live or static) automatically according to the settings defined within the general options window. See Options for the File > Open/Save Next > Save Next Command.
Images and image sequences can be saved automatically during experiments such as ND Acquisition (About ND Acquisition) or a JOB run (JOBS and HCA).
Because of the security enhancement with the UAC (user account control) of MS Windows, it is not possible to save images in those folders that require Windows administrator user rights. Those folders are:
C:\Windows and subsequent folders
C:\Users and subsequent folders excluding C:\Users\[login-user-name]
C:\Program Files and subsequent folders excluding C:\Program Files\NIS-Elements\Images
C:\ (a folder has to be created first on the C: drive to be able to save into it)
Options for the File > Save As Command
Specifies the file type, in which the image will be saved. See Supported File Formats.
Check this option to save the binary layer into the file. If the selected file format does not support layers, the option turns in Burn Binary Image. The binary data are burned into the color data before saving the file.
Check this option to save the annotation layer and the scale layer into the file. If the selected file format does not support layers, the option turns in Burn Annotations. The currently displayed annotation/scale data are burned into the color image before saving the file.
Choose the image compression level (only some image formats support different compression levels).
When pushing the Save button, the Archive information dialog box appears (for LIM and JPEG2000 formats only). Confirm it to save the image.
When saving other than 8- or 16-bit tif file, you can choose to keep the original bit depth of the new file, or to rescale it to 8- or 16-bits. For all new tif files you can also select the option to convert a multichannel image to RGB.
Note
If you are saving 16-bit tiff images, the Scale to 8 bits option is available while the Scale to 16 bits option is not available. If you are saving 8-bit tiff images, the Scale to 16 bits and Scale to 8 bits options are not available.
Saving to movie formats
AVI and MP4 movie files can be created from a ND2 file. When one of the formats is selected in the Save As Type combo box, the following options appear:
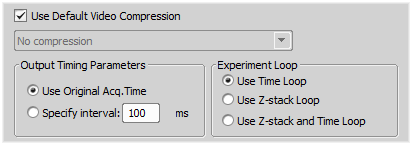
Figure 313.
Select which video compression is applied on created movie files. See About Video Compression.
When the ND document contains XY points, you can decide how these are saved. Either only the current point can be saved into the file, or all XY points can be saved in separate files which are recognizable by “_number” suffix.
Timing of frames of the resulting AVI movie may equal the Original Acquisition Time. If this does not suit your needs, define a custom interval in ms.
Select the dimension, frames of which will be used to create the AVI movie. The dimension must be present in the ND2 file necessarily.
The T dimension frames of the current Z stack position will be used.
The Z dimension frames of the current Time position will be used.
All frames of the ND2 file will be used in the AVI movie.
When the Multipoint dimension is present, only frames of the current Multipoint position are used automatically.
Options for the File > Open/Save Next > Save Next Command
To configure the File > Open/Save Next > Save Next command behavior, run the Edit > Options command and switch to the Save Next tab.
Please see File > Open/Save Next > Save Next Options for details.
The currently displayed image can be quickly closed by pressing the cross button in the top-right corner of the image window.
The image can be also closed by invoking the
File > Close command.If you want to close all images, use the
Window > Close All  command.
If you try to close an image that has been changed, NIS-Elements will display a confirmation dialog box, offering to save the changes.
Use the
Window > Close All but Current command to close all opened documents but keep the current one opened.In the Compact layout, the Close All and Close All but Current commands are available on a context menu when you right-click the image caption.