
Shading correction is a method which can correct illumination inhomogeneities of the captured images. How does this work? First of all, a “shading image” must be obtained. It is an image which represents illumination intensities within the field of view.

Figure 265. Example of a shading image showing inhomogeneous illumination
As you can see in the image above, the illumination intensity is 100% in the center but gets darker near the edges. This can be corrected by applying the shading correction which will equalize intensities of the resulting image based on the captured “shading image”.
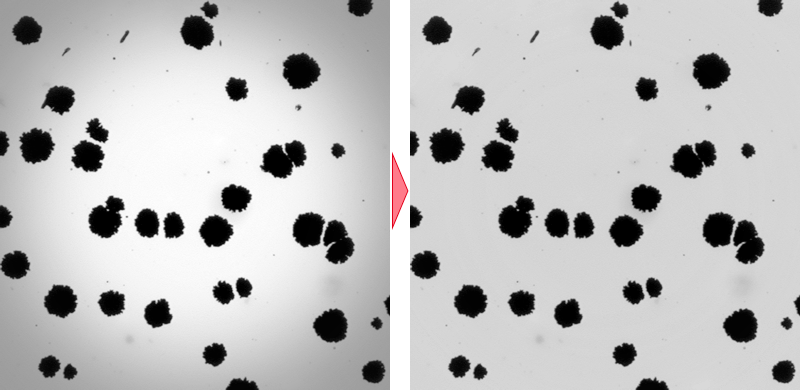
Figure 266. Image before and after applying the shading correction
Run the
 Acquire > Shading Correction Panel command to display the panel.
Select the Simple mode in which one correction image is used for all optical configurations.
Find an empty clean part of the glass and move slightly out of focus.
Select image modality (background brightness) in the dialog.
Capture multiple images (10 is reasonable) by pressing the button. It is optimal if you move the stage between the acquisitions. Images will be merged together to form the final correction image. The Background Variation parameter is taken into account..
Click the button to save the correction image.
Start using the correction by clicking the
 Apply Shading Correction to All Acquisitions button.
Run the
Acquire > Shading Correction Panel command to display the panel.Select the per Optical Configuration mode in which one correction image is used for each optical configuration.
Click the button in the Capture Shading Image section of the dialog and select the optical configuration for which you want to capture the correction image.
Click the
 Capture button and proceed in the same way described above (Simple Shading Correction)
Start using the correction by clicking the
Apply Shading Correction to All Acquisitions button.
If you have dust or dirt on the camera chip, the Shading Correction panel can be used to compensate it.
Run the
Acquire > Shading Correction Panel command to display the panel.Find an empty clean part of the glass and defocus the image
Run the
Acquire > Capture command to capture the image. Make sure the captured image stays active.Select the camera or optical configuration for which the correction image will be used In the Shading Correction panel.
Click the button at the bottom.
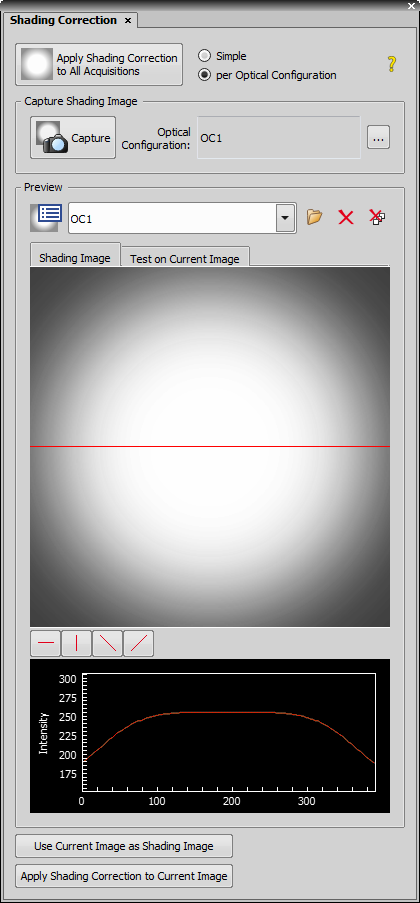
Figure 267. Shading Correction panel
Open it to the main window by the
 button.
Delete it from the list by the
 button.
Examine its intensity profile at the bottom of the panel. Below the preview area there is a set of buttons for changing the rotation of the profile line providing data to the intensity graph below. The profile line can be moved manually using the mouse.
Test the correction algorithm on the current image by switching to the Test On Current Image tab and clicking the
 Test button. The profile graph changes accordingly.
Apply Shading Correction to All Acquisitions This button turns the shading correction on/off on the current image (Simple) or on the current optical configuration (per Optical Configuration).
 Help Capture
 Opens the Capture Shading Image dialog. The information box gives advice on how to properly capture a shading image. Follow the instruction and click to capture the image. Repeat the capture multiple times (10 times optimally) to capture an accurate shading image, then click .
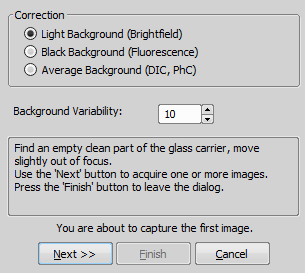
Figure 268.
Select the type of background to be corrected. It is important for the algorithm to know whether the background is bright, dark, or neutral.
This value determines the level of detail of the correction algorithm (smoothness of the curve). Homogeneous shading such as in our example above has low variability, so the default value (10) should work fine. Higher values are suitable for more variable shading images. The range is from 5 to 50.
The drop-down contains a list of captured correction images. In the Simple mode, the correction image has the name of the camera (there can be two items if you have two cameras). In the per Optical configuration mode, each correction image carries the name of the optical configuration used during acquisition. Once you select a correction image, its preview appears in the Shading Image tab. You can:

Shading Correction with the Local Option module
(requires: Local Option)
Shading correction is a technique used to compensate for uneven illumination in captured images.
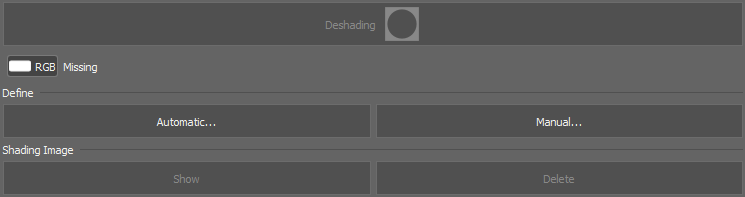
Figure 269. Shading Correction panel

Turns on/off the shading correction. This button has the same functionality as the deshading button in the  Acquisition
  Panel.
List of channels from OC or experiments, with an indication for each channel whether the shading correction is available or not (“Missing”).