
Use the following procedure to calibrate the Ti2-E correction collar.
Put a biological specimen on the microscope stage and then adjust microscope settings according to the specimen.
Set he parameters of the confocal microscope as follows.
Table 4. Recommended values of Confocal parameters for ACC
Scanner Resonant or Galvano Detector DUX-ST or DUVB or NDD Pinhole Size 1.2 AU Channel One channel only, do not select TD channel. Scan Direction Any, unidirectional is recommended. Scan Size 128 x 128 or more. Recommendation: Galvano = 128 x 128, Resonant = 256 x 256 Dwell Time Shortest possible Averaging Any selectable. Recommendation: Galvano = No averaging, Resonant = Averaging 8x
Scan Area Square scan or band scan. Square scan is recommended. Rotation Any selectable. Rotation 0 is recommended Scan Zoom Nyquist value obtained with the Nyquist button on the  AX Scan Area panel.
Notes
If the Scan Size is large, the processing time will be longer.
If the Dwell time is slow, the processing time will be longer and the sample will fade.
The higher the Averaging value is, the longer the processing time will be and the sample will fade.
Click the
 Live button and search for the part that is subject to automatic correction collar correction in the Live image.
Display the
LUTs panel and adjust the laser power and Gain so that the maximum brightness value is about 1000. When the adjustment is complete, freeze the live image.Note
Stronger Laser Power can be used but the sample will fade.
Click the
 (automatic correction) button on the Ti2 Pad to display the ACC Calibration window.
Figure 235.
If NIS-Elements is running with multiple cameras, select AX from the Grabber pull-down menu. On a single-camera system, this menu is hidden.
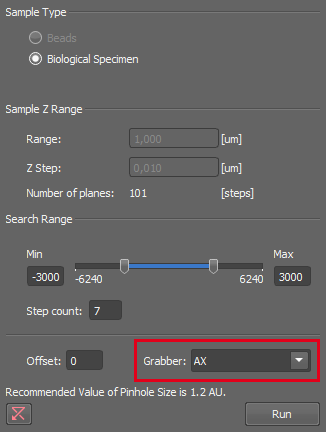
Figure 236. ACC Calibration window
Set the Search Range parameter. Click the reset
 button to set the default values according to the current objective type and sample type. For a water immersion objective (60xWI), select a range of 6000 from the full correction range, such as <0,6000> or <-3000,3000>.
Click the button to start automatic calibration. Z-Stack image acquisition is automatically executed at each search point, and the correction collar gets automatically corrected.
Caution
If the resulting correction value reaches the end of the set range after the calibration is finished, move the search range so that this value is inside the range and run the calibration again.
When the calibration finishes successfully, a message appears and the correction collar moves to the position determined by the procedure.
If an error message appears, return to step 2 of this procedure, adjust the confocal settings and repeat the calibration.
Note
If the same procedure is repeated, the correction value will be different.
See also Automatic Correction Collar Adjustment.