
Typically, a laboratory computer image analysis system consists of a computer, a camera, and a microscope equipped with certain accessories (objectives, filters, shutters, illumination, rotary changers, etc). Most of the mentioned microscopic hardware can be motorized and therefore can be controlled via NIS-Elements. In addition, it is possible to integrate single settings of all these devices into one compact set called Optical Configuration. It is recommended to create several optical configurations containing particular devices settings. Then a single click can completely change the current hardware configuration.
Please check that all the devices (microscopes, cameras, etc.) which you want to associate with the new optical configuration are properly attached to the system and working.
Choose the
 Calibration > New Optical Configuration
  command. In the window which appears, adjust the settings of the devices to match the intended state which will be saved to the optical configuration.
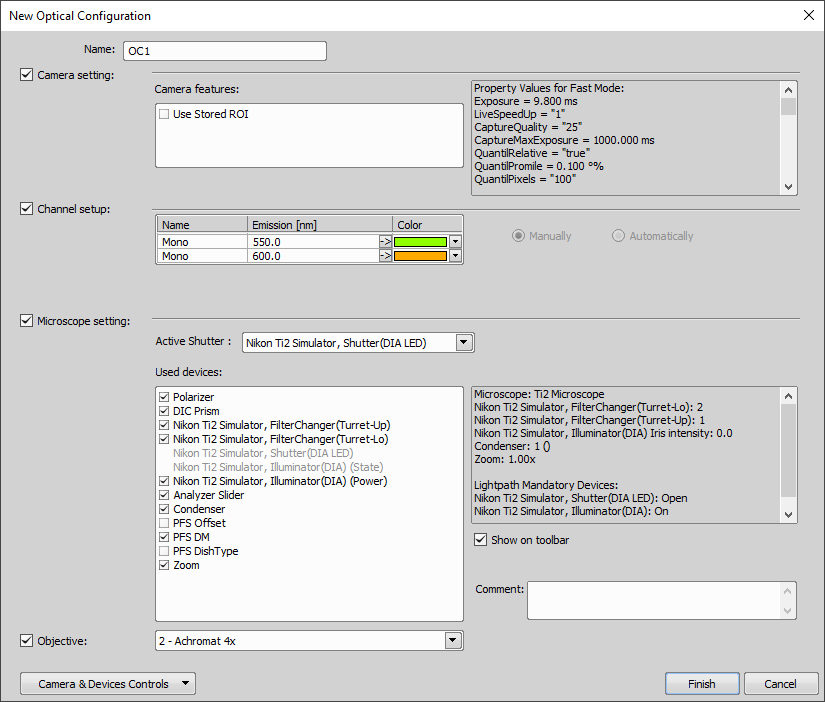
Figure 61.
Type the name of the new optical configuration to the Name field. Use a short descriptive name, the name is used on the button in the main toolbar when you select the Show on toolbar option.
In the left column, select which device settings to associate with the Optical configuration. Only the devices related to the currently selected light path are listed here.
Camera settingA list of the current camera properties appears on the right. It is being updated dynamically.
Use Stored ROIIf you want to include the camera ROI settings, select this option. Status of the camera ROI (ON/OFF) and its size will be set when switching to this configuration.
Channel setupThese settings determine how channels of newly captured images will be named and what color will be assigned to them. The available properties depends on the current camera setup (color/mono, triggered acquisition engaged or not, dual view engaged or not, etc.). In the mono camera mode, you can either assign the name, the emission length and color to the channel Manually, or leave this task to NIS-Elements (the Automatically option). In such case, information of the light path (emission wavelength) will be used to determine the channel name and color.
Microscope settingIf there is more than one shutter available and you would like to associate a shutter with the optical configuration, select which one is the Active Shutter from the pull-down menu. Select which parts of the microscope shall be included in the configuration by checking them in the Used devices dialog box.
ObjectiveAn objective mounted to a motorized nosepiece can be included in the configuration. Select the objective from the pull-down menu. Objectives which are currently assigned to any position of the nosepiece are listed. See Objectives.
Note
The objective must be assigned to a nosepiece position via the microscope control pad or the nosepiece control panel beforehand.
If some of the device settings still need to be adjusted, click the button and select the appropriate control panel from the pull-down menu. Adjust the settings within the control panel, the optical configuration will be updated automatically.
Click Finish to save the new optical configuration and to close the window.
You can create more optical configurations by repeating the procedure. The optical configurations are saved to registry immediately. A backup of the optical configurations can be made by running the
Calibration > Optical Configurations  command and clicking the Export button.
To display the optical configurations manager window, run the Calibration > Optical Configurations command. You can make the following actions from the window:
Create, duplicate, rename, delete, copy settings and switch between optical configurations.
Modify optical configuration properties.
Import and export optical configurations to/from an XML file.
Once created, the configuration appears in the list and can be shared with other users by changing the Private option to Shared (see User Rights). The following operations can be performed on the selected configuration:
It can be deleted by pressing the Remove button. A confirmation dialog box appears.
Its name can be changed by the Rename button. A button with the configuration name appears in the toolbar (if the Show on toolbar option is selected).
The configuration settings may be transferred to another optical configuration by the button. Press the button and select the optical configuration to be overwritten with the current one.
A copy of the configuration can be made via the Duplicate button.
The configuration can be applied to by the Set As Active button.
The settings of all optical configurations can be exported to an external XML file using the Export button.
The previously exported optical configurations settings can be loaded from the XML file via the Import button.
The list of optical configurations can be ordered manually using the arrow-up and arrow-down buttons.
Each configuration can be arbitrarily modified within the right-side portion of the window.
The optical configuration buttons become available in the main toolbar if the Show on toolbar option was selected during the setting process.
You can use one optical configuration when working with live image and switch to another optical configuration just for the image acquisition, very often, this is performed automatically. However, if the optical configuration used for acquisition has the Auto Exposure camera mode turned on, it may produce over-saturated or under-saturated images.
Since the Auto Exposure algorithm estimates the optimal exposure time by analyzing several last frames, it cannot make the estimation correctly if the change of optical configurations would cause significant change in image brightness. To prevent this, we recommend to use a manual exposure mode in the optical configuration used for capturing.