
User management is very useful when a single workstation is shared by number of users. Some user accounts may have administrator rights to NIS-Elements while other's privileges are quite restricted. A per-person system may be established or user accounts may be shared. The following principles are utilized within NIS-Elements:
NIS-Elements can assign privileges to MS Windows accounts. Whoever is logged in the operating system and runs NIS-Elements obtains a default set of privileges. System administrator can then further restrict or extend the user's rights.
It may be not comfortable enough to log the current user off from MS Windows when a user change is required in NIS-Elements. For such case a completely independent list of user accounts, which is not connected with MS Windows users, can be created. Then just restart of NIS-Elements is needed to switch the user.
Every user-created item (setting) important in the work-flow can be protected from unwanted change in two levels. First, the creator of the item (optical configuration, layout, objective, etc.) can save it as private. Unless its status is changed to shared, no other user will even see this item within the lists throughout the application. The second level of protection concerning all shared items is provided by assigning users to Groups and Privileges groups.
Every user is a member of a group. The group enumerates shared items (Hardware Configurations, Objectives, Layouts, etc.) which will be visible for its members. NIS-Elements administrators can create any number of groups and select the items to be visible.
There are basic groups of privileges which allows users or restrict them to perform certain actions. This concerns for example modifying macros, reports, selecting cameras, etc. There are four levels of privileges by default, but further can be created by an administrator:
If you have chosen “ NIS-Elements (Password protected)” user authentication method, a login dialog window appears at every start-up of NIS-Elements. Enter a user name and a password for existing user account. If the option Allow Create New User on Startup is enabled, you can create a new user account without needing an administrator. This account is assigned to the Default group of users and Default group of privileges automatically.
Please read the following example on user management. Step by step, we describe the creation of a shared layout which can not be modified by members of the Common and Guest groups.
Run the
 View > Layout > Layout Manager command. Set at least one of the defined layouts as Shared. (see Arranging User Interface)
In the left column of the window, select User Rights.
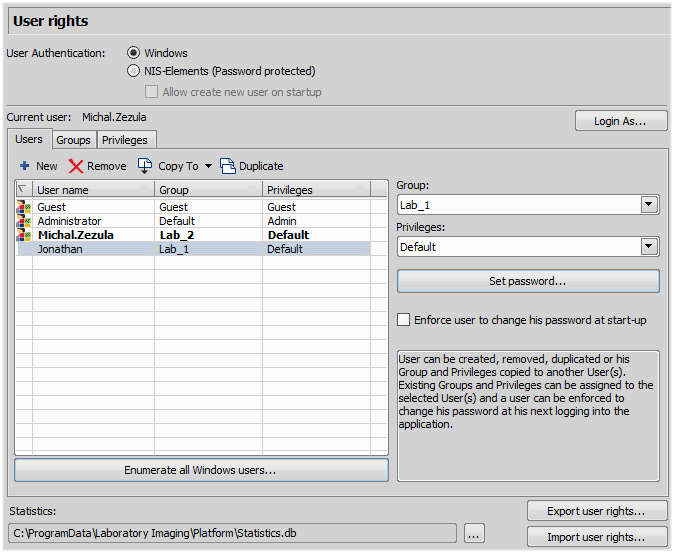
Figure 18. User Rights Options
Make sure you are logged as a user with the Privileges to Modify user rights. If not, use the button to log in under a different account which has the privilege.
Set layout visibility
Select the Groups tab. Here you can see at least one group of items called Default. Either select one a group or create a new one by the New button and choose Layout within the list of items. All layouts set as shared will be listed on the right side within the Accessible items field. Make sure the check boxes next to the layouts which you allow to be used by the group are selected.
Disable layout modification
Select the Privileges tab. Select the group of privileges which should have not the permission to modify the selected shared layouts. In the Privileges field on the right, make sure you de-select the Modify Shared Layouts option.
Apply the new policies
Select the Users tab. In the list of users, select the ones which you would like to apply the policy to (users can be selected one by one or by multi-selection with the Shift or Ctrl key pressed). Then, assign the appropriate Group and Privileges by selecting them from a pull-down menu on the right side of the window.
Confirm the changes by the button.
Only one instance of NIS-Elements can be running on one computer. If a second user starts NIS-Elements when another instance of the program is already running, the following dialog appears.
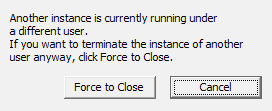
Figure 19. Another instance running
The user can press the Force to Close button to close the running instance. This option is only available if there is no acquisition experiment in progress.
The Windows authentication utilizes Windows accounts to automatically log in to NIS-Elements.
The NIS-Elements (Password protected) authentication utilizes application user accounts and passwords at the start-up of NIS-Elements. Check the Allow Create New User on Startup option to enable creating of a new user in the Login dialog window.
Opens the Login As dialog which enables you to login as a different user e.g. an administrator with more user rights for the purpose of changing User rights settings.
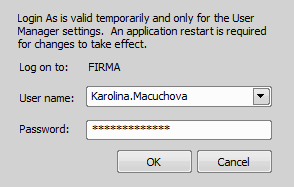
Figure 20. Login As
Select the user name you want to log-in as from the drop-down menu. Enter a valid password and press . The new user identity is available only while the User manager is opened.
 New
New Enables the user to create new NIS-Elements user account. You have to posses the privilege Modify User Rights.

Figure 21. Creating new user
Enter a new user name, assign him to one of the existing Groups and group of Privileges and set the password. Check the Enforce user to change his password at start-up option to make the user change his password at his first login into the NIS-Elements.
User name and password properties
Length of the user name and password is limited to 50 characters. You can use any combination of characters, symbols or numbers (except the Windows ones: ", :, *, ?, ", \, /, <, >, |").
 Remove
 Copy To
 Choose a user from the pull down menu whose group and group of privileges will be changed according to settings of a selected user.
 Duplicate
 You can easily create a new user by duplicating the existing. This preserves all account settings under a different name. If you have selected to duplicate more then one user, enter a name prefix, which is added in front of the original name for all selected duplicated accounts. User which was created as a duplicate has an empty password and is forced to change his password at next application startup.
This table displays all existing user accounts. You can sort them according to any of four columns. The first column displays type of the account. The second one shows user names. The third one displays assigned group of users. The fourth one displays assigned group of privileges. Select one or more users whose settings needs modification.
To change password of a selected NIS-Elements user account, press the Set password button. You have to posses the Privilege Modify User Rights. Otherwise you can change only password of the current user. Following window appears:
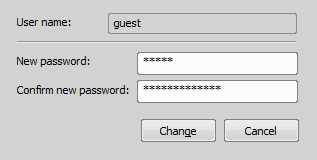
Figure 22. Reset of password
Name of the user is displayed. Enter and confirm new password. When done, press the Change button.

Figure 23. Groups tab
Enables the user to create new group of users. You have to posses the privilege Modify User Rights. Enter a name of new group.
Choose a group from the pull down menu which settings will be changed according to selected group.
You can easily create a new group of users by duplicating the existing. This preserves all group settings under a different name.
All defined groups are listed in this window. Each group contains subsets. If you click on a subset, its items appear in the Accessible items list.
This list shows items of a selected subset. Every item has its own check box. If the check box is checked, all users assigned to the corresponding group will see the item. Otherwise they will not see the item.
Displays all shared hardware configurations. The drop-down menu below the table sets the hardware configuration for users without the privilege to Select HW configuration.
Displays all shared objectives.
Displays all shared layouts.
Displays all macro commands imported into the Macro > Manage Shared Macros window. Check a macro to make the content of it visible to this Group. Check Show Content next to a macro item to allow the user to edit it.
Displays all shared reports and report templates.
Displays all shared definitions of Measurement Sequencer. See Measurement Sequencer.
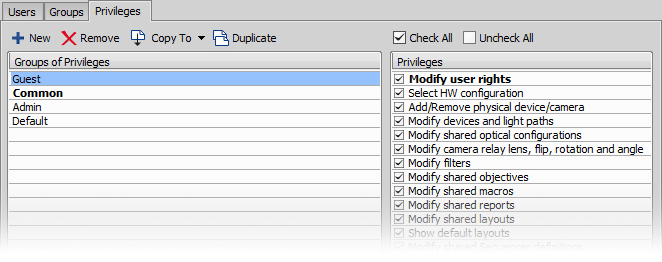
Figure 24. Privileges tab
Enables the user to create new group of privileges. You have to posses the privilege Modify User Rights. Enter a name of new group.
Choose a group from the pull down menu which settings will be changed according to selected group.
You can easily create a new group of privileges by duplicating the existing. This preserves all group settings under a different name. If you have selected to duplicate more then one group of privileges, enter a name prefix, which is added in front of the original name for all selected duplicated accounts.
A list of privileges is displayed. Every item has its own check box. If the check box is checked, it grants all users assigned to the corresponding group relevant privilege to access, change, modify, etc.
The user can adjust assay settings of the Smart Experiment module.
The user can adjust settings in the Devices > Service Settings  dialog.
This option enables the user to make any changes in the User rights dialog window. It is highly recommended to grant this privilege only to administrators.
Enables the user to select a hardware configuration in Devices > Select HW Configuration.
This option enables the user to add or remove devices in the Devices > Device Manager  . If this option is checked, the Modify devices and light paths option is checked automatically as well.
Users with this permission can add/remove/modify devices, light paths and their parameters within the Devices > Device Manager window.
(requires: Confocal AX)
This option enables the user to modify existing shared Nikon Confocal Microscope AX experiment setups. See Experiment Settings.
This option enables the user to change the camera relay lens, flip, rotation and angle in the Acquire > Camera Light Path dialog window.
This option enables the user to change the assigned filter to a turret position.
This option enables the user to modify (change properties, delete, recalibrate, ...) shared objectives within the Calibration > Objectives window. The user having this privilege has the possibility to assign an objective to a nosepiece position and to define optional objectives.
This option enables the user to manage shared macros via the Macro > Manage Shared Macros command. Content of the macro is displayed in the second column.
This option enables the user to manage shared reports via the File > Report > Manage Shared Reports command.
This option enables the user to modify shared layouts in View > Layout > Layout Manager window.
Check this item to automatically display standard layouts (Full Screen, Docked Controls, Measurements, etc.).
Enables the user to modify shared Measurement Sequencer definitions.
Enables the user to remove shared Measurement Sequencer results.
Enables the user to modify a shared confocal alignment.
Note
Users that do not have the privilege to “Modify shared optical configurations” can temporarily change the brightness settings (e.g. exposure time, gain, etc.) in a shared optical configuration and use such adjusted optical configuration for example in Multichannel acquisition. But all such modifications will not be stored and will disappear when the application is restarted.
Note
Please restart NIS-Elements after making any adjustments to privileges to ensure they take effect.
This utility views and filters statistics of all user logins, connected cameras and connected devices. Such statistic data can be useful for multi-user laboratories and other workplaces. Go to [Start menu > Programs > NIS-Elements] program group and select NIS-E Statistics to run the NIS-Elements Statistics browser.
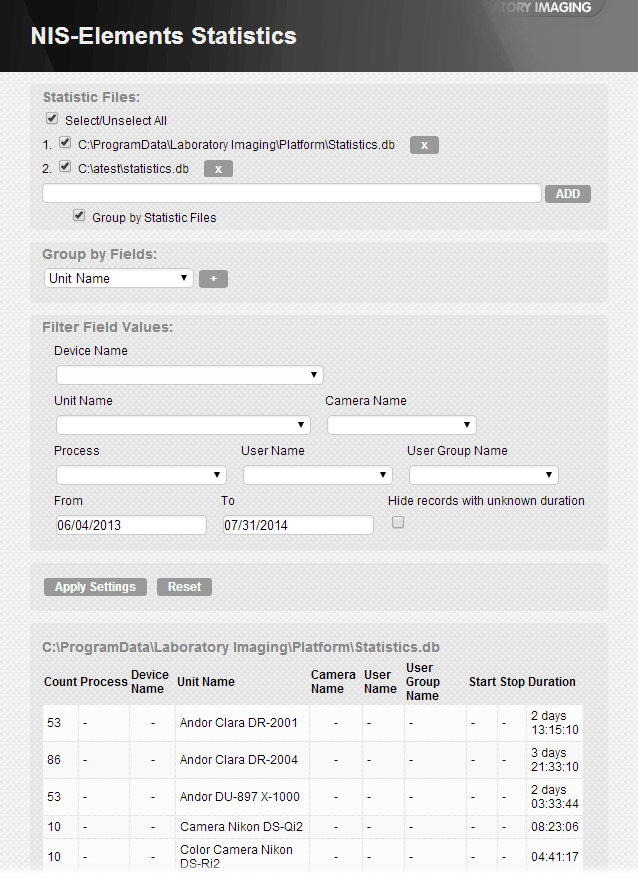
Figure 25. NIS-Elements Statistics opened in an Internet browser
Check the database you will be exploring and/or add more databases using ADD. Results of each statistic file shown in the bottom table can be separated after checking Group by Statistic Files. Select the field for grouping in the Group by Fields combo box. More fields can be added using + . Filter Field Values area is used for applying filters to the statistic data. Hide records with unknown duration filters out records with no stop time. After setting all requested parameters, click Apply Settings to display the statistic results. To restore the settings into default, click Reset.