
Let's suppose you are creating a simple experiment consisting of channels DAPI, FITC, TRITC, TD.
Make sure the AX light path is selected in the
 Experiment panel.
Click on the
 Add button in the Experiment panel and select Multichannel as the type of experiment.
Click the button.
Specify channels
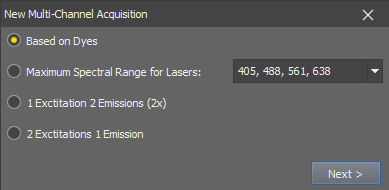
Figure 185.
Select the Based on Dyes option and click the button.
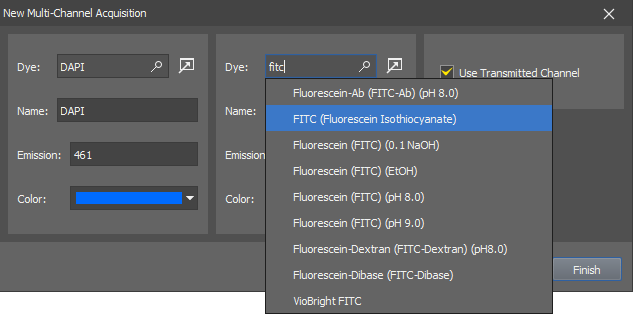
Figure 186.
Type “DAPI” in the first search field, select the actual dye you will be using and confirm it by Enter. Another search field appears. Add the FITC and TRITC dyes as well and select the Use Transmitted Channel option to engage the transmitted light detector in the experiment.
Click to close the window. After you confirm the selection of channels, a window appears with the experiment setup visualized at the bottom.

Figure 187. Spectral graph in the Edit mode
Note
The expert mode is only available for presets created by selecting fluorescent dyes.
Any combination of settings allowed by the hardware can be set to the preset in the expert mode. Select an existing preset in the experiment and click on the button, the visualisation of laser and detectors changes like this:
Select the AX light path and display the
 Exp. Settings window.
Select a multi-channel preset to be modified.
Click on the button.
In the edit mode, click on the button. The visualization changes as follows.
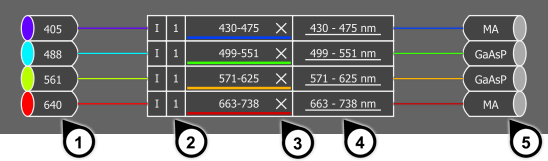
Figure 188. Expert edit mode
Assign lasers to channels
Click on a laser by mouse and drag the arrow cursor onto a channel. Once you drop the dashed line, the laser will be assigned to the new channel.
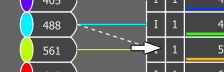
Figure 189.
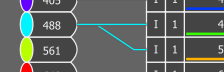
Figure 190.
Assign channels to passes
There are two types of passes which determine the order in which channels are acquired.
Software passesSoftware passes are marked by Roman numbers, I, II, III etc. A software pass is an additional option which is used if the combination of lasers and channels cannot be achieved by using hardware passes. Click the number and select a pass in which the channel will be acquired.
Hardware passesHardware passes are marked by Arabic numbers, 1, 2, 3, etc. Click the number and select a pass in which the channel will be acquired.
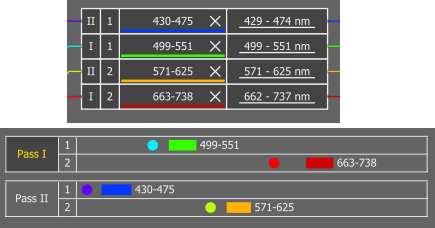
Figure 191. Software and hardware passes
Remove channels
An entire channel can be removed from the setup by clicking the
 icon next to the channel name.
Edit filter settings
Click on the wavelength range displayed next to the channel name. According to the physical setup of the confocal microscope, either filter-changer control appears for filter selection or two sliders for adjusting the variable filter limits appears.
With the NSPARC detector, the filter wheel positions can be selected next to the wavelength range.

Figure 192. Filter changer setting
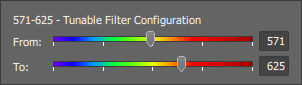
Figure 193. Variable Filter setting (requires: DUX-VB)

Figure 194. Filter changer of the NSPARC detector (requires: NSPARC)
Note
(requires: DUX-ST)
On DUX-ST systems, you can display all filter cube wheels (preceding the current filter in the light path) at once by selecting the Show all filters above check box. This will help to select the filters correctly.
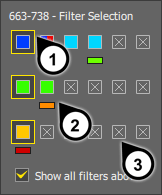
Figure 195. Show all filters above (requires: DUX-ST)
Filter cube (at wheel #1) which reflects blue (452 nm) to the detector #1 and transmits the rest (LP 495 nm)
Filter cube (at wheel #2) which reflects green (525 nm) to the detector #2 and transmits the rest over an orange filter (LP 607 nm)
Filter cube wheel #3. The selected filter reflects yellow (593 nm) to the detector #3 and transmits the rest over a red filter (700 nm)
Assign detectors to channels
Click on a detector by mouse and drag the arrow cursor onto a channel. Once you drop the dashed line, the detector will be assigned to the new channel.
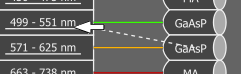
Figure 196.
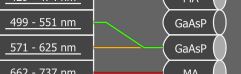
Figure 197.
(requires: DUX-VB)
Select the AX light path. Open the
Exp. Settings window.Specify fluorescent dyes
Similarly as in a multi-channel preset, add the dyes you will use to the preset:
The software assesses your selection of dyes and creates the preset with reasonable options selected.
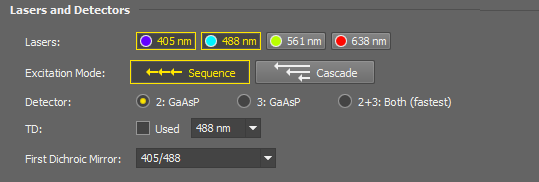
Figure 198. DAPI+FITC spectral experiment defaults
You can adjust them arbitrarily.
Save the Preset
When everything is set, click on the button, type a name of the new preset to the window and confirm it by .