
Calibration of the image is of crucial importance to measurement. On calibrated images, realistic measurements can be performed and objects of different images could be compared to each other. A correct calibration has to be made before you begin to measure.
There are two ways how to obtain a calibrated image:
To capture images with a calibrated system (objective). Please see the Objective Calibration chapter which explains how to calibrate the NIS-Elements system.
To calibrate an uncalibrated image manually:
There are two ways to calibrate an image
After you run the  Calibration > Recalibrate Document command, you can specify a distance in the image or set the current pixel size. Please see Manual Calibration
When you have an uncalibrated image, you can use an already calibrated objective to calibrate it. Right-click the Uncalibrated field on the image status bar and choose one of the objectives from the Calibrate using Objective sub-menu. Of course, the same objective which was used to capture the image shall be selected.
It is possible to measure optical density (absorbance) and Brightness with NIS-Elements. A predefined calibration is used by default, but the user can make his own calibration curve to specify the relation between pixel intensity and density/brightness. For brightness, the default calibration curve is linear, for density, see SumDensity .
Only the density calibration is described below, the brightness calibration is analogous except that it is started by the _CalibrateBrightness macro command.
The live image or a saved image can be used for the calibration.
Run the
_CalibrateDensitymacro command, the following window appears: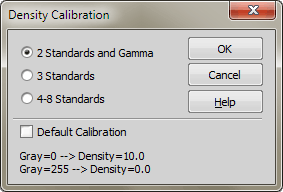
Figure 405.
Select one of the calibration methods
2 Standards and GammaIf selected, you are supposed to use two density standards for the calibration and gamma parameter of a camera. When you press the OK button, following window appears:
3 StandardsIf selected, you are supposed to use three density standards for the calibration.
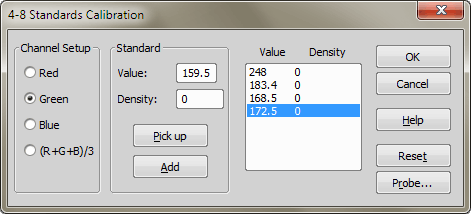
4-8 StandardsIf selected, you are supposed to use four or more density standards for the calibration.
Default CalibrationThe default calibration curve will be used and no calibration will be performed.
Note
A density calibration curve is a decreasing function.
Click to proceed with the selected method. A window appears according to the selected calibration method. Pick up the intensity values from the image or type them directly. Specify the corresponding density values.
When finished, click the button to confirm the calibration.
2 Standards and Gamma - Options
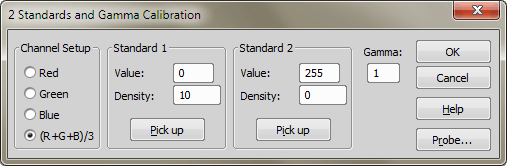
Figure 406.
Select the channel which will be used as the data source for the Probe... (the buttons).
Define the Intensity-to-Density value pairs. You can enter the values directly or use the buttons to calculate the mean intensity value from within the probe.
Gamma parameter of an attached camera. For more details, see technical reference of the camera.
Note
Some (older) cameras had the Gamma parameter set within their body and it was needed to let the software know about this setting. For other cameras, leave the Gamma parameter set to 1.
Click this button to define the shape and the size of a probe. You can move the probe over the current image by mouse.
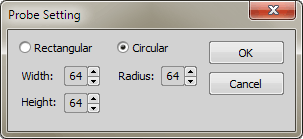
Figure 407.
3 Standards - Options
Follow the instructions described above.
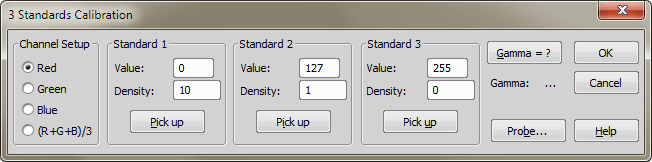
Figure 408.
NIS-Elements supports the following units:
pixels, nanometers, micrometers, millimeters, centimeters, decimeters, meters, kilometers, inches, mils
If the image is uncalibrated, pixels are the only units available. In case of a calibrated image, it is possible to select other units which are then used to display all values (e.g. measured length/area). There are two ways of how to select the desired units:
Right click the image status bar where the calibration is displayed. Select the units and precision from the context menu.
Or, click the Current unit button located in the
Calibration > Objectives command window and select the units.