
JOBS is an environment aiming at complex acquisition and data analysis with easy to use and comprehensive user interface.
Features highlights:
Well-plate, dish and slide support
Conditional acquisition
Set of ready-to-use templates
Wizard for Operators
Visual Programming Style
Integrated Analysis
Asset Management via Database
Data Mining
Remote Access and Sharing
NIS-Elements platform
Jobs are automated procedures for complex image acquisition and data analysis. Typically it is a conditional acquisition on well plates, dishes or slides for long times. It may include Confocal and wide-field camera acquisition combined with photoactivation or bleaching.
The strength of Jobs is their flexibility. They rely on building blocks that can be freely assembled into arbitrary procedures in order to fulfill any particular needs. As all this is done visually using Drag-drop it is called Visual Programming. This approach combines advantages of programming – flexibility – and limits the drawbacks: having to learn how to write a programming source code.
When such procedures – Jobs – are executed, images and analysis data are produced. The images are stored in ND2 files. Metadata and analysis results are stored in the database together with links to the ND2 files. The complete acquisition history is stored in the database as well as the whole organization and structure of Jobs and Projects.
 JOBS Explorer is the heart of the HCA and JOBS modules. Run the
  View > Analysis Controls > JOBS Explorer
  command to display it. All jobs, job runs and all acquired data are viewed and managed throughout this window.

Figure 1067. JOBS Explorer with the JOBS module
Name of the currently connected job database is displayed in this row. The pull-down menu provides tools for managing job databases. See Database context menu
Jobs are organized into Projects - virtual containers which help you organize your jobs. Create your own project or use the default one. You can have projects named e.g. “cell proliferation”, “translocation”, etc. or name it by its author e.g. “Catherine”, “John”, or for example use dates as project names.
However, since you can display results of the whole project in a single result view, it may be a good idea to keep similar jobs together. For instance it may be useful to have a 5hour and a 10 hour proliferation jobs together in one project, but it may produce some complications to put 6-well-plate data together with a 96-well-plates.
This area aggregates predefine job templates which are executed by clicking on their button.
Jobs Explorer shows the contents of one project at a time as a list of jobs. Each job can be unfolded to display all instances of when it was run - so called Job Runs. Single jobs (in bold type) represent the definition which can be viewed and modified in the job editor, wizard or run time. The run instances can be opened to reveal a view on acquired images and data.
A path to the database file used to store JOBS. Use the right-most pull-down menu to manage the database. See Database context menu.
 New
New Adds a new project. The Project window appears. Enter name of the new project and/or a custom description.
 Properties
 Enables changing the information of the active project which were set in the Project window. Projects (if not active) can be deleted here by clicking .
 Results (Project), Results (Jobs)
 Opens the results window of the selected project, job or job run.
 New
New (requires: JOBS) Adds new job to the active project. The Job Definition window appears. See Job Definition Window for details about creating new jobs.
 Edit
Edit (requires: JOBS) Opens the job definition window and displays the selected job to be edited.
 Delete Selected Job
 Removes the selected job.
 Add New Job from Template
 (requires: JOBS) NIS-Elements comes with a set of job templates. This button opens the Job Templates window where you can select one of the templates and load it to the JOBS Explorer. The predefined template cannot be overwritten however if changed, it can be saved to your new Job or exported to a .BIN file.
 Import from File
 (requires: JOBS) This button imports a previously saved job definition into your current project.
Executes a job optimized for high content analysis of fixed/live samples. A simple wizard appears. See Using Job Definition Wizard.
 Order by
 The jobs in the list are ordered by Date by default. Within this button, you can add a second field for job sorting.
 Show/Hide Jobrun Details
 This button displays/hides job details such as the Jobrun Description defined in the Job Run Properties window accessible from the context menu over the job run.
 Run Job
 This icon appears next to a selected job and is used for its execution.
This button opens the Quick Start Toolbar Configuration enabling to adjust the JOBS Explorer panel. System templates can be inserted into the buttons area by checking their check box. Also Templates, Existing Jobs or jobs from a File can be inserted and arranged in the window by dragging&dropping. To remove a button, drag it outside the white area.
Once an empty job is created or an existing job is opened, the job definition window appears.
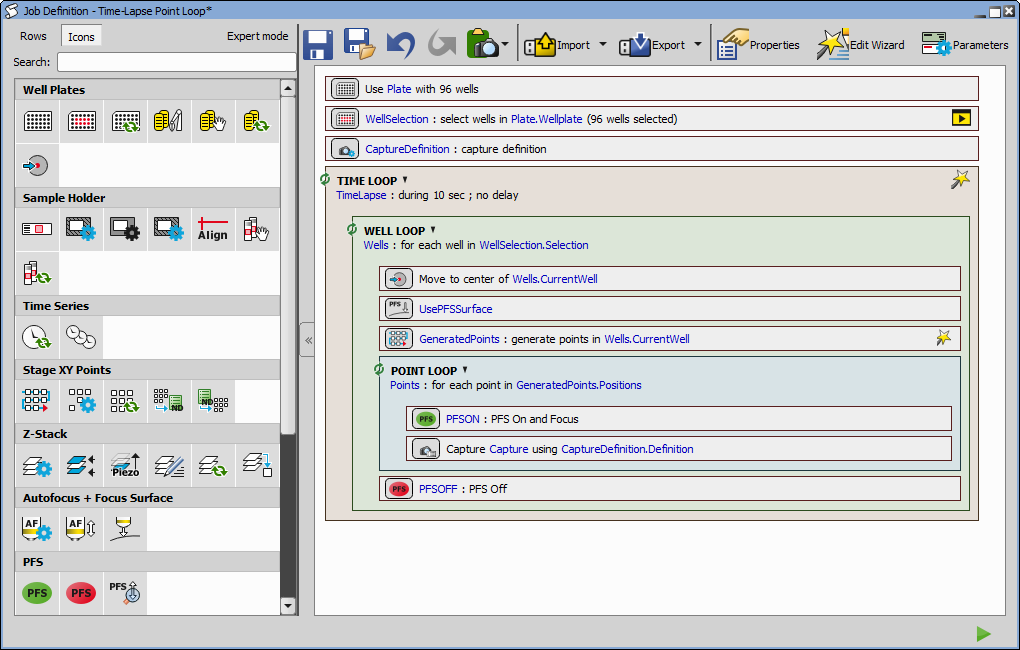
Figure 1068. Job Definition window
This window is the main place for the Job program flow and for changing task parameters. Apart from the main toolbar there are two main areas available:
All tasks available are displayed here in the form of icons (or icon+description). Expert mode button switches between the simple (basic tasks) and advance view mode (all tasks). Tasks are organized into logical groups. Some tasks depend on the presence of some devices. They may not appear in the palette until that device is added into the device manager ( Devices > Device Manager  ). To insert a task to the job, drag its icon into the main area which forms the job definition. Width and thus the number of the icons (tasks) in every row in the task list can be set to any number of icons by sliding the right border of the task list. The Search box can be used to quickly find a task after typing its name.
This pane holds the tasks that form the program. Each task has an icon and text that describes what the task will do when executed. Every task has different parameters which are revealed by double-clicking on its caption. Tasks can be marked as to be shown in the Wizard or at runtime. All tasks which were dragged here will be run one after another until the job is finished.
Before thinking about single tasks you have to decide whether you want to modify a predefined template (New Job from Template), use the assistance of the definition wizard (Using Job Definition Wizard) or create a new Job from scratch (New Blank Job).
Operation
Most of the editing operations are done by moving the Tasks around. By simple dragging and dropping the tasks from the left to the right you create your complete Job sequence in a matter of minutes.
To insert a task into the job program, drag the icon to the main program area which contains the job definition.
To move a single task or multiple tasks to different place, hold the task in the main area and drag it to another place in the program.
To delete a task from the program area, simply drag it out of the job main program area.
To set parameters of each task, double-click its caption.
Warning
Some tasks depend on other and their order of execution needs to be correct. Please see Basic Job Rules to avoid error warnings when setting up your Job.
 Rows,
Rows,  Icons,
  Hidden
 These buttons change the appearance of the task panel. It is possible to switch between the Rows + description view mode and Icons view mode. In the Icons view mode it is possible to change the width of the task panel by dragging the right border line of the scroll bar. The task panel can also be fully hidden by clicking on the Hide button in the middle of the Job Definition Window.
Expert mode in JOBS displays all available tasks. By default, this mode is off and the Job Definition window shows only the basic tasks.
 Save Changes
 Save As
 Saves the Job Definition with desired name into a Project that could be then selected from the Introduction to Jobs Explorer.
 Undo Changes,
  Redo Changes
 Moves back and forth through the history of changes.
 Export to HTML or Bitmap
 Copies the definition screen shot of the current job including key parameters into clipboard.
Saves the definition of the current job into a .html file.
Copies the definition of the current job into clipboard.
Import Imports an existing job definition from a .BIN file or from clipboard.
 Export
 Exports the current job definition to a single .BIN file or copies it to clipboard.
Properties This button opens the Job Properties dialog window where the following features related to the current job can be set.
In the Job description edit box a description of each job can be entered and saved together with the job. This description is displayed in the caption of the Job Wizard and Job Execution Progress window.
Progress window section enables the user to Show/Hide the progress window during the job run or to preview image in the progress window after the first capture or on the job start.
When Job definition changes section defines what is done when changes in the job definition are made. These changes can be saved to the current job definition, saved as a new definition or the user is asked to specify the location where to save them.
Treat adjustments in Wizard as Job change should be checked if it is requested to apply the changes made in the wizard directly to the job definition.
Wizard section specifies when the Run button is shown in wizard - always or Enable only if all tasks are visited (highlighted green).
Advanced features section groups advanced features such as enabling the Test Run, Parameters or Programmable Actions in Wizard.
Results section enables the user to open the results view after the job is finished (Show Job Results after execution).
Storage section specifies the file format used to store images created by a capture task (Acquisition >  Capture) for all captures inside the current job. The recommended (and default) setting is ND2 (the system tries to save images from different loops to a single file if possible). If the captured data are to be processed by other software, set the format to TIFF (Single or Multi-page). Compression defines the amount of compression for the selected file format. Color Channel Data specify a color channel storage method - Pixel or Plane. The default is per plane. Generate Multi-Resolution specifies whether to use multi-resolution creation per job basis ((requires: Local Option)).
OME metadata can be saved with the TIFF file to increase the TIFF file compatibility (e.g. proper channel designation).
See also Supported File Formats.
 Edit Wizard
 This button opens the Job Wizard edit dialog window. Please see: Edit Wizard.
 Parameters
 Each job can be parametrized on the task level. This button opens the Job Parameters dialog window where you can define the name of your parameter, type, values it takes and whether it requires another parameter from the list to be set to a certain value. You can also mark each parameter to be shown in wizard/runtime. For more information about using parameters, please see: Defining Parameters.
Run Job Executes the current Job.
Jobs Toolbar ( View > Analysis Controls > JOBS Toolbar  ) has some common features with Introduction to Jobs Explorer. It enables organizing, editing and running single Jobs, Job Wizards or Test Runs.
A job can be added to the toolbar from within the View > Analysis Controls > JOBS Explorer window: right click on the job name and select Show on Toolbar or just drag and drop a Job from Jobs Explorer.

Figure 1069. Jobs Toolbar with HCA templates