
Easiest way to start using Jobs is to choose from pre-existing Job templates created for most laboratory tasks. By clicking the  Add New Job from Template button in Introduction to Jobs Explorer you can access the Job Templates. A template is a predefined set of tasks (see Tasks) which you simply insert into your current job definition. The template can be used either “out of the box” or you can select a template closest to your objective and edit some of its tasks or add other tasks into it. Double-click on the desired template or press the Import button. The Job Wizard window appears. You can now set up the parameters step by step (see: Using Job Definition Wizard). To see the job definition and edit the imported template, click and then click
  Edit inside Introduction to Jobs Explorer.
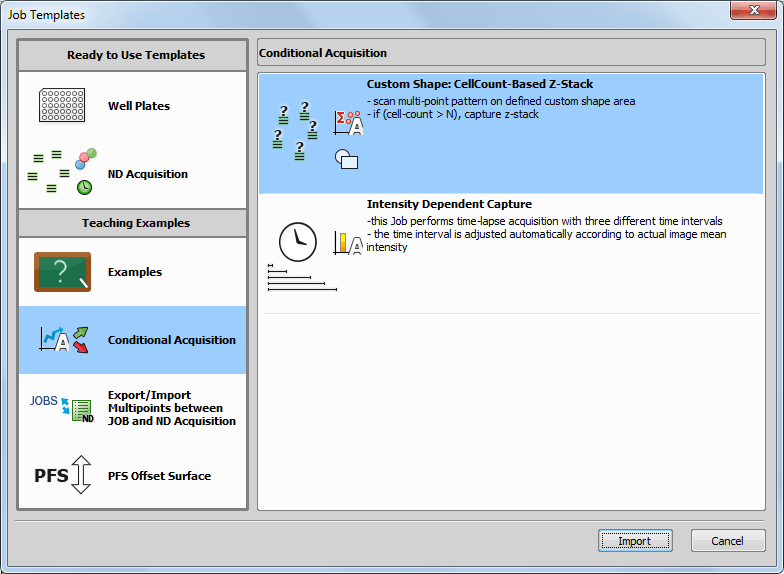
Figure 1076. Job Templates
Go to
 View > Analysis Controls > JOBS Explorer
  window.
Here you can select an existing project or create a new one by clicking the
 Add New Project button.
The Job Definition window opens. Here you can combine all different tasks to create a new job fulfilling your research needs together with all available devices compatible with NIS-Elements. Just drag and drop tasks from the left into the main area of the Job Definition window.
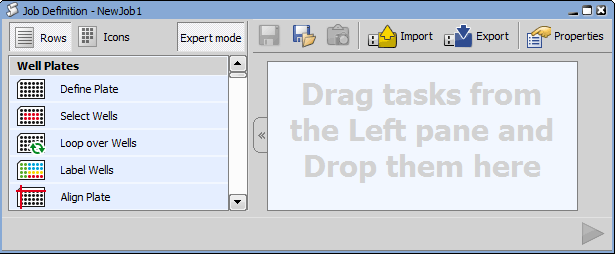
Figure 1077.
The tasks inside a job definition can be reorganized by dragging them up or down. Tasks which are not needed can be deleted by dragging the task out of the job window.
To set the task parameters, double click the caption of the appropriate task.
Don't forget to save your job before closing the Job Definition window.
 Add New Job
A Job is usually run multiple times to acquire data in different conditions. It happens that few parameters have to be changed before each run (e.g. length and interval of a time-lapse, well-plate metadata, like drug concentrations or labels, or even threshold intensity level). For this reason it is possible to mark some tasks for reviewing in a Wizard. In this case it is possible to run a Wizard where only the tasks that were marked are presented for definition. To put a task into wizard right-click the task and choose Put in Wizard.
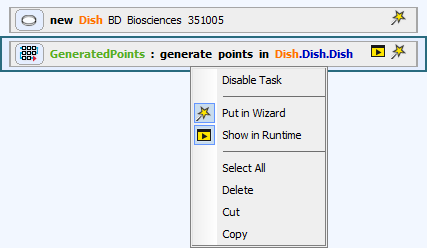
Figure 1078. Putting tasks into Wizard
Definition Wizard is also useful for specialist / operator role division. The specialist creates complex Jobs with decisions and analyses. He does not want the operator to see all the complexity of the task but still needs to let him change a few parameters. The wizard enables this.
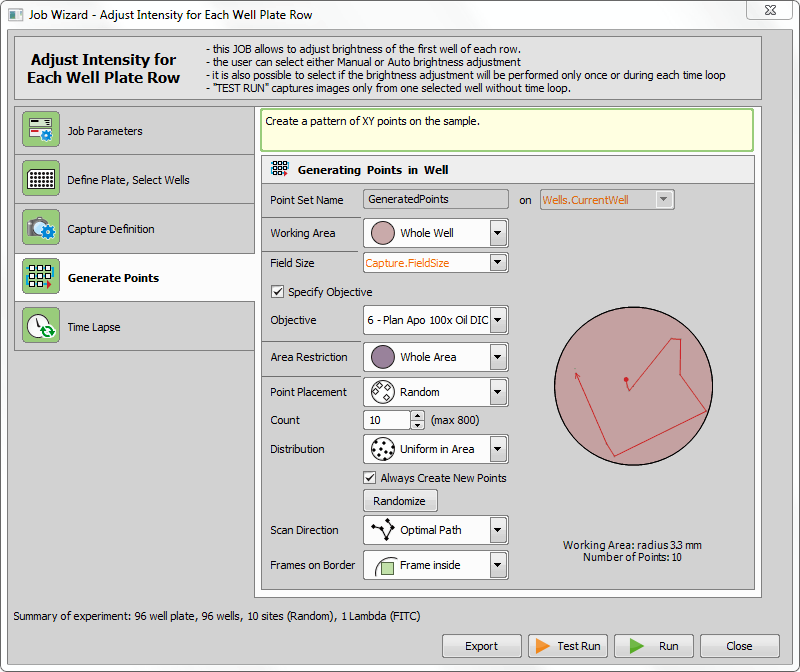
Figure 1079.
The current setting of the wizard can be saved into a HTML file after clicking .
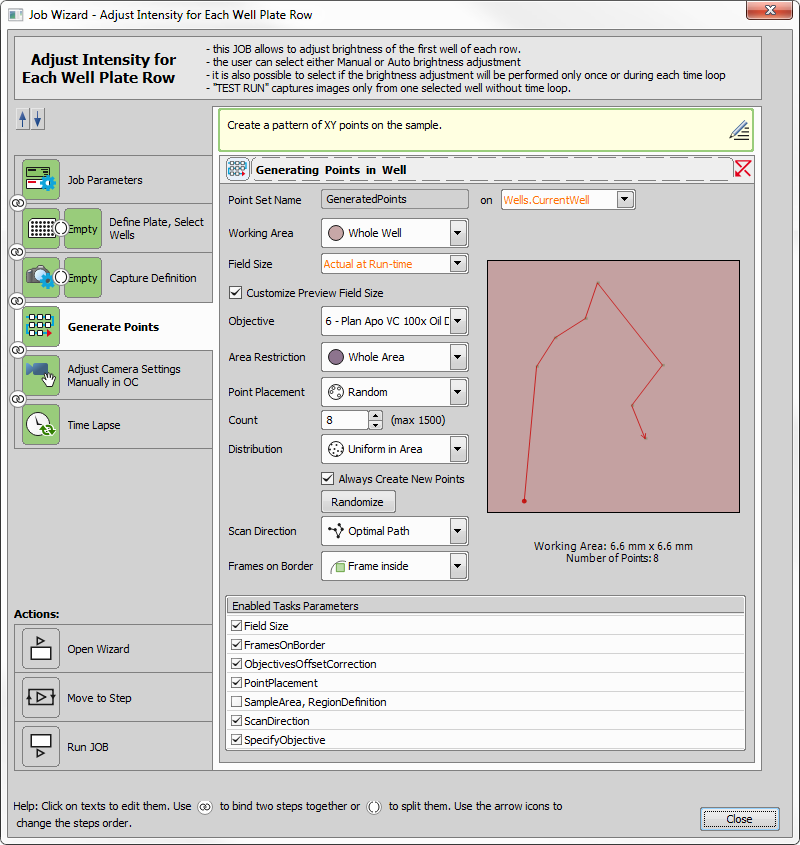
Figure 1080. Job Wizard dialog window in the edit mode
The  Edit Wizard button opens the Job Wizard dialog window in the edit mode. Wizard steps (tasks that were marked with the
  wizard icon can be freely sorted using the
  up and
  down arrows, except the Parameters step which has to stay always first. Wizard steps can be bound together by clicking on the
  Connect or
  Disconnect buttons. For each task, only selected options can be enabled for the operator, and others can be disabled. Thus the user working with the wizard can use only the options checked in the list under each task (Enabled Tasks Parameters).
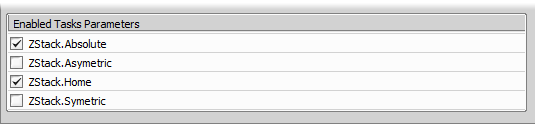
Figure 1081.
Three programmable actions (events) can be used to validate the user's settings during the wizard run and to adjust them pragmatically or to display warnings. Tasks at the top of the Job Wizard edit window can be used to create a “mini job” which is then performed before the wizard opens -  Open Wizard, between each step/grouped steps -
  Move to Step or after the Run button is clicked -
  Run JOB.
Texts of all used tasks can be changed (by clicking on the task name) and their description can be edited after clicking on the Edit Task Description icon.
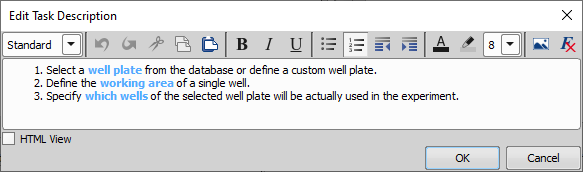
Figure 1082. Edit Task Description window
Select one of the predefined styles which will be applied to the whole paragraph or the selected text.
 Undo
Undo Moves back through the history of changes.
 Redo
Redo Moves forward through the history of changes.
 Cut
Cut Cuts the selected text into clipboard.
 Copy
Copy Copies the selected text into clipboard.
 Paste
Paste Pastes the selected text from clipboard to the cursor position.
 Bold
Bold Applies the bold font style.
 Italic
 Applies the italic font style.
 Underline
 Applies the underlined font style.
 Bulleted list
 Applies a bulleted list to the paragraph. Ctrl + - turns this function on/off.
 Ordered list
 Applies a numbered list to the paragraph. Ctrl + = turns this function on/off.
 Decrease indentation
 Decreases the paragraph offset.
 Increase indentation
 Increases the paragraph offset.
 Text foreground color
 Changes color of the selected text.
 Text background color
 Changes background color of the selected text.
Changes size of the selected text.
 Insert image
 Inserts an image (jpg, gif, png, bmp) from a file.
 Remove character formatting
 Removes any character formatting from the selected text.
Displays the HTML markup so that the task description and any inserted thumbnails can be adjusted using HTML 4.
First step of any job procedure is to define your samples. You can choose between well plates, slides or stage areas (free shapes). If defining standardized sample holders (well plates, slides), it is recommended to select the specific product model you are using from the database. This can be done by clicking .
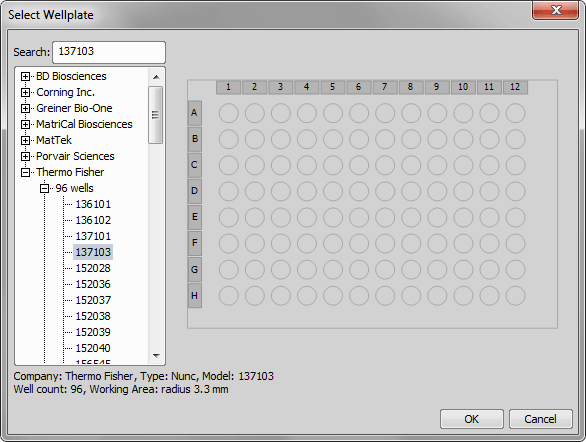
Figure 1083.
If your well plate cannot be found in the database, you can create a custom well plate. See Custom Well Plate Options.
Slide definition is closely described here: Sample Holder >
 Define Slide.
Any other free shapes on a stage can be defined using Sample Holder >
 Define Stage Area. Please see Sample Holder > Define Stage Area.
Note
Any sample holder that was selected/defined has to be properly aligned. Well plates are aligned using Well Plates >  Align Well Plate Holder inside Jobs or globally using HCA/JOBS > Well Plate > Align Well Plate Holder. Slides are aligned using Sample Holder >
  Align Slide Holder in Jobs or globally using HCA/JOBS > Slide Holder > Align Slide Holder. Alignment of well plates and slides is stored in the database. User can see not only absolute stage coordinates but also coordinates relative to the plate/slide. Relative coordinates are helpful when later revisiting locations on the same or different system and when doing analyses outside NIS-Elements (e.g. doing statistics in MS Excel).
Before capturing any images using the Acquisition >  Capture task you have to define the capture settings in the Acquisition >
  Capture Definition task window, where you select your optical configuration to be used to capture each of the channels. Typically, laboratory computer image analysis systems consist of a computer, a camera, and a microscope equipped with certain accessories (objectives, filters, shutters, illumination, rotary changers, etc). Most of the mentioned microscopic hardware is often motorized and therefore can be controlled via NIS-Elements. In addition, it is possible to integrate single settings of all these devices into one compact set called Optical Configuration. It is recommended to create several optical configurations containing particular devices settings. Then a single click can completely change the current hardware configuration.
For more information about setting up the Optical Configuration please see: Creating New Optical Configuration.

Figure 1084.
Loops are special repetitive tasks which contain an inner block. When you fill this block with tasks and run the loop, it repeatedly executes the whole inner block of tasks one after another. You can then define whenever you want to stop the repetition (after a certain amount of time, number of loops, after a condition is true, etc.). You can also loop tasks inside another loop to make building of repeated processes even more effective.
Parameters represent “conditions” for single tasks. Multiple experimental situations can be prepared and organized into a single job so that the operator does not have to switch between many jobs.
A single task can carry many parameters. If all values of its parameters are met at the beginning of the job run, the task is executed. If one parameter value is different than the initial parameter selection, the task will be skipped.
To start using parameters, click the  Properties button inside the Job Definition Window and check Parameters. Now click to confirm the selection and open the Job Parameters window by clicking the
  Parameters button. Click the
  Add New Parameter button to add the first parameter. Give it a name, choose its type (On/Off, choice from a list of options or a numeric value) and define the values it takes clicking . If multiple parameters are used one can require another one to be executed. This conditional parameter can be selected from the Requires parameter combo box. Don't forget to mark where each parameter will be shown and adjusted - in Wizard,
  Run Time or both. When done with defining all your parameters, click .
Now you need to assign prepared parameters to single tasks. This can be done in the Job Definition Window by right-clicking on the desired task and choosing Requires parameter.... Parameter relations dialog window opens up.
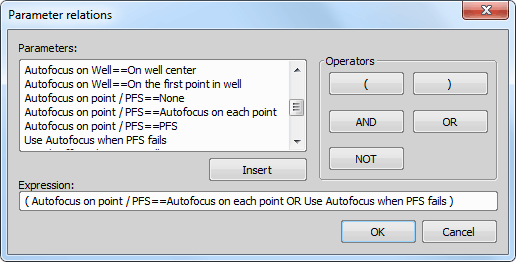
Figure 1085.
Here you can choose from all parameter values defined previously and Insert them separately or use them with Operators defining an expression (e.g. Capture==Z-Stack AND Analysis==Cell Count; task will run only if the user selects to Acquisition > Capture a Z-Stack >  Define Z-Stack and to use the Analysis >
  Cell Count Analysis at the beginning of a job run). After confirming the expression, it is displayed in the caption of the appropriate task.
Before executing the job it is important to define the initial parameter values at the top of the Job Definition Window.
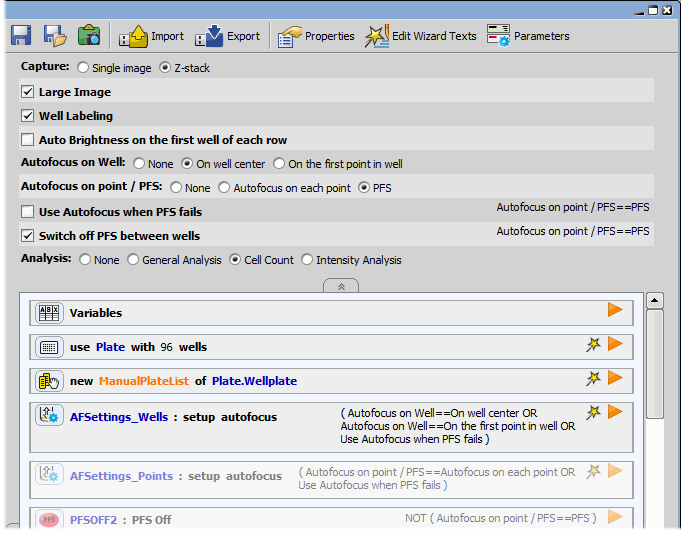
Figure 1086. Job Definition window showing the initial parameter values
After executing the job, a parameter table will be shown. There you have to set the values you wish to use in the current experiment and click . All the subsequent steps of your job depend on this selection.
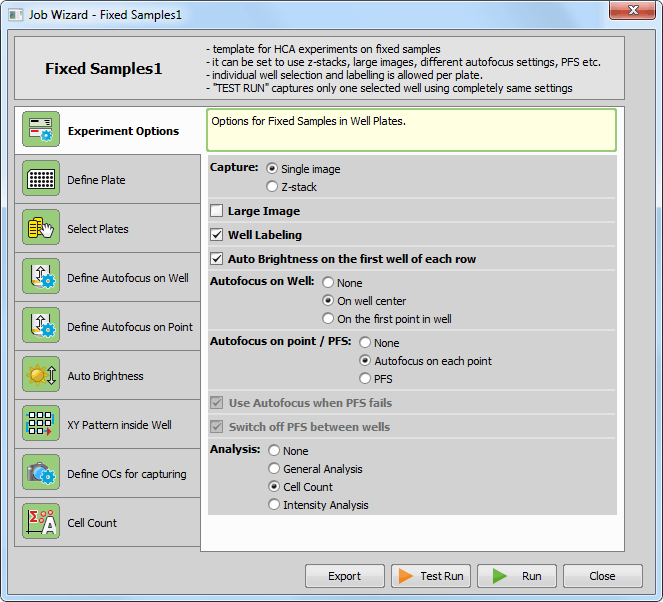
Figure 1087. Parameter table in Job Wizard
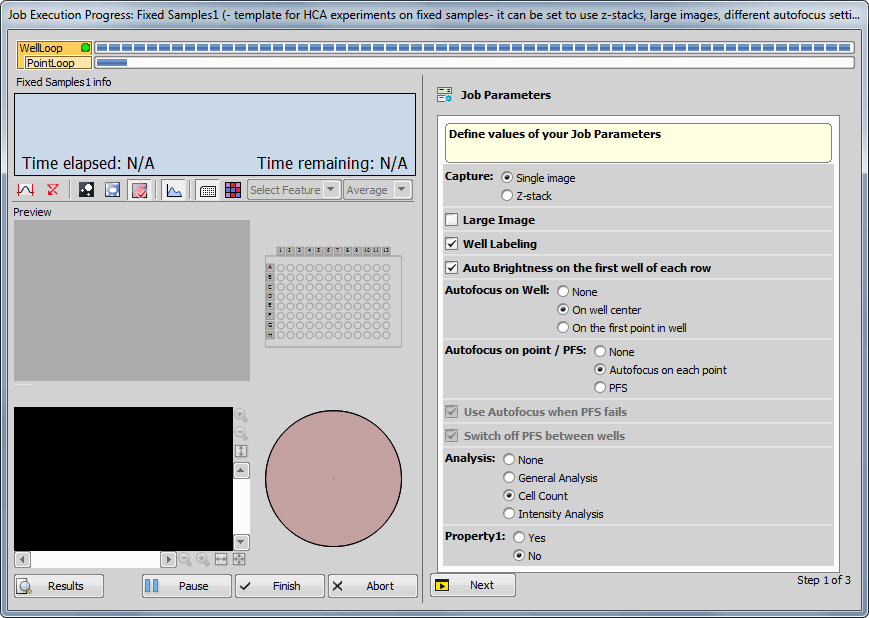
Figure 1088. Parameter table in Job Execution Progress window