
Any color/text labels and any metadata can be assigned to each well of your well plate. Label definition/assigning and metadata assigning can be made inside the HCA template or directly in the Well Plates >  Label Well Plate task.
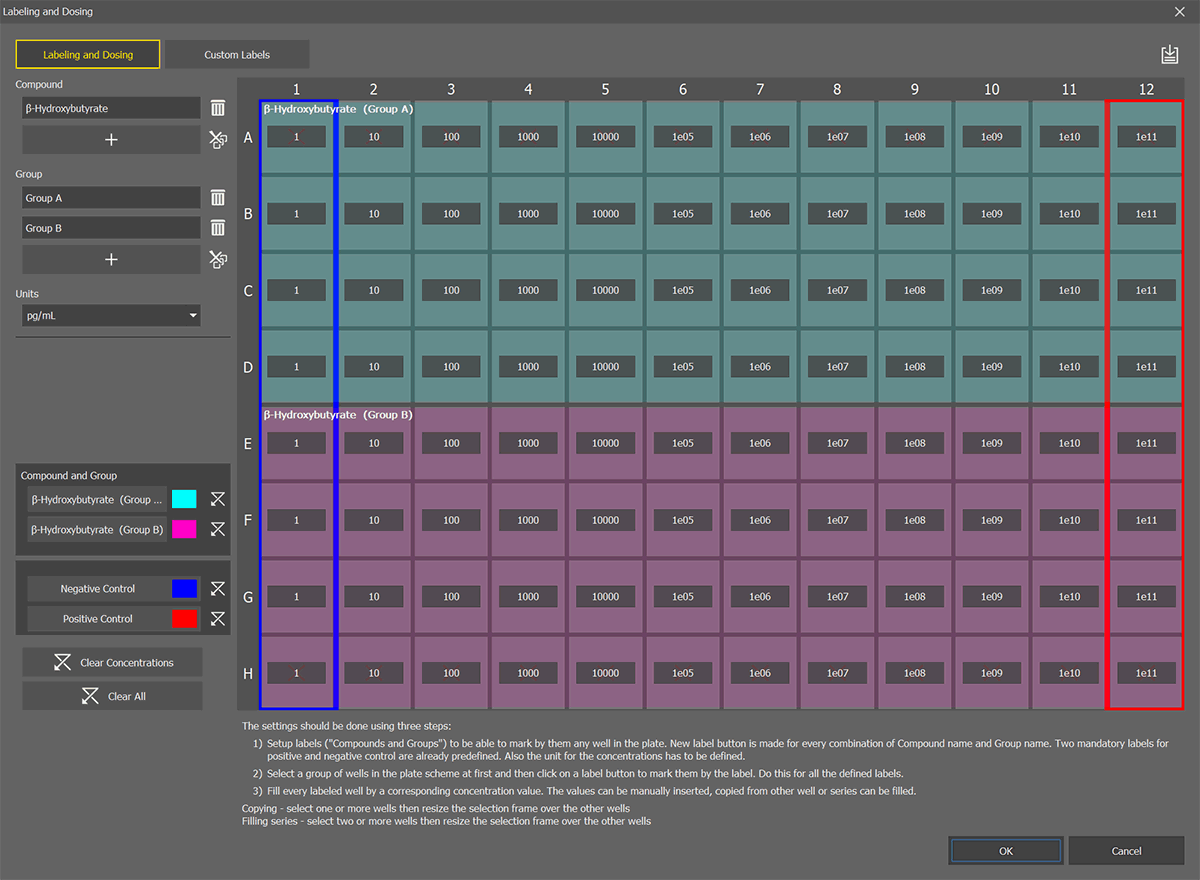
Figure 1125. Labeling and Dosing window.
Open the Manage Custom Metadata window ( HCA/JOBS > Presets > Manage Custom Metadata to create new metadata.
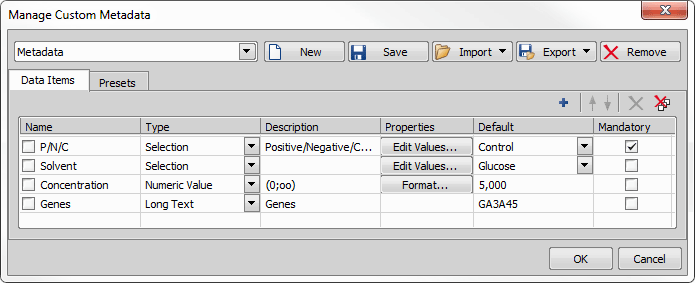
Figure 1126.
Data Items tab
 New
New Creates new custom metadata set.
 Save
Save Saves the current custom metadata definition using the name on the left.
 Import
 Enables the user to import custom metadata definition from a .xml file or reuse them from an existing image file.
 Export
 Exports current or all metadata definitions to a .xml file.
 Remove
 Removes the current metadata.
Presets tab
This tab is used for setting up metadata sets (grouped metadata of different types). In the left list, single sets are created, arranged, renamed or deleted. On the right side of the dialog window, values of individual items are set. Predefined presets can be used in the System >  Custom Metadata task.
Defining metadata
Create a new metadata set - click on New and give it a name. Click  Add New and name your first metadata, choose its type, enter a text description, edit its properties, choose the default value and select whether it is mandatory or not. Add as many metadata as you like and confirm their definition by clicking .
Setting metadata
Click in the Well Plates > Label Well Plate task or in the Sample Labeling tab of the HCA template to open the Labeling/Quantities window (closely described here: Labels and Metadata). Click Custom Metadata... to open the Select Custom Metadata window where you can choose the metadata set from the first combo box and select (by a check mark) which metadata will be used in the current job. Make your selection and click . In the wellplate table make a well selection of wells to which you want to assign the chosen metadata. To assign metadata to selected well(s), right-click on the selection and choose Set Custom Metadata and confirm your metadata selection or click on the right side of the metadata name listed in the top right corner of the window.
Once you are done with adding labels/metadata, click to get back to the Well Plates > Label Well Plate task or Sample/Labeling tab of the HCA template. You can save your label as a .xml file by clicking the  button. You can also import your saved labels by clicking the
  button. Clear your labeling any time by clicking the
  button.
After the HCA/Job containing labels/metadata is executed and finished, the Job Results window opens. Click  Show Labeling to display labels over wells. Labels of the wells selected in the wellplate area are highlighted in the labels toolbar (invoked by clicking
  Show Labels). Any label can be temporarily turned off by unchecking the check box next to its name.
To assign prepared labels and metadata to the wells displayed in the result view, copy the metadata inside your spreadsheet application and click  Import Metadata in the results view. Please see Importing predefined presets from spreadsheet applications for importing prerequisites.
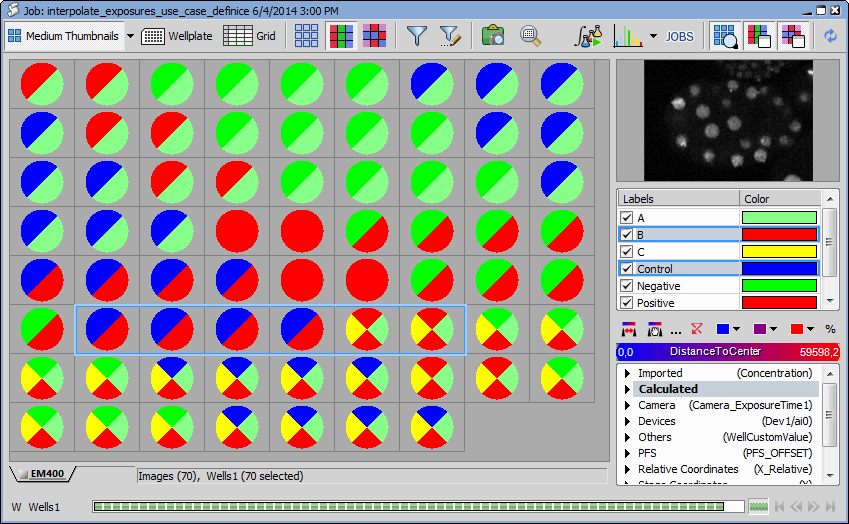
Figure 1127. Job Results View displaying well labels
Two types of formats are supported for importing custom presets into the Labeling/Quantities dialog window. Labels and quantities have to be defined similarly to one of the examples below.
Plate View

Figure 1128. Plate View identification and definition
First row defines the plate (its name, name meaning, hotel). Next row contains the value type (Label, Numeric Value, Short Text, Long Text, Selection, Date), value name (empty for Label) and Unit (empty for Label). The values are then typed in the following rows as they appear in the well plate.
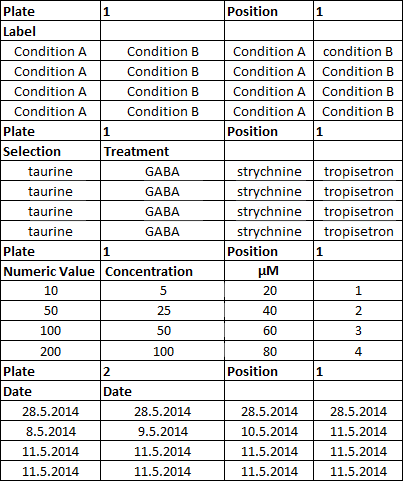
Figure 1129. Example of a Plate View table format
List View
This view is used to label and quantity features of each well by a single row record. First four rows (Variant A) or three rows (Variant B,C) specify the hotel position (optional), identify the plate, position of each well on a plate, value types (Label, Numeric Value, Short Text, Long Text, Selection, Date) with value names and units. If the Plate name meaning value contains an empty string “”, then the name of the plate is used for plate identification. WellIndex and Plate Position identifiers are considered to start at 1.
Variant A

Figure 1130. Variant A: list view identification and definition
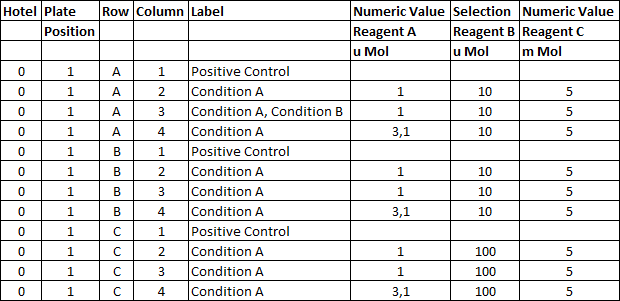
Figure 1131. Variant A: example of a list view table format
Variant B

Figure 1132. Variant B: list view identification and definition
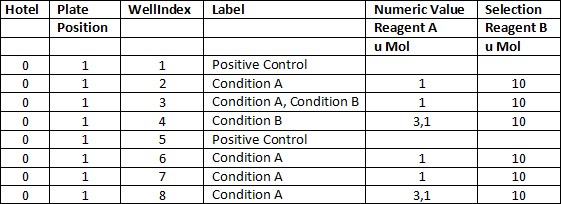
Figure 1133. Variant B: example of a list view table format
Variant C

Figure 1134. Variant C: list view identification and definition
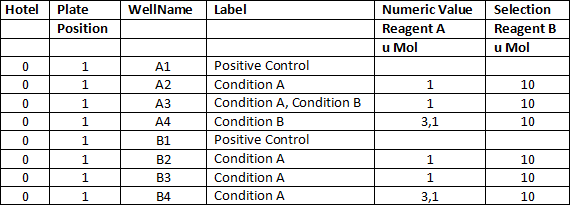
Figure 1135. Variant C: example of a list view table format
Note
Both row and column well localisation can be described using numbers starting from one (1,2,3, ...) or by letters (A, B, C, ...). For example well “B3” can also be described as well “23”, “2C” or “BC”.
Linking with Well Plates >  Plate Loader
Imported labels/quantities can be linked based on position of the well plate in a hotel (Linked by Position) or using a barcode (Linked by Barcode). Plate # selection among multiple hotels has to be unique, otherwise the linking is not performed. E.g. if plates #1 and #2 from hotel 1 and plates #3 and #4 from hotel 2 are selected in the Well Plates > Plate Loader, labels marked with hotel number 1 to 4 are linked correctly. Whereas if e.g. plate #1 is selected in both hotels the link for plate 1 is not created and a new preset named #1 is created instead.
Single wells or single points can be easily labeled with a color and a name during runtime. Use tasks System >  Create Labels (see: System > Create Labels) and System >
  Assign Label (see:System > Assign Label).