
 Define Analysis
 This task can be used to define multiple analyses which can be run during or after image acquisition. Link the task to your Acquisition > | Requires: Task: Acquisition > |
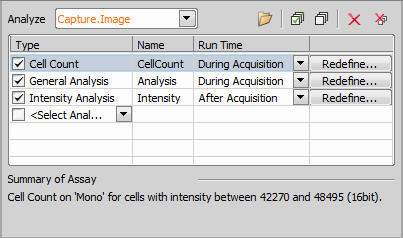
Figure 1322.
JOBS Recipe Manager
Clicking on in the Analysis task caption opens the JOBS Recipe Manager where it is possible to  Import/
 Load from NIS... any previously created analysis recipes. Recipes marked with a check mark are arranged in a new section called Analysis Recipes in the Job Definition Task Palette.
 General Analysis
 General analysis in jobs has the same functionality as General analysis from the Image menu, however in Jobs it brings much more versatility. Please see General Analysis in the electronic help for detailed examples. | Requires: Task: Acquisition > Module: |
Once you set up a General analysis it can be later used as a custom task. To do so, first you have to save your analysis settings (for General analysis from the Image menu click and name your .ga file, for General analysis in Jobs click ). Then click and search for your saved settings. Use the Import... or Load from NIS... buttons if your analysis is not already listed. Then select the desired recipe and click . Selected analysis recipe carrying the analysis settings is now represented by a custom task inside the Analysis Recipes section of the task palette.
Parameters of the Analysis >  General Analysis task are closely described here: General Analysis.
 Cell Count Analysis
This analysis is designed for counting organic cells. It operates on a single channel and produces one binary mask and a set of predefined features. Count the number of cells in a sample and measure their properties. | Requires: Task: Acquisition > |
Parameters of this analysis are closely described here: Cell Count Analysis.
 Intensity Analysis
Evaluates the intensity of the whole camera field of view. Decide whether to capture the whole well in a well plate or not (based on the signal in the field). | Requires: Task: Acquisition > |
Parameters of this analysis are closely described here: Image Intensity Analysis.
 General Analysis RGB
 (requires: General Analysis)
Allows to create a new binary layer defined as an intersection of the three RGB channels based on the RGB or HSI threshold values. Use the benefit of the RGB or HSI threshold to define the binary layer to be analysed. | Requires: Task: Acquisition > Module: |
Parameters of this analysis are closely described here: Image > General Analysis RGB.
 Out Proc
 (requires: Outprocess Assay)
This task enables the user to use an external program to process/analyze images captured via JOBS. If the external program produces output in a form of binary images or an array of values in a text file, JOBS load and use them for further analysis. Process images created in Jobs using ImageJ. | Requires: Task: Acquisition > Module: |
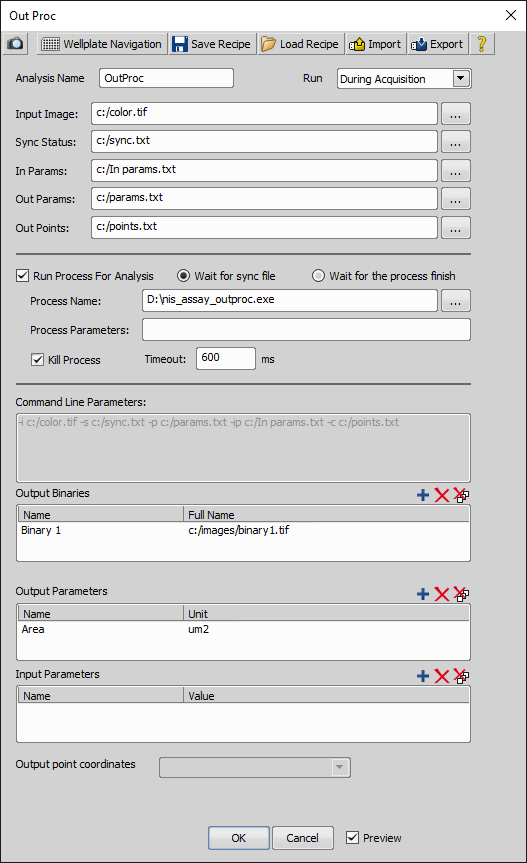
Figure 1323.
The top part of the window is common to all analysis windows are described in the Analysis chapter.
Name and path to the TIF image generated by NIS-Elements for analysis. E.g. “C:\color.tif”
Name and path to the text file with status of the analysis. E.g. “C:\sync.txt”. This file is shared between NIS-Elements and the external program. Running processes can communicate due to the sync status saved in this file. Possible values are:
Not ready
Ready for analysis
Analysis is finished
Cancel execution
Name and path to the text file where analysis results will be saved. E.g. “C:\outputparams.txt”. It will contain a list of values specified in the Output Parameters section.
Note
There are hidden parameters used for each external process start. Instead of the command: C:\Windows\System32\cmd.exe /C c:\tmp\outproc\outproc.bat the following command is used by NIS-Elements: C:\Windows\System32\cmd.exe -i c:/tmp/outproc/color.tif -s c:/tmp/outproc/sync.txt -p -c c:/tmp/outproc/points.txt /C c:\tmp\outproc\outproc.bat. These parameters correspond to the communication files paths set in the Out Proc window.
Points are generated into this file by the external application (e.g. points representing centers of binaries).
Example 19. points.txt file format
One stage coordinate per line prefixed by two characters which defines type of the coordinate (e.g. "x=") should be written inside, Z coordinate is optional.
Two points including z coordinate:
x=100
y=100
z=100
x=200
y=200
z=200
Two points without z coordinate:
x=100
y=100
x=200
y=200
Select this option if the external program you use runs on demand and needs to be called to process each image. Programs which run independently and are capable of checking the content of the Sync Status file do not need this function.
If this option is checked, the external program uses a sync file to synchronize with NIS-Elements. This way it knows when NIS-Elements prepared the data. When the data processing is finished it tells NIS-Elements that the processing is finished so that NIS-Elements can load the results.
If this option is checked, NIS-Elements wait until the process is ended.
Definition of binary TIF files generated by the external program which ought to be loaded by NIS-Elements after analysis. The first field specifies name of the binary layer, the second field is a name and path to the TIF file containing the binary image data.
Definition of result values generated by the external program. Supposedly, the external program generates a list of values, each value on a new line. This definition pairs these values to its description under which they will be available within NIS-Elements.
Maps the variables from a Job. The process can use these values as input parameters. For example if label = “posX” and value = “Job.Points.CurrentPoint.Stage.x” the external process can load from the “In params.txt” the X value of the stage.
(requires: JOBS) (requires: Local Option)
If Transform to Stage Coordinates is checked, the pixel point coordinates are transformed into stage XY coordinates based on the calibration, stage orientation and position.
Processing with ImageJ
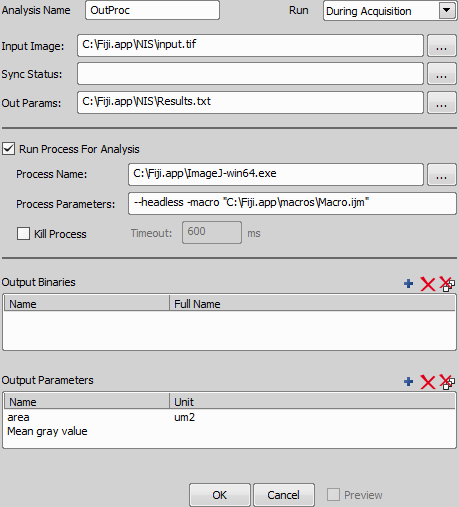
Figure 1324. Out Proc processing with ImageJ
Out Proc task also enables the user to process images using ImageJ. Set the path of the Input Image generated by NIS-Elements and the path to the file containing results generated by ImageJ (Out Params). It is important to let the Sync Status field empty. Enable Run Process For Analysis and set the Process Name as an executable ImageJ file. Specify the macro and other options in the Process Parameters field. For example to measure the image area and mean gray value using ImageJ enter the following macro:
path = getDirectory("imagej")+"NIS"+File.separator;
print (path);
open(path+"input.tif");
run("Input/Output...", "jpeg=85 gif=-1 file=.txt use_file");
run("Set Measurements...", "area mean redirect=None decimal=3");
run("Measure");
saveAs("Results", path+"Results.txt");
eval("script", "System.exit(0);");
Measured results are connected to the output parameters specified in the Output Parameters area of the Out Proc task and are shown in the job results window.
 Wound Healing
This task controls the wound healing analysis used for measuring changes of cell distribution in time. Inspect the regrowth of damaged tissues. | Requires: Task: Acquisition > Module: |
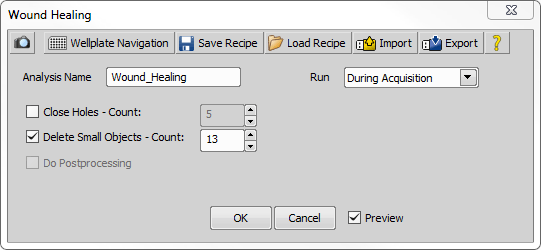
Figure 1325.
The top buttons which are common to all analysis windows are described in the Analysis chapter.
 Live/Dead Analysis
Is used for counting live and dead elements in one sample. This analysis is closely described here: Live/Dead Analysis. Define one channel for counting Live elements and one for Dead elements to count both types in a single sample. | Requires: Task: Acquisition > |
This task section contains other jobs analyses. To be able to execute any analysis in Jobs, your job definition has to contain Acquisition >  Capture Definition and Acquisition >
  Capture or one of the alternative capture tasks (Acquisition >
  Capture (current), Acquisition >
  Capture HDR, Acquisition >
  Capture HDR (current), Acquisition >
  Capture Continuous EDF/MaxIP (current)).