
(requires: JOBS) or (requires: JOBS View)
Next to the database path in the  JOBS Explorer panel, there is a pull down menu marked with
  containing the following options.
Click this button to create a new database. Specify where it will be stored and enter its name.
Selects which items will be copied into the newly created database.
Opens an existing database from a .dat file.
Renames the current database file.
This option is used for fast switching between the databases checked in the Manage Quick Databases window. To edit the list of quick open databases, click and add/remove/move up/move down your databases, check which of them will be shown and specify the maximal number of the recently used databases.
 Refresh
 This function enables refreshing the database.
Frequent database inserts, updates, and deletes can cause the database file to become fragmented. This function rebuilds the entire database to improve the speed when working with the database.
Specify the folder where you want to backup your current database and select whether to include its images.
Click and search for the .bin file to load your backed up database. Specify whether you want to restore images (Include Images check box) and click .
This window opens the Upload dialog. Please see: Database Upload/Download. Click and specify where the Remote database .dat file is present. Use the check boxes next to each job to include/exclude them into/from the uploading process. The Uploading Rules table below shows the compared data status of both the local and the remote databases. Adjust the Action to perform combo boxes to set the merging rules and then click to start the uploading process.
This window opens the Download dialog. Please see: Database Upload/Download.Click and specify where the Remote database .dat file is present. Use the check boxes next to each job to include/exclude them into/from the downloading process. The Downloading Rules table below shows the compared data status of both the local and the remote databases. Adjust the Action to perform combo boxes to set the merging rules and then click to start the downloading process.
Opens the Import Files into Current Project dialog window enabling to import selected .ND2, .tif and .tiff files into the current job.
Opens the Advanced Import Files into Current Project dialog window used for advanced image importing into the current job. Dimension, its parsing and loop can be defined before the import. For more information please see Advanced Files Import.
Opens the Import Biostation CT files into Current Project dialog window enabling to import selected biostation .CT files into the current job.
 Properties...
 Enables setting the database root folder, sharing properties together with image storage properties. For more information about database properties, please see: Database Properties.
Warning
Always use the  HCA/JOBS > Database > Backup command when doing a backup. Copying the “jobsdb.dat” file manually could corrupt the database structure and the backup will be inaccessible.
Run the HCA/JOBS > Database > Backup command, a dialog box appears. The backup routine copies the database file to a specified folder. If image files are also backed up (recommended) they are copied as well. The backup folder is a regular database bundle and can be accessed from NIS-Elements. If the backup folder already contains a previous backup, it is merged in the following way:
The previous database file is renamed (current date is appended) and a new file is created.
New image files are added to the backup folder.
User can choose what will happen with the ND2 image files.
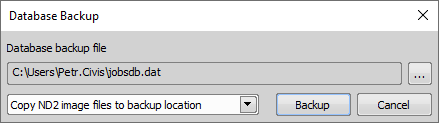
Figure 1136.
Please see Database Properties chapter on how to set the database.
This operation replaces the content of the current database folder with the content of the backup folder. Restoring the database destroys the original content of the current database.
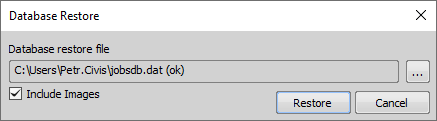
Figure 1137.
Press the ... button to browse to your database folder. After selecting it, click and Restore to finish the restoration process. You can uncheck the Include Images check box in case you don't want to restore image files.
Projects, jobs and job results are stored in a database. This database contains all metadata except images acquired by jobs. Images are not stored in the database file. This is for two reasons: efficiency and data security. As images are ordinary ND2 files they are independent of the database and can be opened by NIS-Elements directly. Images are marked as read-only and should not be modified in NIS-Elements. On the other hand, the database can be opened and accessed without the images. Therefore images are stored in folders and the database contains relative paths to them. Images and database files exist in a folder and make a bundle. This bundle can be copied as a whole. However it is not safe to copy the folder while it is accessed by NIS-Elements. Use the Database Backup / Database Restore functions instead. You can adjust the following database settings after you click the button:
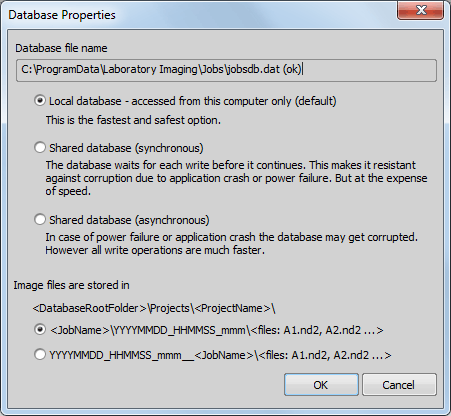
Figure 1138.
Shared database (synchronous) - opt this if access from multiple PC's is required. This setup is safe and sufficient for long-lasting experiments (e.g. 1 frame per minute).
Shared database (asynchronous) - if access from multiple PC's is required along with the speed of access. Regular back-ups are absolutely necessary with this setup.
Warning
If an unexpected error such as power failure occurs while the database is being accessed, the database may get corrupted (lost).
<JobName>\YYYYMMDD_HHMMSS_mmm\<files: A1.nd2, A2.nd2 ...>
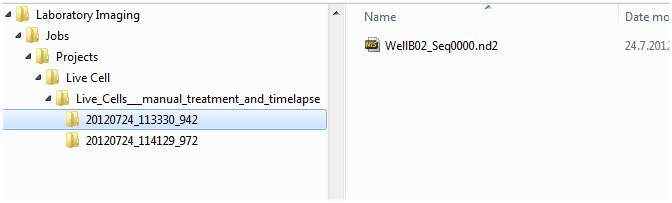
Figure 1139.
YYYYMMDD_HHMMSS_mmm__<JobName>\<files: A1.nd2, A2.nd2 ...>
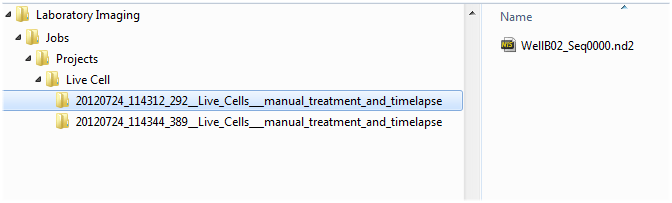
Figure 1140.
Define the path to your database files and select the type of access to the data. You can choose between:
Choose in which form you want to save your image files. The following options are available:
Y = Year, M = month, D = day, H =hour, M = minute, S = second, m = millisecond
The jobs database is contained in the jobsdb.dat file in the database folder. It contains the project and the job hierarchy, all the definitions (jobs, analysis recipes, labels, tags, etc.), acquisition data like plate or well information, loop indexes, time analysis results, links to the image files and much more. All this information is stored in a single file. The database file is usually much smaller than the size of an image file.
Other temporary files may also appear in this folder (typically jobsdb.dat-shm, jobsdb.dat-wal or jobsdb.dat-journal). These files indicate that the database is in use. All temporary files should disappear after all NIS-Elements applications accessing that particular database are closed. If NIS-Elements did not finish properly, these files may remain. They must not be deleted as they contain a valid database state. In this case NIS-Elements should be launched, database connected and NIS-Elements closed again. Note that it is not safe to copy the .db file at that moment. NIS-Elements is connected to a single Jobs database at any given time – it is the current database. The current database can be changed in Database Properties (see: Database Properties). NIS-Elements stores the current database folder on per user basis which means that every user can have his own database.
Database size
To avoid deposit and upgrade difficulties caused by huge databases, please follow the basic database rules.
Make smaller, more manageable databases (use
HCA/JOBS > Database > Create New Empty).Measure features per object only where it makes sense - e.g. in many HCS analyses on a well-plate, statistics per frame (not per object) may be enough.
Cut off irrelevant data before merging databases.
If the database is still huge, it makes sense to put the .db file on an SSD disk (must be big enough) and mount a normal drive to “Projects”. Navigate to the folder containing your database file and execute the following command (from the command line): mklink /J Projects "C:\Temp", where “C:\Temp” is the folder of your choice.
Note
If you experience any other problems with the database (slow performance, crashing, ...), try to clean up the local and remote database ( HCA/JOBS > Database > Cleanup).
With new versions of NIS-Elements the database file format may change to support new features. An upgrade of the database is required before it can be used by a new version of NIS-Elements. However, the upgrade renders the database inaccessible from any previous version of NIS-Elements. When the database is accessed by multiple NIS-Elements instances, they all must be working with the same database version.
It is a good practice to make a backup of the database before an upgrade of NIS-Elements is made, although <name>_backup_<date>_<time>.dat backup file is created automatically before the upgrade is performed. This file is automatically renamed to e.g. _v520.dat if the backup succeeds. Settings of the old NIS-Elements 5.20 - 5.21 (builds 1400 - 1499) are inspected and the settings pointing to the upgraded database are replaced to show the new _v520 database.
A warning message is displayed before the upgrade:
The database at
F:\JobsDb\jobsdb.dat
must be upgraded in order to be used with this version of NIS-Elements.
Note:
(1) Upgraded database cannot be accessed by earlier versions of NIS-Elements!
(2) This version of database will be preserved as jobsdb_v520.dat in the same location for older versions of NIS-Elements.
Do you want to proceed with the upgrade?
(requires: Remote DB for JOBS)
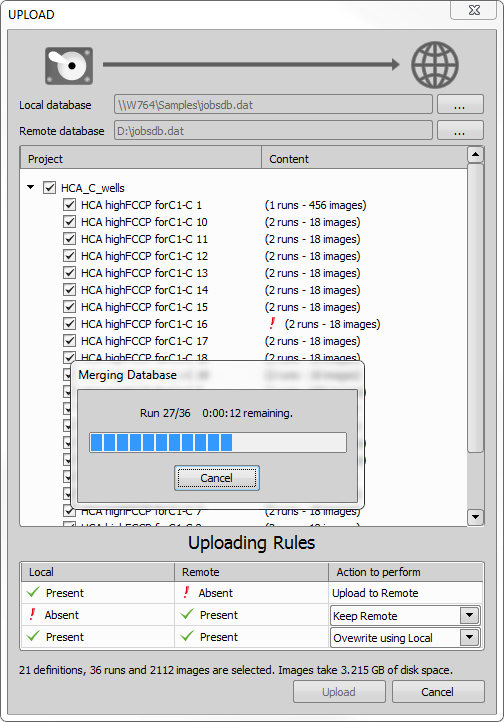
Figure 1141.
Downloading a remote database or uploading a local database can result in database merging. Parameters and rules of database merging are specified in the Upload/Download dialog window.
Dialog window options
Use the check boxes next to each job to include/exclude them into/from the uploading/downloading process.
Displays the number of job runs and acquired images per each job definition. If the content displays this  symbol, some files are missing in the source database.
Note
New data of runs/analyses/tags are transferred only if Overwrite is selected. New projects and job definitions are transferred always (selected only).
Invalid actions
downloading/uploading into the same database
downloading/uploading into a database created using a different version of NIS-Elements
downloading/uploading into a local database on a network drive
downloading/uploading into a network database folder on a network drive with read-only permission