
import limjob and
define a run function (with this exact signature) at the module level.
Find interesting locations within wells
Run Autofocus at each location
Verify locations and proper Focus
Run Acquisition
Text files (*.txt)
HTML files (*.html *.htm)
Text files (*.txt), HTML files (*.html *.htm)
All files (*.*)
 Question
Displays a pop-up window requiring user interaction. After “answering” by clicking one of the buttons, the job continues. Use this task to stop the job sequence and let the user decide what to do next. Please see Using Questions in the electronic help for detailed examples. |
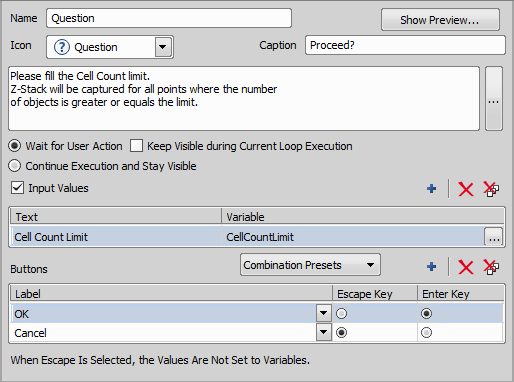
Figure 1305.
Choose an icon which will be displayed together with your question. Four graphics are available: Information, Question, Exclamation and Error.
Stops the job sequence until the user answers the question. If the Keep visible during current loop execution option is selected, the question stays visible during the loop execution even after user input.
If there is no interaction from the user in the specified time, the question is confirmed and the job automatically continues.
If checking this option, the question shows up and the job continues even without user interaction.
Check if you want to input any user data (e.g. defined in System >  Variables). Click the
  Add New button and select the variable. Name of the selected variable can be set in the Text field. To change the variable, click .
 Remove the button
 Remove All
For more information about using Questions please see: Using Questions.
 Macro
Macro
This task enables the user to write and run a macro. The whole set of available macro commands can be used. Write sophisticated C-like scripts for tasks which cannot be done by a Job or reuse your existing macro. Please see Macros in the electronic help. |
Using Job Parameters within the Macro Task
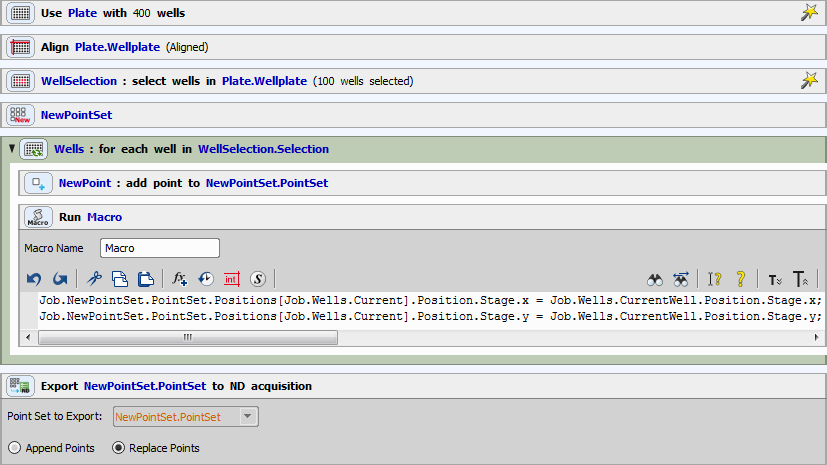
Figure 1306. Macro job example 1
This example job generates a point set (pattern of points on a well plate) without moving the stage. The embedded macro fills the point set with x and y coordinates of the center of each well from the well selection. Obtained points can be used later in a different job for a fast acquisition.
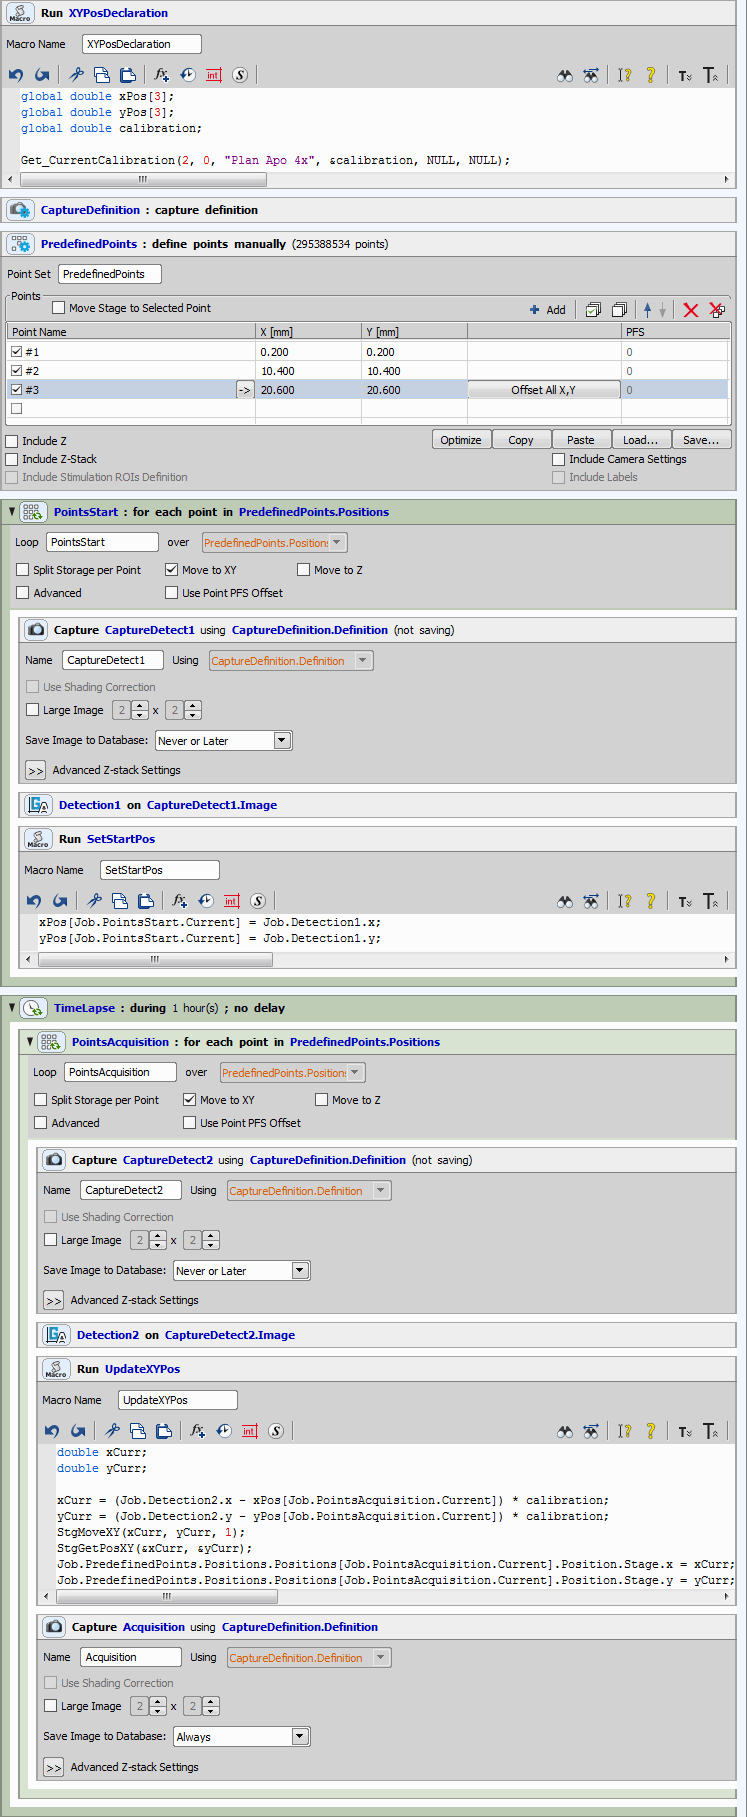
Figure 1307. Macro job example 2
This example job has similar functionality as the Time Series >  Keep Object In View task following the object of interest and keeping it in the center of the camera FOV. In this specific job, three manually selected objects are followed for an amount of time set in the Time Series >
  Time Lapse. The first macro defines the variables and declares objective calibration. Then the three points are manually marked using the Stage XY Points >
  Predefined Points task. Stage XY Points >
  Loop over Points is performed once and thresholding defined in the Analysis >
  General Analysis is used for identifying the objects of interest. The second macro sets the objects initial position into the predefined variables. The third macro finds the current x and y position of the center of the object and shifts the stage to these coordinates. Then it updates the objects position in the point set with the current position.
Another example of using a macro job can be found here: Jobs_SetFilenamePart.
 Python Script
 (requires: JOBS) (requires: Local Option)
This task enables users to write scripts in the Python language in places where the one-line System > |
User can define parameters of the task (NewParam) that are visible to other tasks in the job and to itself during the run. The parameters are initialized to specified values before the job is executed.
After the code is modified click . The code gets evaluated and any errors are displayed in the box below the editor.
The Python code must:
import limjob

def run(imgs: tuple[limjob.Image], Job: limjob.JobParam, macro: limjob.MacroParam, ctx: limjob.RunContext):
    pass
Inputs
Access image defined in Input Images, index is given by “#”.
Call method array() to get data (read only) as 4D numpy.ndarray (Z, Y, X, Component).
Access Job parameters, you can edit simple variables (numbers, strings).
Same syntax as in the System >  Expression task.
– access global variables defined via NIS-Elements macro language.
Same as Variables in the System > Expression task.
Currently not implemented.
Add new image by clicking on “+”, then select image in drop-down menu. You can select any image from task before in list. To access image and image data in python, see variable “imgs” in function “run” definition in python code. Currently image access is limited by loop. To access image put Python task and task generating image to same loop level.
Add new parameter by clicking on “+”, then define name, type and initial value of parameter. Initial value is evaluated as python code. For example, for initializing float array you can write both [0, 1, 2, 3, 4], and range(0,5). Parameters are reinitialized on JOB program start. Parameters of this task can be accessed for read and write by this and by other tasks (e.g Expression). To edit array in python, you have to set whole array.
Job.PythonScript.NewParam = (0, 1, 2, 3, 4)
Task parameters of the Filepath type are not evaluated as python code. The simplest way to set them is by clicking the button and selecting the desired file. In a Python script, these parameters are treated as string variables.
Execution in the main thread may be required when using NIS-Elements macro language functions or variables. Running the task in a side thread, on the other hand, allows interaction with the JOBS progress dialog and the “ctx.shouldAbort()” function, and prevents the NIS-Elements window from freezing while the task is running.
There are currently implemented few “global” functions which can be called inside function run. Please note, that this API is experimental and may be changed completely in next version. Parameters and returned values are in micrometres.
XY_GetPosition() -> Tuple[float, float]
XY_Move(x: float, y: float) -> None
XY_MoveRelative(x: float, y: float) -> None
Z_GetPosition() -> float
Z_Move(z: float) -> None
Z_MoveRelative(z: float) -> None
limjob.PointSetParam class has dedicated methods for simple insertion of points.
append(x: float|list[float], y: float|list[float], z: float|list[float] = None) -> None
set(x: float|list[float], y: float|list[float], z: float|list[float] = None) -> None
limjob.Image class has these methods and parameters.
componentCount: int
bitsPerComponent: int
size: tuple[int, int, int]
calibration: tuple[float, float, float]
alignment: int
calibrated: tuple[bool, bool, bool]
units: tuple[str, str, str]
transformPxToStage(x: float|list[float], y: float|list[float]) -> tuple[float|list[float], float|list[float]]
array() -> ndarray
Note
limjob.Image.size() returns the dimensions in the order (width, height, depth), but when we take the NumPy array data via limjob.Image.array(), the dimensions are in the opposite order.
Warning
Warning: Currently, NIS-Elements functions do not take numpy datatypes as input parameters so these have to be converted to classic python integers or floats.
Examples
import limjob
import numpy as np

def run(imgs, Job, macro, ctx):
    img = imgs[0]
    img_data = img.array()[0, :, :, 0]
    t = np.max(img_data)
    pixels = np.argwhere(img_data == t)[0]
    (x,y) = (float(pixels[1]), float(pixels[0]))
    (x,y) = img.transformPxToStage(x, y)
    Job.NewPointSet.PointSet.append(x, y)
import limjob

def run(imgs, Job, macro, ctx):
    if len(Job.NewPointSet.PointSet.Positions):
        stg = Job.NewPointSet.PointSet.Positions[0].Position.Stage
        XY_Move(stg.x, stg.y)
Expression
Assigns values to variables available within the job. Can be used to modify settings of any task, manipulate motorized devices, etc. For more information about working with expressions please see Using Expressions in the electronic help. |
Variables
Declares global variables within NIS-Elements. In programming, a global variable is a variable accessible from anywhere in the application ( NIS-Elements in this case) unlike a local variable which is accessible in a limited scope (such as a macro function). Global variables declared by this task can be accessed e.g. by task System > |
Choose the numeric type of your variable.
Integral number
Real number
Sequence of characters.
If selected, the variable will be of the type “array” which usually contains a set of values of the selected Type.
A value can be assigned to the variable within this task or within task System > Expression.
 Custom Metadata
Enables the user to enter custom metadata to be used before (in wizard) or during the job run. Metadata can be created and managed in the Manage Custom Metadata dialog window (see Defining and Setting Metadata). Defined metadata of different types (e.g. numeric value, text, selection, date, ...) are grouped into metadata sets and stored in the database. Metadata information applied by this task during the job are recorded into the job results and into the corresponding captured images. Define your labels and quantities in the job wizard and use them later on in a multiple well plate job. |
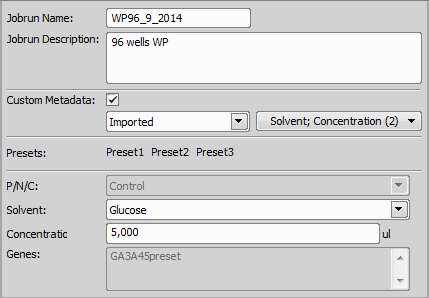
Figure 1308.
If checked, custom metadata will be used. Select a metadata set and choose which metadata from this set will be used from the neighboring combo box. Active metadata values can be adjusted in the edit boxes below depending on the use of this task in your job definition.
Presets defined in the Presets tab of Manage Custom Metadata (see: Defining and Setting Metadata) are displayed here as buttons for quick switching between them.
 Wait
Wait
This task pauses the job for a specified amount of time. Use this task whenever your job experiment needs a time pause, e.g. when illumination prolongs the sample emission. |
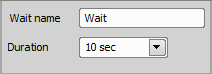
Figure 1309.
 Comment
This task can be used for adding constantly visible notes / comments right into the job sequence. Use this task to write down information explaining the particular job procedure to a user seeing the job for the first time. |
 Send E-mail Notification
Sends an email to the specified address. SMTP server configuration (within the task) must be correct. Use this task to send results of the experiment, messages about the experiment progress (failed, finished, in progress, ... ), etc. |
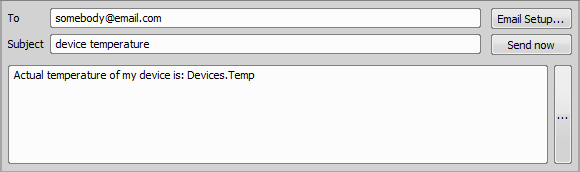
Figure 1310.
This function opens the SMTP Configuration window (please see HCA/JOBS > Presets > Email Setup ).
The ... button on the right side adjacent to the text box enables the user to insert job variables. You can also use your custom variables defined in the Variables task (see System > Variables).
Examples: Notification about the Job experiment end, notification to exchange well plates, notification that auto focus failed, etc.
 Send SMS Notification
Sends a text message to the specified phone number if the particular mobile phone operator provides such services (sending SMS over email). Send notifications about variables changing during the experiment (e.g. temperature in the incubator). |
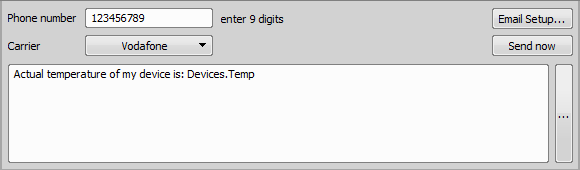
Figure 1311.
This function opens the SMTP Configuration window (see HCA/JOBS > Presets > Email Setup ).
The ... button on the right side adjacent to the text box enables the user to insert job variables. You can also use your custom variables defined in the Variables task (see System > Variables).
 Create Labels
This task defines labels which can be used for labeling single wells or single points during runtime. Define labels to be used to mark contents of the wells of a well plate. |
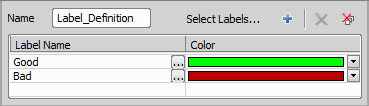
Figure 1312.
Add labels by clicking the button or by clicking the Add New. Set their name and choose the labeling color. You must use the System >  Assign Label task to assign these settings.
Assign Label
This task assigns labels set in System > Use this task with a System > | Requires: |

Figure 1313.
Filtering by these labels inside Well Plates >  Loop over Wells and Stage XY Points > Loop over Points is possible. Select a label from the Set Label list and assign it to a well/point loop. Check Reset other Labels if you want to clear existing labels.
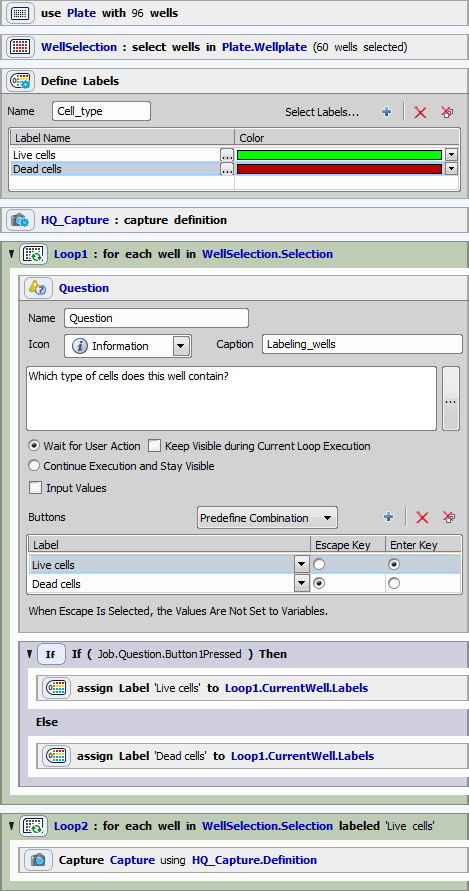
Figure 1314. Label use case
 Set Class
 Assigns the defined class to the selected well(s)/point(s)/slide in a loop. Analysis > | Requires: |
 Loop over Slides
 Debug
Debug
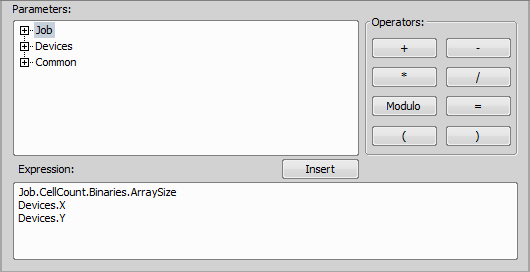
Figure 1315.
Moves to the next task in the job sequence.
If there is no user interaction during the specified time limit, the job automatically continues.
 Phase
Phase
Some use cases can be logically separated into Phases (preparation, verification, acquisition). This task can be used for holding parts of the job, creating conditions between these parts and running these parts in a custom order. |
Example 18. Example of a well plate acquisition job separated into 4 phases:
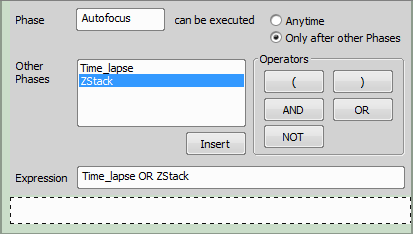
Figure 1316. Phase task
All task contained in the dashed area at the bottom of the task can be executed Anytime or Only after other Phases. Such condition can be created in the Expression area using basic Operators and for inserting the selected phase. After defining phases and clicking  Run Job, options for their direct execution or execution of the whole job are shown below.

Figure 1317. Job Execution sub-menu
Phases can also be launched in the Introduction to Jobs Explorer from the context menu over a job definition containing phases.
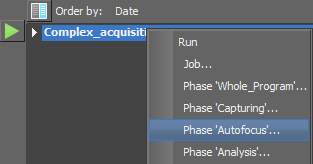
Figure 1318. Context menu in the JOBs Explorer
After a phase is executed, this information is stored so that the job can later be executed from the following phase. Each phase can be executed multiple times and the job can still be executed whole at once.
 Finish
This task finishes the current job run. When a Conditions > |
 Condition (If)
 Abort
Abort This task cancels the current job run. Place this task in the Else section of Conditions > |
 Condition (If-Else)
 Execute Macro After Run
This task is used when a macro command is required to be run after the job is finished or aborted. |
Please see Macros in the electronic help for more information.
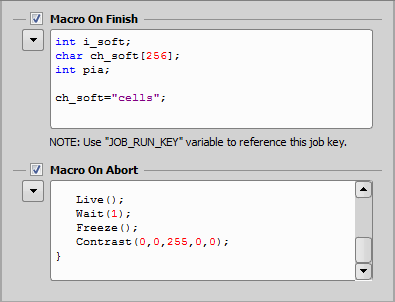
Figure 1319.
 Execute Python After Run
Executes the python function “run” defined in the python script after the job run ended. Use it to open the current job folder in the MS Windows explorer. |
Inputs
False on finished job and True on aborted job.
Current job key number.
Provides access to job tasks and job tasks parameter.
Provides access to global macro variables.
Providess access to additional functions, see pylim.py file in python site-packages folder.
To call macro use nis.mac.MacroFunctionName(macro_inputs...).
nis.mac.OpenLogFile()
When input is a value, you can use basic python types - int, floats or string.
If input is a pointer you have to construct and pass objects of nis.ptr types.
Numeric types are nis.ptr.char8, nis.ptr.byte, nis.ptr.int, nis.ptr.int64, nis.ptr.word, nis.ptr.long, nis.ptr.dword, nis.ptr.double.
Text types are nis.ptr.char.
Number or number array is created as
nis.ptr.int()                      nis.ptr.int() -> 0, nis.ptr.double() -> 0.0
nis.ptr.int(count)                 nis.ptr.int(1) -> 0, nis.ptr.double(2) -> [0.0, 0.0]
nis.ptr.int(count, value)          nis.ptr.int(1, 1) -> 1, nis.ptr.double(2, 1) -> [1.0, 1.0]
nis.ptr.int(sequence)              nis.ptr.int([5]) -> 5, nis.ptr.double([3, 4]) -> [3.0, 4.0]
Text is created as
nis.ptr.char()                     nis.ptr.char() -> ""
nis.ptr.char("text")               nis.ptr.char("text") - > "text"
You can use keyword None in place of nullptr.
res = nis.mac.DB_CreateTable("Database", None, "Table", "DBDescription")Value inside nis.ptr objects is changed via macro functions and could be retrieved via method get().
x = nis.ptr.double()
y = nis.ptr.double()
nis.mac.PiezoXYGetPosition(x, y)
print(x.get(), y.get())
Example:
Opening jobrun folder after execution.
import limjob
import nis
import subprocess

def run(is_aborted: bool, job_run_key: int, Job: limjob.JobParam, macro: limjob.MacroParam, ctx: limjob.RunContext):
    if is_aborted:
        return
    path = nis.ptr.char()
    ret = nis.mac.Jobs_GetJobrunFolder(job_run_key, path)
    subprocess.Popen(fr'explorer "{path.get()}"')
Executing ga3 recipe on saved files.
import limjob
import nis

def run(is_aborted: bool, job_run_key: int, Job: limjob.JobParam, macro: limjob.MacroParam, ctx: limjob.RunContext):
    for file in ctx.savedFiles():
        nis.mac.GA3_Execute("C:\\path\\recipe.ga3", file, None)
nis.mac.ImageOpen(file) Backup After Run
Backs up the current Jobs database after the job run is finished. Automatically backup the database after each job run. |
 Alternative Storage Location
 Changes the storage location. NIS-Elements database is ignored and all acquired files are saved into the specified folder. Use this task to save files from each job run into their own separate folder. |
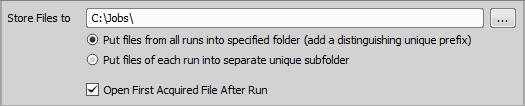
Figure 1320.
 Storage
 This task enables the user to decide whether all acquired files are saved into a folder or thrown away. Use this task in a part of the job where it is useful not to save the big generated files. |
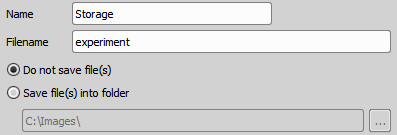
Figure 1321.
 Block
Block
A general task for wrapping blocks of other tasks. Wrapped tasks can be easily collapsed and expanded or disabled. |
 Exit with Error
Upon execution, this task will terminate the currently running job and display the designated error message. Use this task in a job sequence to terminate the job when the defined experiment does not follow the protocol. |
 Parameter Set
 (requires: JOBS) (requires: Local Option)
Enter multiple integer, double or string parameter values. |
 Integer Parameter
 (requires: JOBS) (requires: Local Option)
Defines a new integer parameter value. |
 Double Parameter
 (requires: JOBS) (requires: Local Option)
Defines a new double parameter value. |
 String Parameter
 (requires: JOBS) (requires: Local Option)
Defines a new string parameter value. |
 Path Parameter
 (requires: JOBS) (requires: Local Option)
Defines a new path parameter. |
Input path to a folder or file.
Specifies whether the dialog allows selecting a file or a folder.
Determines whether the file dialog is used for opening an existing file or saving a new file.
Defines file type filters for the file dialog.
Note
In the wizard mode, the dialog configuration (Dialog Type, File Mode, and File Filters) is hidden.
 Text Parameter
 (requires: JOBS) (requires: Local Option)
Defines a new string parameter value using a text editor. Useful for longer strings or files you need to save inside the JOBs project. |
 Alternate_FileName
Changes the output image file naming for a job loop. Insert the Z-position information to each image file name of the captured Z-Stack. | Requires: Task: Any loop task. |
Name of your System > Alternate_FileName task.


Sets other properties added to the filename right after “Name”. This menu changes with the selected Loop.