
The Image Intensity analysis evaluates the intensity of the whole Field of View. It is purposefully simple. The example of usage for this analysis is when deciding whether there is a signal in the field or not - i.e. if you want just to decide if to capture (or not to) the whole well. If the field is the whole well, there are some options to restrict the well outline (rectangular or circular) and center portion if necessary. It is also possible to restrict the range of intensities. Image Intensity analysis window enables defining the Image Intensity as shown on the following picture. If you click the first Preview icon you can see your changes directly on the live image.
This analysis evaluates the image data intensity. It is purposefully simple. Image Intensity is useful if you want just to decide if to capture (or not to) the whole well. You can evaluate the whole image, circular / rectangular region of the image or the thresholded portion.
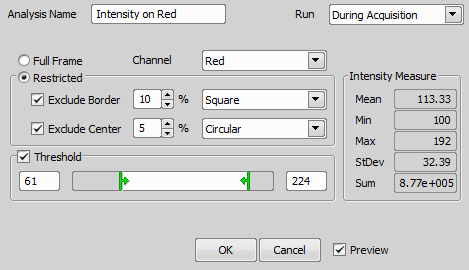
Figure 563.
The top buttons which are common to all analysis windows are described in the Analysis chapter.
Name your image intensity analysis.
Calculates full frame of the live image.
Check if you want to restrict the image area.
Set the sliders to distinguish objects on which the intensity will be measured.
Shows currently measured values from the live image.
After defining the Image Intensity and clicking , you can use parameters resulting from this analysis to define an expression. The parameters are then available in the Define Expression window under the “name of your Capture task” / Analysis / “name of your Image Intensity”.