
The  Analysis Explorer control panel enables the user to manage and run analysis recipes. Choose
  Image > Analysis Explorer to display it.
If Assay Launcher module was checked in Modules during NIS-Elements installation, three predefined GA3 recipes for the Nikon Ti2 and Nikon Ji microscopes become available. Also a shortcut to Analysis Explorer is created in the shortcuts section of the  Compact layout. For editing and using GA3 recipes, we suggest duplicating the GA3 recipe rather than overwriting it.
First button of the control panel  Create New is a pull-down menu with all available analyses. Once you define your analysis and save it, a new analysis definition is created in the explorer. Each time the analysis is run, a new analysis record is added under the analysis definition name. It is linked to the image file to which the analysis was applied.
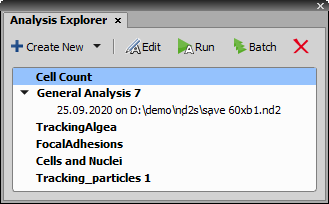
Figure 524.
Dialog Window Options
Create New Selects and defines a new analysis which can be directly executed on the current image or saved for later use. Herein, analyses can also be imported from an analysis file (  Import Analysis from File...) or from Jobs (
  Import Recipe from JOBS).
 Edit
Edit Opens the analysis dialog window enabling to edit the analysis definition.
 Run
Run Executes the selected analysis definition on the currently opened image.
 Batch
Batch Opens the Batch Analysis window enabling to execute the selected analysis definition on multiple files (see: Batch Analysis Options).
 Delete
 Deletes the selected analysis definition/analysis record.
Context Menu over the Analysis definition
Run Runs the selected analysis definition on the currently opened image.
Edit Opens the analysis dialog window enabling to alter any parameters and overwrite the selected analysis definition with these new settings.
 Rename
 Renames the analysis definition.
 Duplicate
 Duplicates the selected analysis definition.
 Export
 Exports the current analysis definition into a file.
Delete Deletes the selected analysis definition.
Context Menu over multiple selected Analysis definitions
Export Selected Items Exports each selected analysis definition into a file.
Delete Selected Items Deletes the selected analysis definitions.
Context Menu over the Analysis record
 Open File
 Opens the image linked to the selected analysis record. Double-clicking on the analysis record does the same.
 Open Containing Folder
 Opens the folder containing the image linked to the selected analysis record.
 Revert to this definition
 Uses the analysis definition of the selected analysis record to overwrite the parental analysis definition.
Make new Analysis from this definition Creates a new analysis definition from the selected analysis record.
Delete Deletes the selected analysis record.
Open an image to be analyzed.
Select the analysis from the
Create new pull-down menu. The analysis definition window appears.Adjust the analysis settings - live preview of the segmentation is displayed in the image so you can play with the segmentation parameters. Save it using the
 Save As button or click , enter its name with a description and confirm by clicking . Now the named analysis definition is listed in the Analysis Explorer and is ready to be run on other images.
In the Analysis Recipes portion of the window select the level of user interaction:
Run the batch without user interactionThe analysis will be applied to all images in the batch “as it is”.
Show definition for each imageAfter opening each image in the batch, the analysis definition window appears allowing you to adjust the settings for each image separately. This per image analysis adjustments do not influence the original analysis definition.
Show definition onceThe definition window appears only once after opening the first image of the batch. Analysis adjustments made here are applied to all subsequent images in the batch and do not influence the original analysis definition.
Select Files to be processed . Browse for the folder containing images to be analyzed and adjust the selection of files to be processed. Click .
When the batch is done the progress dialog.
All measurement results of the last used analysis are saved to the global NIS-Elements results table which is opened after the analysis/batch is finished. Run the View > Analysis Controls > Automated Measurement Results  command to display the appropriate control panel.
Caution
Each run or batch run overwrites the View > Analysis Controls > Automated Measurement Results or View > Analysis Controls > Tracking ![]() panel with new results.
panel with new results.
Particular settings of your analysis may be saved as a recipe so that you can reuse the settings anytime in future. Moreover, each run of the analysis recipe saves the settings to the database so you can create a recipe out of the analysis run. Here are the options:
Right-click the analysis name and select Export command. Browse for the location to save the analysis definition to and click . The file will be saved with an extension appropriate for the analysis type (such as *.cellcount)
Click the Create new button and select Import Recipe.... Locate the file containing the analysis definition (e.g.: “c:\recipes\definition.cellcount”) and click .
(requires: JOBS)
Click the Create new button and select Import Recipe from JOBS. A list of recipes saved from the JOB definition window appears (see Analysis). Select one and click .
Local changes (e.g. different threshold value) may have been applied to each run of one analysis. You can replace the original analysis definition by one of these locally changed. Just right-click the analysis run and select Revert to this definition.
All these actions are accessible from a context menu which appears when you right-click an existing analysis name.
Once the image folder is selected, all contained images become listed in the table. By default, only images with the value Valid in the Status field are selected for processing. Check status of the other images and decide whether to include them in the batch as well.
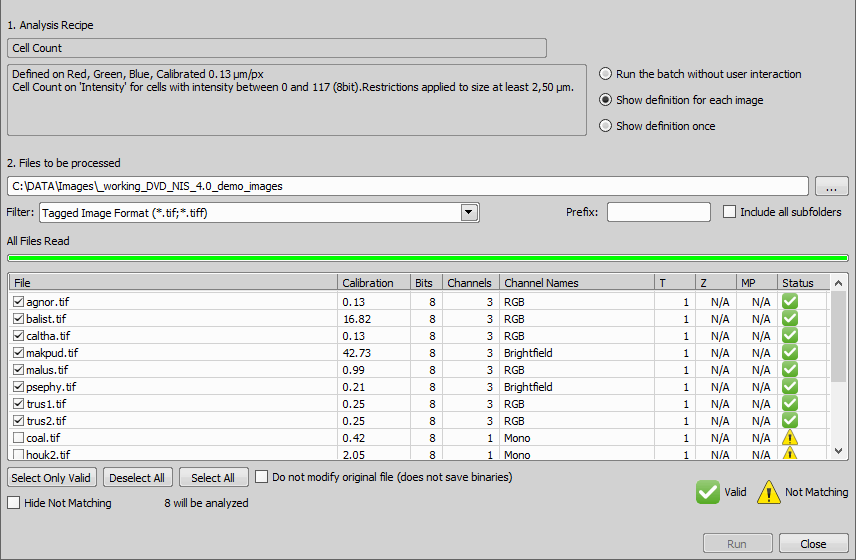
Figure 525.
Image Statuses:
 Valid
Valid The file is perfectly compatible with analysis definition.
 Not Matching
 The file is not perfectly compatible with analysis definition but it may be converted automatically. This is typically a single-channel image where the channel name does not match the name used in the analysis definition or calibrations do not match (uncalibrated definition used on calibrated image and vice versa).
 Conversion Dialog
 The file is not compatible with analysis definition, user interaction is needed in order to assign image channels to the channels used in the analysis definition. Typically channels in the image do not match channels in the analysis definition.
 Invalid
 The file cannot be processed. Typically, it has less channels then required by the analysis definition.
Note
File list is arranged alphabetically by the file type in the following order from top to bottom: Valid, Not Matching, Conversion Dialog, Invalid.
Other Options
Standard filter based on filename extensions. Only images matching the selected extension will be listed.
Another filter based on filename prefix. If you type e.g. “i” to this field, only filenames beginning with the letter “i” will be displayed.
Select this option to list images regardless of the folder structure. All images of the above-defined folder will be displayed.
Select or remove selection of all images in the list.
If checked, only measurement is done without influencing the analyzed image and no binaries are saved to the image.
Note
Analyses which do not produce Automated Measurement Results such as Cell Motility always modify the original file (otherwise there would be no results) and therefore the check box is hidden for them.