


Open JOBS Explorer
Expand the JOB in the list to display job runs.
Select and right-click the job run used to capture the N-SIM image.
Select Reconstruct N-SIM Image from the contextual menu.
 Capture Definition
 Defines the single-channel or multi-channel acquisition settings. Use this task to define parameters of the image captured by the Acquisition > |
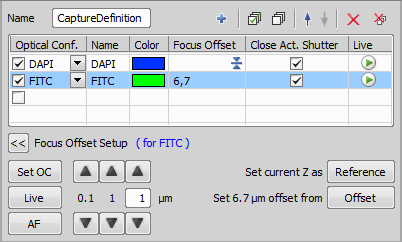
Figure 1338.
Select an optical configuration to be used to capture each channel.
Please see Multi-channel Acquisition.
Specific options
Sometimes when using multiple channels for acquisition, not all channels have the same Z positions with the best focus. Using one channel as reference, user can specify focus offsets for individual channels. Therefore all channels are captured in focus automatically.
In addition user can control active shutter individually for each channel. Check Close Act. Shutter check box to minimize bleaching or uncheck it to leave the shutter opened and thus speed up the acquisition.
Opens the live image dialog window.
This button reveals the Focus Offset settings. If two or more Optical configurations are used (e.g. when OC's use different objectives) an offset between them can be defined. Click on the first OC, click to see the live view of the selected OC, focus (you can use for automatic focus) and set it as . Click on the second OC, click to activate it (switch to its live view), use the up/down arrows to focus and click to assign the offset distance from the first OC.
 Capture
 Performs acquisition according to the selected Acquisition > Use this task to acquire large images and run an analysis upon capture. | Requires: |
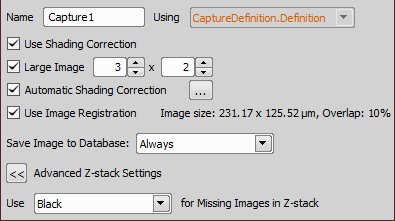
Figure 1339.
Name of your capture task.
Select a Acquisition > Capture Definition task set previously.
Check this option to turn on the shading correction using a captured shading image. Please see Acquire > Shading Correction Panel for more information.
Large image is acquired as a series of overlapping images taken one by one in regular grid of given dimensions. After acquisition, images are stitched together into one big image.
Enter the grid dimensions and check if you want to Use Image Registration. This function tries to find the perfect match of the overlapping parts of images, however it takes some time to compute.
To perform the shading correction automatically without capturing the shading image, check this option and click to choose the type of correction which best represents the background of your sample image.
In this part of the Capture dialog, you can define the image saving conditions. Two options determining how to save the images to the database are available: Always or Never or Later.
When combining multiple captured images together not all frames have to be captured in the image file. For example: Capture Z-stack with Capture1 and then capture only home position with Capture2. Images from Capture2 will be missing in other then home position of the Z-stack.
Select Black for missing images to be black, similarly select White. Select Duplicate to duplicate captured image to all missing images in the Z-stack.
 Capture Current OC
 Performs acquisition according to the currently selected Optical Configuration. Acquisition > Use this task for quick image acquisition with the currently used Optical Configuration. |
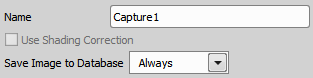
Figure 1340.
Name of your task.
Check this option to turn on the shading correction using a captured shading image. Please see Acquire > Shading Correction Panel for more information.
Define the image saving conditions. Two options determining how to save the images to the database are available: Always or Never or Later.
 Capture HDR
 Captures a high dynamic range image according to the selected Acquisition > Use this task for a high dynamic range image capture removing reflections from an over-illuminated sample. | Requires: |
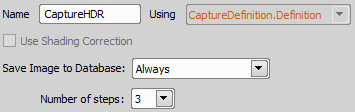
Figure 1341.
Name of your task.
Select a Acquisition > Capture Definition task set previously.
Check this option to turn on the shading correction using a captured shading image. Please see Acquire > Shading Correction Panel for more information.
Define the image saving conditions. Two options determining how to save the images to the database are available: Always or Never or Later.
Defines the up and down steps of the HDR.
 Capture Current OC HDR
 Captures a high dynamic range image according to the currently selected Optical Configuration. Use this task for quick high dynamic range image acquisition with the currently used Optical Configuration. |
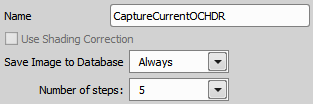
Figure 1342.
Name of your task.
Check this option to turn on the shading correction using a captured shading image. Please see Acquire > Shading Correction Panel for more information.
Define the image saving conditions. Two options determining how to save the images to the database are available: Always or Never or Later.
Defines the up and down steps of the HDR.
 Capture Current OC EDF
 Captures an extended depth of focus image according to the currently selected Optical Configuration. Use this task to capture an extended depth of focus fully covering a thick sample. | Requires: Module: |
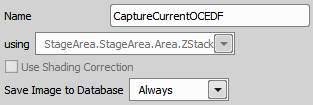
Figure 1343.
Name of your task.
Select a task carrying a Z definition.
Check this option to turn on the shading correction using a captured shading image. Please see Acquire > Shading Correction Panel for more information.
Define the image saving conditions. Two options determining how to save the images to the database are available: Always or Never or Later.
 Capture VC
 Captures a Z-Stack of a bright field which is used for the volume contrast image (image with increased contrast between the sample tissues). Volume contrast image is not created automatically but can be created later using Applications > Volume Contrast > Create VC Image from Current ND. Use this task to capture a Z-stack for the volume contrast reconstruction. |
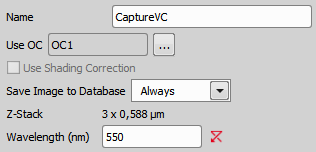
Figure 1344.
Name of your task.
Click on the button to select an optical configuration (e.g. Acquisition > Capture Definition) used for the capture.
Check this option to turn on the shading correction using a captured shading image. Please see Acquire > Shading Correction Panel for more information.
Define the image saving conditions. Two options determining how to save the images to the database are available: Always or Never or Later.
Shows the Z-Stack size to be captured. For example “3 x 0.625 µm” means that three Z planes with a step size of 0.625 µm will be captured.
Specified the wavelength for the capture.
 Capture and Reconstruct VC
 Creates a single volume contrast image after capturing a Z-Stack of a bright field. The number of the Z frames and the Z step size are determined automatically depending on the condition of the objective lens and camera. Use this task to capture and reconstruct a volume contrast image. |
Name of your task.
Click on the button to select an optical configuration (e.g. Acquisition > Capture Definition) used for the capture.
Check this option to turn on the shading correction using a captured shading image. Please see Acquire > Shading Correction Panel for more information.
Define the image saving conditions. Two options determining how to save the images to the database are available: Always or Never or Later.
Shows the Z-Stack size to be captured. For example “3 x 0.625 µm” means that three Z planes with a step size of 0.625 µm will be captured.
Specified the wavelength for the capture.
Defines the algorithm parameter influencing the background removal. The lower the number the more of the background is removed. Click on the  Recommended button to set the recommended value.
 ND Acquisition
 Acquires an ND2 image according to the definition specified within the task. Use this task to acquire multi-dimensional images. |
For more information about ND2 Acquisition please see About ND Acquisition .
 Fast Timelapse
 Uses the maximum capture speed of the camera set in Optical Configurations to acquire a desired number of frames. Use this task whenever a high-frequency image acquisition is required. |
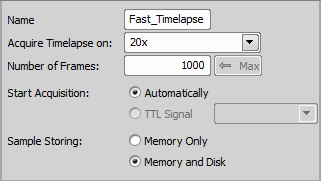
Figure 1345.
Select the optical configuration used for timelapse acquisition (Acquire Timelapse on). Use the  Max button to get the maximum number of frames or enter the number manually.
The acquisition can be triggered by a TTL Signal or it can start Automatically. The frames are then stored into an ND2 file. Sample Storing should be faster when the Memory Only (RAM memory) option is selected.
 Triggered Experiment
 (requires: RT Acquisition)
This task aggregates all necessary features used for triggered acquisition. Use this task in the job for the fastest image acquisition possible. The camera acquisition actions are controlled solely by the hardware. | Requires: Device: Wavelength Switcher, Piezo XY (optional), Piezo Z (optional) |
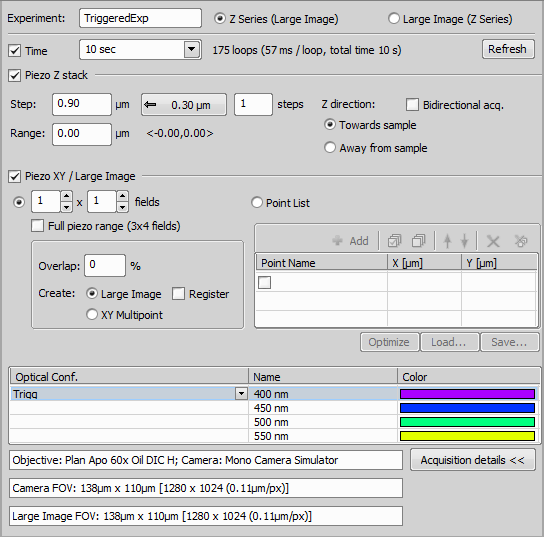
Figure 1346.
Name of your Triggered Experiment.
Specify which procedure is done first and which is done later. First option creates a full Z-Stack and Large Image is created later on each Z plane. Second option creates a Large Image on the first plane, then moves to the second plane, etc.
Check this option if you want to specify the duration of your experiment. Number of loops and time per one loop is indicated next to the combo box. Use to update the loop/duration estimate.
Check this option if you want to capture a Z stack. Specify the Step size and/or a Range, use the ![]() Suggested Step Size or enter a number of steps. Z direction can also be specified. Bidirectional acq. moves the stage in both directions from the sample, Towards sample scans in the direction to the sample and Away from sample scans the Z stack from the sample.
Suggested Step Size or enter a number of steps. Z direction can also be specified. Bidirectional acq. moves the stage in both directions from the sample, Towards sample scans in the direction to the sample and Away from sample scans the Z stack from the sample.
This option can be used for acquiring XY points or Large Images. For Large Images enter the number of fields or use the Full piezo range. Specify the image overlap in percent. You can set whether you want to Create Large Image or XY Multipoint. Register tries to find the perfect match of the overlapping parts of images, however it takes some time to compute. Point list can be used for capturing multi points. For more information about XY points, please see Multi-point Acquisition.
Click on to select which optical configuration is used for the triggered experiment.
Displays additional information about the adjusted experiment (e.g. used Objective, Camera FOV and Large Image FOV).
 Illumination Sequence
 This task sets the camera-to-device triggering patterns. Please see Usage Examples in the electronic help. | Requires: Device: Wavelength Switcher Module: |
 Live Window
 Displays, freezes or hides the live-signal window. Use this tool whenever a preview of what is happening under the microscope is needed. |
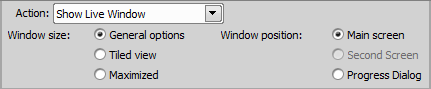
Figure 1347.
Choose one of three live actions: Show Live Window (opens a new preview window), Freeze (freezes the preview) or Close Live Window (closes the preview).
Depending on your preference, choose one of the three window size options: General options (exerts the last used window size), Tiled view (tiles the live window alongside with other windows) or Maximized (Maximizes the live window).
If using multiple monitors, this function can put your Live window onto your Second screen, keep it on the Main screen or embed it directly into the Progress dialog.
 Merge and Store Captured Images
 Specifies the file format used to store images created by the connected Acquisition > Use this task to change the output file format of the data acquired by your job. |
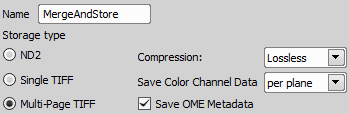
Figure 1348.
Name your storage setting.
Selects the file format storing images created by a capture task.
Compression defines the amount of compression for the selected file format.
Choose a color channel storage method - Pixel or Plane. The default is per plane.
Note
This options may be useful for advanced users who plan to further process the images in other applications (such as MatLab). You can ignore it if you use just NIS-Elements.
OME metadata can be saved with the TIFF file to increase the TIFF file compatibility (e.g. proper channel designation).
See also Supported File Formats.
(requires: Local Option)
Specifies whether to use multi-resolution creation per storage basis.
 Detect Background
 This task can detect background from captured images. This task creates two parameters (IsBackground and IsSpecimen) which can be used with a Conditions > | Requires: |
 Condition (If)
Figure 1349.
Warning
This task requires Background/Specimen detection to be set up first. Go to: HCA/JOBS > Background Detection > Teach Background/Specimen Detection.
Name your detect background task.
Choose the data for the background detection.
Select on which channel the detection will be performed.
 Save Captured Image
 If Save Image to Database in the Acquisition > Use this task to save images if a condition is met or when an analysis brings satisfying data. | Requires: Task: |

Figure 1350.
Name of the task.
Select the Acquisition > Capture task from which the acquired images will be taken.
 Capture N-SIM
 Captures an N-SIM image using the selected method. The captured image is composed of several image tiles. Use this task to capture structured illumination super-resolution images. | Requires: Module: |
A single N-SIM image can be created within JOBS Explorer:
Caution
This task is only available with the NSIM module installed (it is a separate setup file).
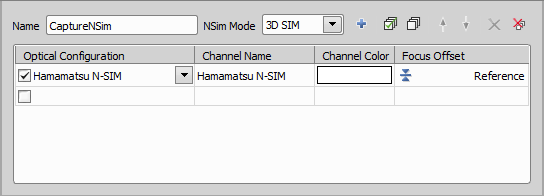
Figure 1351.
Select the mode for capturing the N-SIM image.
Select an optical configuration which supports N-SIM acquisition.
Sets focus offset - see Acquisition > Capture Definition for description.
 STORM Acquisition
 This task is used for acquisition using the STORM (Stochastic Optical Reconstruction Microscopy) method. Use this task to capture fast biological processes by the STORM method. | Requires: Device: Multi-laser Module: |
Controls the parameters necessary for proper Single Particle Tracking acquisition. For more information please see Single Particle Tracking. Acquire a timelapse image of functional molecules in the nucleus to analyze their trajectory statistics and motion. | Requires: Device: Multilaser for STORM acquisition. |
 Assign Capture Definition
 Assigns a capture definition to a selected label. Capture images using different capture definitions in each well of a well plate. | Requires: |
 Label Wells
Name of the task.
Selects a capture definition to be assigned.
Selected label to which the capture definition will be assigned.
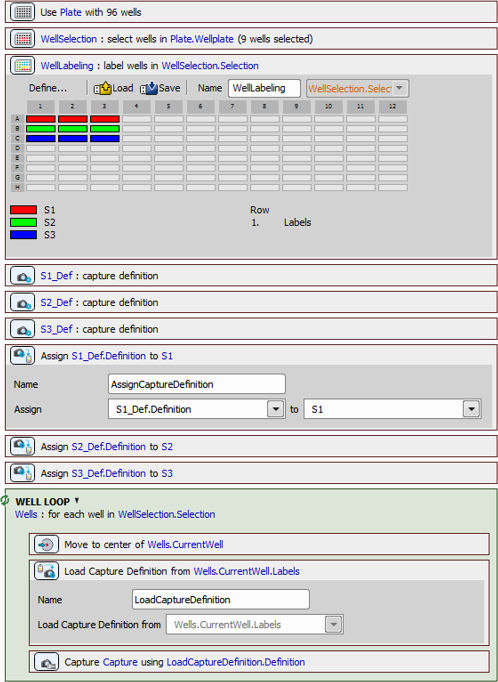
Figure 1352. Example of Usage
 Load Capture Definition
 Loads a capture definition from a selected label. Defines different settings for wells using the Well Plates > | Requires: |
 Loop over Wells
 Loop over Points
Name of the task.
Selects a point/well from a loop from which a capture definition is loaded.
Figure 1353. Example of Usage
 Adjust Camera ROI
 Adjusts the camera ROI according to the light path (microscope tube aperture) or the well size. ROI according to the light path is the default ROI for all camera pads. The ROI can be fitted (Inner/Outer) in the well or optionally Shrinked to a specified percentage value. |
 Loop over Components
 Loops through image channels defined by the Acquisition > |
Select a capture definition (Acquisition > Capture Definition)
Activates the optical configuration assigned to the current channel.