JOBS

Well Plate
Slide Holder
Presets
Background Detection
Acquisition
Database
JavaScript

Create a custom slide (using Sample Holder >
 Define Slide) with Alignment Crosses and use these crosses to target corners of the coverslip, visible corners of the slide or any other reference points.
Use Sample Holder >
 Define Stage Area with a rectangular shape and find corners of the coverslip, visible corners of the slide or any other visible reference points.
(requires: JOBS Viewer)
This control window is used for managing jobs. The following control window appears:

Figure 2084.
See Introduction to Jobs Explorer for detailed description of this window.
(requires: JOBS Viewer)
Opens the job editor where you can start to create a JOB. See Creating a Job.
(requires: JOBS Editor)
Opens the Job Editor Options window.
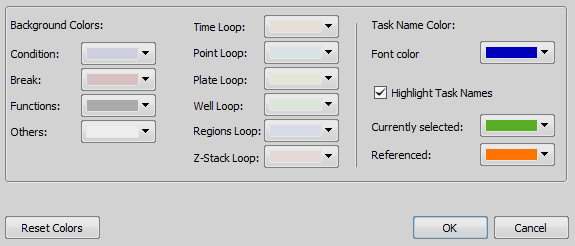
Figure 2085. Job Options dialog window
(requires: JOBS Viewer)
If this option is selected and a Job is started, all previously opened Job Results windows will close automatically.
(requires: JOBS Viewer)(requires: Well Plate Loader)
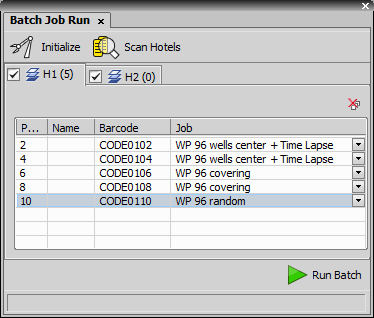
Figure 2086.
Batch Job run provides the ability to queue different jobs for different well plates in plate hotels.
(requires: JOBS Viewer)
This function opens the Align Well Plate window. Select a standardized well plate from the database, define the Position of the Locking Clamp to set the well plate orientation and click . Then precisely align the well plate by one of the available methods (please see: Well Plates >  Align Well Plate Holder). This alignment is used globally in NIS-Elements once the selected well plate is aligned and is recommended for fixed well plate holders.
(requires: JOBS Viewer)
Here you can search for previously saved well plates, create new ones, delete them or import / export them from / to a .BIN file. For more information about how to create custom well plates see Well Plates >  Define Plate.
(requires: JOBS Viewer)
This function opens the Align Slide definition window.
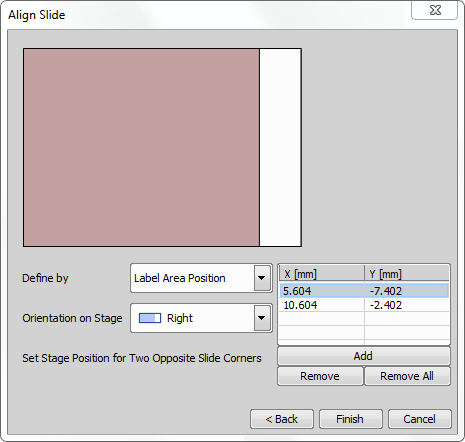
Figure 2087.
Search for your slide and click . Now you have to specify its orientation on the stage. The orientation can be defined by Label Area Position, Smear Direction or Crosses Position (if the slide has crosses). Select the real Orientation of the slide from the combo box. Finally Add two XY points of the two opposite corners of your slide and click .
Slides with covered corners
If your slide is mounted to the stage in a manner that its corner(s) are not visible in the Live View, it is impossible to align it using the predefined slides from the database. In this scenario there are two options:
(requires: JOBS Viewer)
Here you can search for previously saved slides, create new ones, delete them or import / export them from / to a .BIN file. For more information about how to create custom slides see Sample Holder > Define Slide.
(requires: JOBS Viewer)
Adjusts the email / server (SMTP) settings needed for sending emails or SMS notifications via HCA / Jobs.

Figure 2088.
(requires: JOBS Viewer)
Here you can enter an email address or a phone number (or both) to which the job will send you messages if an error occurred during the job.
Caution
A SMTP (email) configuration must be set properly in order for this command to work. See HCA/JOBS > Presets > Email Setup

Figure 2089.
(requires: JOBS Viewer)
Opens the Labeling Tags window. For more information about labeling see Well Plates >  Label Wells.
(requires: JOBS Viewer)
Opens the Manage Custom Metadata dialog window. Please see Well Plates > Label Wells for more information.
(requires: JOBS Viewer)
Here you can manage your Recipe Settings.
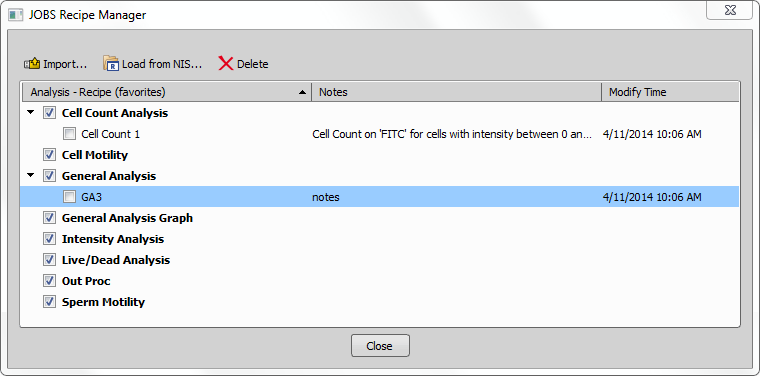
Figure 2090.
 Import...
 Imports job recipes from a file.
 Load from NIS...
 Imports recipes currently defined in the Image > Analysis Explorer window.
 Delete recipe
 Deletes the currently selected recipe.
(requires: JOBS Viewer)
Opens the Background detection dialog window.
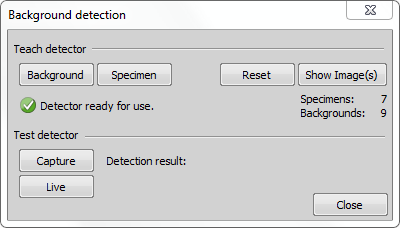
Figure 2091.
Run live view and make sure that the background fills the field of view of your camera, then click . Now place your specimen in the field of view and click . You can repeat this process for Background/Speciment many times to improve the detection. Now the background/speciment can be automatically detected. is used to reset the detected images, opens images used for the Background detection. Buttons and can be used for testing the detection.
Automatic background detection can now be used in several tasks, e.g.:  Autofocus Settings (see: Autofocus + Focus Surface > Autofocus Settings). Its label “IsBackground” is stored in the database and can be used in the job e.g. as a condition.
(requires: JOBS Viewer)
This command is used to run devices in parallel (e.g. Stage and Filter Wheel moves at the same time) to speed up the acquisition either during a job run or in ND Acquisition using a Ti Recipe. If a device producing recipe signal is connected (i.e. Ti-E, NIDAQ), the devices start the parallel movement just on “exposure end” signal instead of “after capture” in Jobs without Ti Recipe.
(requires: JOBS Viewer)
Creates a new Jobs database. Specify the location of the database files, name the .dat file and click .
(requires: JOBS Viewer)
Opens a dialog window where you can select which items of the current database will be copied to the new database.
(requires: JOBS Viewer)
Shows the Open Database File window enabling to load a Jobs database from a .dat file.
(requires: JOBS Viewer)
Opens the Database Rename dialog window which can be used to rename the currently opened database.
(requires: JOBS Viewer)
Shows a dialog window enabling to load an existing database from a .dat file.
(requires: JOBS Viewer)
This function reloads the currently opened database. If any changes are made to your database remotely (more users working on one database), use this function to promptly reload the database so that it is up to date.
(requires: JOBS Viewer)
Frequent database inserts, updates, and deletes can cause the database file to become fragmented. This function rebuilds the entire database to improve the speed when working with the database.
(requires: JOBS Viewer)
This command enables saving all files you have created using Jobs into a desired folder, see Database Backup.
(requires: JOBS Viewer)
This operation replaces the contents of the current database folder with the contents of the backup folder.
(requires: JOBS Remote Database)
This window opens the Upload dialog. Click and specify where the Remote database .dat file is present. Use the check boxes next to each job to include/exclude them into/from the uploading process. The Uploading Rules table below shows the compared data status of both the local and the remote databases. Adjust the Action to perform combo boxes to set the merging rules and then click to start the uploading process.
(requires: JOBS Remote Database)
This window opens the Download dialog. Click and specify where the Remote database .dat file is present. Use the check boxes next to each job to include/exclude them into/from the downloading process. The Downloading Rules table below shows the compared data status of both the local and the remote databases. Adjust the Action to perform combo boxes to set the merging rules and then click to start the downloading process.
(requires: JOBS Viewer)
For more information about database properties go to Database Properties.
(requires: JOBS Viewer)
If this command is displayed, a new version of NIS-Elements with an updated database structure was installed. Run the command in order to use the database with the new version.
Caution
Once the database is upgraded, it cannot be accessed by older versions of NIS-Elements.
(requires: JOBS Viewer)
Opens a dialog window used for editing and running a JavaScript.
(requires: JOBS Viewer)
Opens a dialog for opening a *.js, *.txt file and then editing and running it.
(requires: JOBS Viewer)
Opens the Manage JavaScript files dialog window aggregating the recently used JavaScript files.
(requires: JOBS Viewer)
Opens the Run JavaScript dialog window used for loading the script from the *.js or *.txt file.
(requires: JOBS Viewer)
Opens the Manage JavaScript files dialog window aggregating the recently used JavaScript files.