Deconvolution

Select your microscopy Modality , wide-field or confocal.
Fill-in the numerical aperture (NA) value of the objective used.
Fill-in the refraction index of the immersion medium used. There are some values predefined in the nearby menu (air, water, immersion oil, glycerin).
Fill-in the calibration field. Mind that the deconvolution doesn't work on uncalibrated sequences.
Pick the channels to deconvolve in the Channels field.
Fill-in the emission wavelengths (EmW) of the channels. These values don't have to be accurate because they affect the result only slightly.
Fill-in the Z-Step distance between the single Z-slices of your sequence.*
Press the Deconvolve button.
(requires: 3D Deconvolution)
This command setups and runs 3D deconvolution of the current ND image. See 3D Deconvolution .
(requires: 2D Deconvolution)
This command setups and runs 2D deconvolution of the current image. See 2D Deconvolution.
(requires: 3D Deconvolution)
Open a sample image containing beads with a known diameter and run the PSF Extractor to generate the point spread function(s) from the image. Save the extracted PSF file and load it using the Import PSF function inside the Deconvolution dialog (see Import PFS in 3D Deconvolution ). For more information about capturing beads, please see Determining the Point Spread Function (PSF).
Image channel from which the PSF will be extracted.
Physical diameter of the beads used in your sample image.
Number of layers in which the PSF will be detected. The more layers you define the more point spread functions will be extracted and shown in a multi-point image.
Start with the default value. If the result is not satisfying (e.g. when the sample contains a lot of noise particles with a similar size as the beads) try to lower the value.
(requires: 2D Deconvolution)
This command defines the settings for de-blurring of live image. See Live De-Blur Setup.
(requires: 2D Deconvolution)
Runs denoising and deconvolution on the live image calculated by GPU (graphics card). The pull-down menu next to the function button shows/hides the Live Denoise & Deconvolution dialog window.
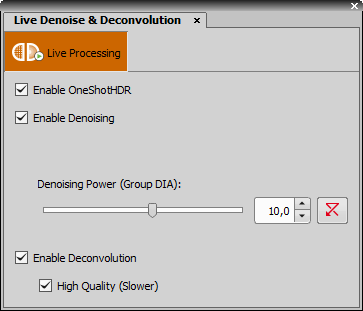
Figure 2092. Live Denoise & Deconvolution dialog window
Dialog Window Options
 Live Processing
 State of this button indicates whether the live processing is performed (orange color) or not.
Enhances the dynamic range on the currently captured image.
Check this option to enable image denoising (removing any image noise). Check the channel(s) which should be denoised and set the Denoising Power.
Check this option if you want to run the fastest deconvolution method on the live image.
Decide whether you prefer quality to speed. A simpler and faster algorithm is used if this option is deselected.
(requires: mod.deconvolution.legacy)
Before deconvolving the sequence of images, the following settings should be adjusted:
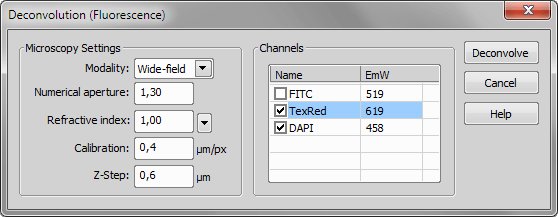
Figure 2093.
* - It is important to fill the same value that was used during the Z sequence acquisition. The deconvolution will not work properly without a reasonable Z-Step value. When you are about to capture a Z sequence, you should Acquire > Capture Z-Series > Capture Automatically to Suggested step size or smaller in order to get enough detail for the deconvolution algorithm to work fine.
(requires: mod.aqdeconvolution)
This command displays the control window of AutoQuant deconvolution module:
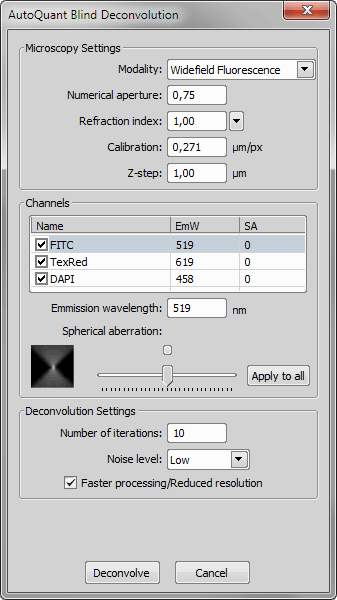
Figure 2094.
Microscopy Settings
A type of the microscope that was used to capture the image sequence can be selected (widefield fluorescence, transmitted-light bright field, laser scanning confocal, spinning disk confocal, multi-photon fluorescence).
These values that give information about the microscope settings are usually retrieved from the captured image. However, they can be modified by user.
The channel name (Name), emission wavelength (EmW), and spherical aberration (SA) are also retrieved from the image or can be modified by user.
Deconvolution Settings
Specify how many times you would like to perform the deconvolution algorithm.
Select the noise level of images (low, medium, high)
The resolution of the result can be reduced on behalf of the speed of processing (The resolution is reduced temporarily during the processing. Afterwards, the original resolution is renewed).
Note
If the ND2 file contains more than one Z-serie, the dialog will be extended by another part where it is possible to select whether to process just the Current Z-serie or All.
(requires: mod.2drtdeconvolution)
This command displays the window with the settings for 2D Real-time deconvolution. It can be placed to the left/right docking pane and stay always displayed. To do so, double click the window caption.
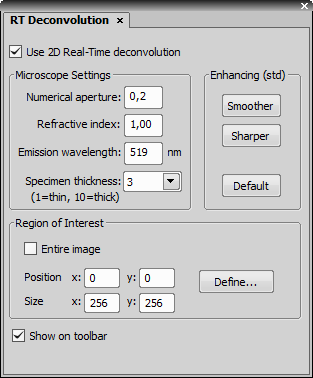
Figure 2095.
Applies the settings and deconvolves the image.
Microscope Settings are the input parameters for the deconvolution.
NA of the objective lens. This value is written on the objective itself.
Refraction index of the lens immersion medium (typically 1.00 for air, 1.33 for water, 1.51 for immersion oil, 1.61 for glycerin).
Emission wavelength of the fluorescent specimen in nm. Use 520 nm if unsure.
Describes how thick the is the specimen being imaged. The value is typically between 1 and 5. Use 1 for optically flat mono-layers, and 5+ for thicker specimens.
Enhancing group controls the noise amplification vs. image smoothness. The default setting is suitable for low-noise images.
Press this button to decrease the noise.
Press this button to increase the sharpness of the image.
Return to default (std) setting.
Region of interest specifies the part of the image where the deconvolution will be done. Reducing the area for the deconvolution will increase its speed.
Check this option if you want to deconvolve the entire image.
Top-left corner of the rectangle representing the ROI.
Width and height of the rectangle representing the ROI.
If you press this button, you can draw and/or adjust the rectangle with mouse directly in the image.
Adds the  RT Deconvolution icon to the top toolbar. It can be used to turn the deconvolution on/off.
It is necessary to have the image calibrated in order for the deconvolution to work. If you see this message, you should calibrate the Optical Configurations you use.
Note
All these parameters can be also set using the following functions: RTD_DefinePSF , RTD_DefineROI , RTD_LiveEnhancing
One image (e.g. Opened from file) can be deconvolved with function Deconvolution > RT Deconvolution not > Enhance Current Image.
(requires: mod.2drtdeconvolution)
This command applies the Deconvolution > RT Deconvolution not > Show RT Deconvolution Setup to the current image. If the Live image is on, it becomes frozen automatically and then deconvolved. When you are working with ND2 files, select the frames to which the function is applied in the window that appears.