Create a custom slide (using Sample Holder >
 Define Slide) with Alignment Crosses and use these crosses to target corners of the coverslip, visible corners of the slide or any other reference points.
Use Sample Holder >
 Define Stage Area with a rectangular shape and find corners of the coverslip, visible corners of the slide or any other visible reference points.
Click
 Initialize and follow the instructions to initialize your slide loader.
Scan for the loader hotels by clicking
 Scan Hotels.
To change the slide model used in the slide loader, click
Select slide....Select or deselect the found slides and hotels to be used in your job.
Optionally add the name and barcode to each of your slides and add Notes for the hotel.
Define Slide Specifies the dimensions of a slide including its working area. Used whenever slide is used as a sample holder. | Requires: Module: |
If you use a standardized slide, click and search for your slide in the slide database.
For non-standard slides, click and define its properties (width, height). If you use slides with alignment crosses, it is recommended to check Alignment Crosses and set their X and Y Offset for later precise alignment.
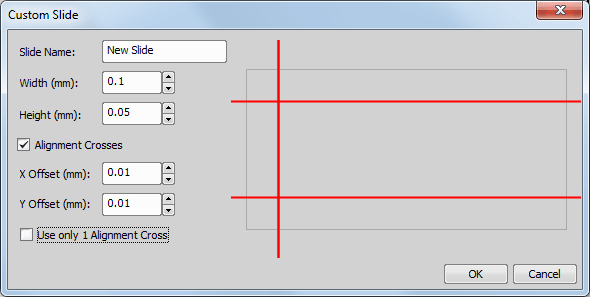
Figure 1276.
Once you have selected/defined your slide, you have to specify its orientation on the stage. The orientation can be defined by Label Area Position, Smear Direction or Crosses Position. Select the real Orientation of the slide from the combo box.
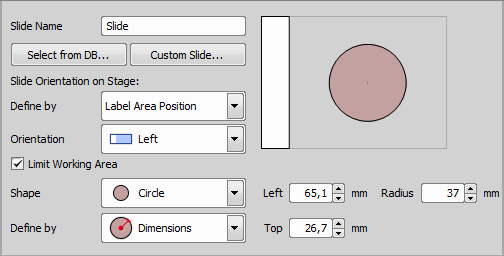
Figure 1277.
At last it is possible to limit working area of the slide. This area can be a Rectangle or a Circle defined by Dimensions or using the Interactive feature which requires to Add XY points lying on the border of the selected shape (3 corner points for the rectangle or 3 edge points for the circle).
After defining the slide it is ready for alignment. Please see: Sample Holder >  Align Slide Holder.
Define Stage Area In this task you can specify the area of interest on your stage holder. Used to define a non-standard sample holder. | Requires: Module: |
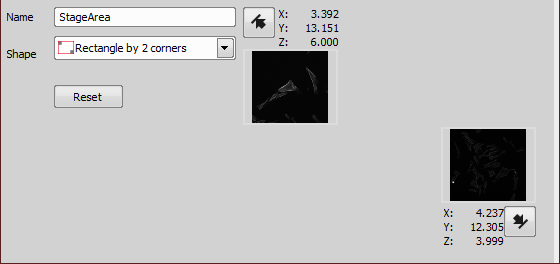
Figure 1278.
Type the name of your stage area task.
Choose a stage area shape for its definition. Then click the arrows on the right side one after another while moving the stage to define the edge points. A small preview image is assigned to each defined point. Define without Capturing sets the scanned area shape without capturing images of the definition points, therefore no preview images are shown. can be used to remove all defined points and start all over again.
Some shapes do not use edge buttons but a definition table - in such case use to enter the definition points.
Circle by radius shape requires to enter a Radius value and to Set Center Position.
Define Large Image Area This task specifies the area of interest on your stage holder. It is similar to the Sample Holder > Used to define a non-standard sample holder. | Requires: Module: |
Align Slide Holder Determines exact position of the selected slide on the XY stage. Used each time the slide is changed on the stage. | Requires: Module: |
Select a slide from the combo box, move your stage to one corner of your slide and click . Move the stage to the Opposite Corner and click . Alignment is now finished. Changes to the alignment can be done by removing the XY coordinates clicking Remove or Remove All.
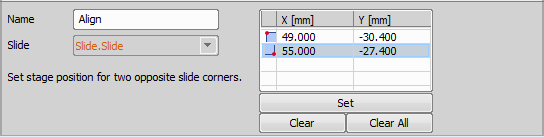
Figure 1279.
Name of the Align Slide task.
Select slide for alignment.
Uses the stage coordinates as corner points used for alignment of the slide.
Removes the selected coordinate.
Removes all coordinates used for slide alignment.
Note
Slides can also be aligned globally using HCA/JOBS > Slide Holder > Align Slide Holder. This alignment is saved into the database and applied on new slides automatically.
Slides with covered corners
If your slide is mounted to the stage in a manner that its corner(s) are not visible in the Live View, it is impossible to align it using the predefined slides from the database. In this scenario there are two options:
Slide Loader Communicates with the slide loader connected to your system. Put this task to wizard to initialize the slide loader and scan hotels for slides just before the experiment begins. | Requires: Device: Slide loader Module: |
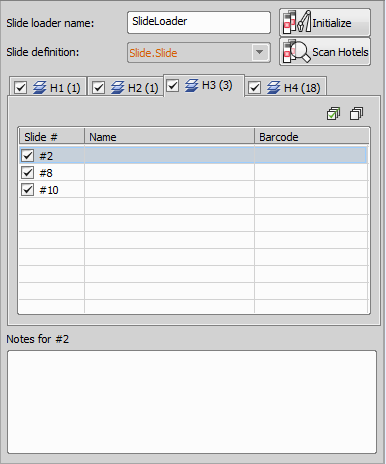
Figure 1280.
Dialog Window Options
Name of the task.
Initialize (Re)initializes the connected slide loader.
Scan Hotels Scans the hotels of the connected slide loader for all available slides.
 Refresh
 Refreshes the slide loader.
Select slide Opens a dialog window defining the slide model used in the slide loader.
 Hotel tabs
 Each hotel tab represents a hotel of the connected slide loader. Slides contained in the selected hotel are listed below. The slides and hotels with a selected check box are used throughout the job.
 Select All
 Selects all slides in the hotel.
 Clear Selection
 Deselects any checked slides in the hotel.
Position of the slide in the hotel.
Name of the slide.
Barcode of the slide.
More notes for the selected slide.
 Manual Slide List
 Specifies the list of slides to be used in a loop over slides. These slides have to be changed manually. Assign names and barcodes to slides in an ordered list. This information will be included in the experiment results. | Requires: Module: |
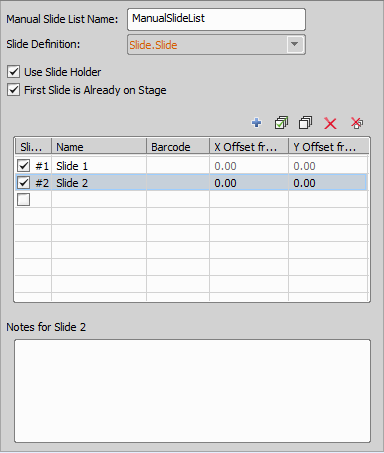
Figure 1281.
Name of your manual slide list.
Select the slide definition (Sample Holder > Define Slide).
If using a multi slide holder, you can adjust the slide XY offset from the first slide in the table.
Check this option if your first slide is already on stage.
 Add New Slide
 Adds a new slide into the table.
 Remove
 Removes the selected slides.
 Remove All
 Removes all slides from the table.
Automatic sequence number of your slides.
Name of your single slides.
Here you can enter your own barcoding for each slide.
X axis offset from slide 1.
Y axis offset from slide 1.
In the blank window below the slide ordered list you can fill out any other information about each of your currently selected slides.
 Loop over Slides
 Runs the contained tasks on each slide of the specified slide list. Analyze all slides in the list and perform high-magnification capture on the ones meeting the defined condition. | Requires: Module: |
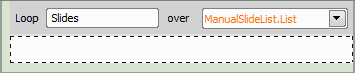
Figure 1282.
Name your slide loop.
Choose a slide list from your current job.
 Advanced Loop over Slides
 This task can be used to fully control the procedure when working with a slide loader. Objective clearance (escape Autofocus + Focus Surface > Typically the job runs through all slides in the loader and assigns some information to them. For example, an analysis (Analysis > | Requires: Module: |
 Escape Z
 Refocus Z
 General Analysis
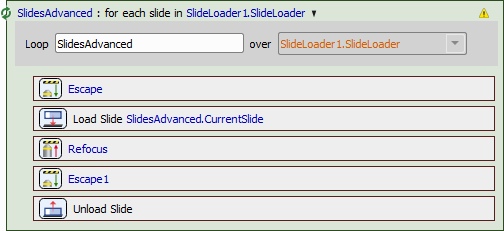
Figure 1283. Manual slide loop procedure respecting the objective clearance, similar to what the Sample Holder > Loop over Slides task does automatically.
Name of the task.
Defines the slide loader containing slides over which the inner tasks will be executed.
 Load Slide to Stage
 This task loads the current slide from a slide loop onto the stage. See Sample Holder > | Requires: Device: Slide Loader Module: |
Name of the task.
Selects a slide loop.
 Load Slide from Stage
 This task unloads the current slide from a slide loop from the stage. See Sample Holder > | Requires: Device: Slide Loader Module: |
Name of the task.