
Place it inside the Well Plates >
 Loop over Wells task and than use the Optical Configurations >
  Aggregate Auto Signal.ai Results to set acquisition parameters for the whole well plate.
Place it inside the Acquisition >
 Loop over Components to set acquisition parameters for each channel of a Acquisition >
  Capture Definition task.
 Select Optical Configuration
 Switches the system to the selected optical configuration. Use this task to make arbitrary changes on automated devices such as changing the camera settings, switching objectives, etc. |
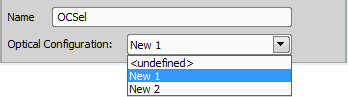
Figure 1354.
Choose one of your optical configurations to be activated.
 Auto Brightness
 Automatically adjusts the brightness settings (exposure time, gain, ... ) based on the parameters of the captured image. Benefit from the captured image and use it to automatically adjust the brightness settings for the rest of the job. |
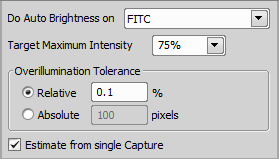
Figure 1355.
Select the Optical Configuration on which auto brightness will be performed.
Determines intensity of the lightest pixel in the resulting image. It is computed as a percentage of the camera bit-depth. For 8-bit cameras, the Target Maximum Intensity of 75% would be 255 x 0.75 ~ 191.
Specifies number of pixels which will be ignored when computing the Target Maximum Intensity. For example, if your camera has one or more defective pixels which gives constantly the maximum value (white), these pixels shall be excluded from the calculation. Define the tolerance either as percentage of all pixels (Relative) or Absolute by specifying their number.
Estimates the values needed for Target Maximum Intensity from a single capture.
 Auto Signal.ai
 Uses AI (artificial intelligence) to find an ideal camera exposure time and illumination power on the captured image and stores the brightness settings into a Well Selection or Point Set. |
Select the capture definition to which the exposure time and illumination power will be set. <current settings> just runs the task and does not save the result anywhere.
Select whether where to assign the result (e.g.: to the current well within the Well Plates > Loop over Wells task). <current position> just runs the task and does not save the result anywhere.
Prefers fast exposure times.
Prefers image quality (longer exposure times).
Percentage of the available intensity range allowed in the image. Higher intensities will be considered as over-illuminated. For example, if the value is set to 50% for 8-bit images, any intensity higher than 128 is over-illuminated.
The acceptable percentage of over-illuminated pixels in the image.
Aggregate Auto Signal.ai Results Aggregates results of the Optical Configurations > Is used in combination with Optical Configurations > | Requires: |
The well selection for which to calculate the exposure and illumination power.
Number of wells where over-illumination is acceptable. A well is over-illuminated if the Over-illuminated pixels limit [%] setting of the Optical Configurations > Auto Signal.ai is exceeded.
 Set Exposure to Optical Configuration
 This task assigns the desired camera exposure to an optical configuration selected from the drop-down menu. Use this task in a job to quickly switch between different camera exposures on the same optical configuration. |
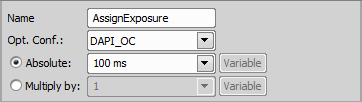
Figure 1356.
Name of this task.
Select an optical configuration to which the exposure time value will be applied.
Absolute exposure value.
Relative multiplier of the existing value in an optical configuration.
Specify the exposure value by selecting a global value.
 Adjust Camera Settings Manually in OC
 This task is useful for changing camera settings during a job run. Use this task in a job sequence to pop-up a maximized live window on your second monitor to comfortably adjust the camera settings. |
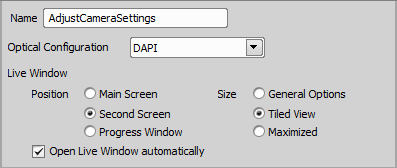
Figure 1357.
Name of this task.
Select optical configuration which will be used during the job run.
Choose where the Live window will be placed. Three options are available: Main Screen (main monitor), Second Screen (second monitor) and Progress Window (embeds into the Progress window).
Select the size of the Live window. General Options is the default size set in NIS-Elements options. Tiled View rearranges your opened windows together with the Live window to form a tiled layout. Maximized fully maximizes the Live window.
Check this option if you want to launch the Live window automatically. If you want to turn this window on manually, leave this check box empty and click the  Live button inside the Job Execution Progress window after running the job.
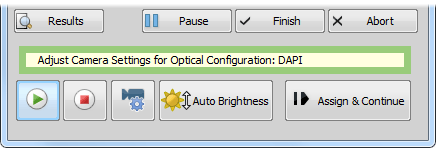
Figure 1358. Bottom part of the Job Execution Progress window
When you execute the Job, more options appear at the bottom of the Job Execution Progress window:
Live window Turns on the Live window as defined in the Optical Configurations > Adjust Camera Settings Manually in OC task inside Job Definition.
 Freeze Live window
 Freezes the Live window.
 Camera settings
 This control opens the Camera Settings dialog window.
Auto Brightness Enables applying automatic brightness (exposure, gain, ...) on the selected optical configuration.
 Assign & Continue
 Clicking this button assigns the current camera settings to the selected optical configuration and continues in the job progress.
 Assign Camera Settings to Point/Well
 Takes camera settings from a selected optical configuration and applies it to a selected row, column, well or point. Let an analysis mark which wells are interesting to be inspected in detail and assign a prepared camera settings to them. | Requires: |
 Loop over Points

Figure 1359.
Name of this task.
Select optical configuration from which the camera setting is taken for the assignment.
Select to which you want to assign the camera settings and specify the selection in the last combo box.
 Interpolate Exposures between Wells
 This task interpolates/copies exposure values from wells with known values (e.g. assigned by Optical Configurations > When capturing fluorescence images on a well plate using dilute solutions or suspensions, fluorescence intensity may decrease linearly. Exposure time and other parameters can be adjusted only on the first and last well of the dilution range - manually using Optical Configurations > | Requires: |
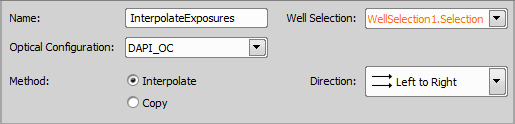
Figure 1361.
Name of this task.
Select the desired Well Plates >  Select Wells task.
Choose the desired Optical Configuration used.
Choose one of the methods - Interpolate calculates interpolation between two wells with known exposure and applies the new values between these two, whereas Copy copies known values to all ongoing unknown values.
Specifies the direction of Interpolating/Copying. Left to Right goes from left to right on each well plate row, Top to Bottom goes from top to bottom on each well plate column.
 Close Shutter
 Closes the shutter specified within the task. Select one of the shutters available in the system. Use this task in the job whenever a selected shutter needs to be closed. | Requires: Device: Shutter |
 Open Shutter
 Opens the shutter specified within the task. Select one of the shutters available in the system. Use this task in the job whenever a selected shutter needs to be opened. | Requires: Device: Shutter |
 Set Brightfield Acquisition
 Sets acquisition settings to the hardware according to the settings defined in the Devices > Service Settings Use this task in the job before the Well Plates > |
 Continuous Scan of Well Centers
There are different values defined for each use case in the Devices > Service Settings  window. Select which one will be used.
On multi-camera systems, one of the cameras is selected to be used for overview scanning at the top of the Devices > Service Settings window.
Use the camera selected at the time the job is run.
Use the camera selected for overview scanning.
Load acquisition settings for the objective which will be active at the time the job is run.
Load acquisition settings for the selected 4x objective.
 Set Brightfield Acquisition 4x
 Sets acquisition settings to the hardware according to the settings defined in the Devices > Service Settings Use this task in the job before the Well Plates > |
On multi-camera systems, one of the cameras is selected to be used for overview scanning at the top of the Devices > Service Settings window.
Use the camera selected at the time the job is run.
Use the camera selected for overview scanning.
Load acquisition settings for the selected objective.
 Select Objective
 Sets the nosepiece to the position of the selected objective. Place this task before the Optical Configurations > |
A list of objectives currently assigned to nosepiece positions.
 Select Capture Definition OC
 Selects an optical configuration assigned to a single channel within the Acquisition > Place it inside the Acquisition > |
Select “CurrentLambda” of the ancestral Acquisition > Loop over Components loop to select the OC for capturing the current channel.
 Set Startup Fluorescence
 Sets exposure time and light power to the hardware according to the Startup Fluorescence option defined in the Devices > Service Settings Use this task in the job before the Optical Configurations > | Requires: |
Select the Acquisition > Capture Definition task where the startup fluorescence shall be set.