


 Generate Points
 Creates a pattern of XY points on the selected sample. Used with quantitative/statistical methods to detect objects in a large number of “randomly” scanned frames. | Requires: Task: Well Plates > Module: |
 Define Slide
 Define Stage Area
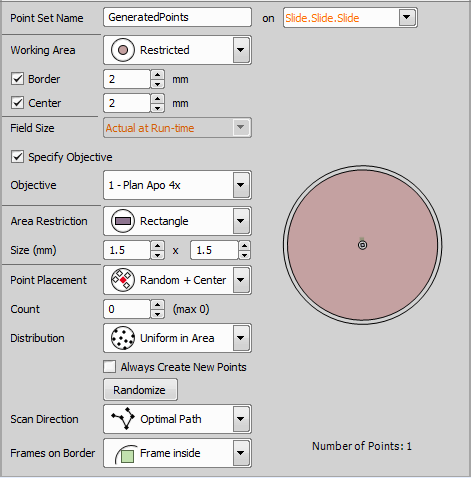
Figure 1287.
Main settings of this task are described below, however some settings enable advanced adjustments (e.g. size, distance, count, ...). These functions are self-explanatory and are clearly depicted in the preview area.
Type the name of your point set.
Select on which sample holder to generate the points.
Define the working area of the sample holder.
Actual at Run-Time uses the field of the currently used objective. Points are generated using the objective set right before the job run. Custom can be used to select a specific objective from the combo box which is then always used for the point generation. If a Acquisition >  Triggered Experiment task is defined, its field size can be selected here.
If checked, an objective can be selected from the drop-down menu defining the used field size.
Objective to be used for generating points.
If multiple cameras are connected, select the one to be used with this task.
Specify the restriction inside the working area.
Choose one of the point placement methods listed. Manual method enables the user to add points by clicking into the preview area. Created points can be moved using the primary mouse button. Right-clicking deletes the point below the cursor.
If Point Placement is set to Random, Random+Center or Manual, Random scan direction scans in the randomized order whereas Optimal Path scans points in the most effective order.
If Covering or Regular Pattern point placement is selected, Meander scans in a winding manner and Left to Right scans row by row from left to right.
If Point Placement is set to Spiral, options in the Scan Direction combo box specify the direction of rotation (ClockWise/CounterClockWise) and heading from/to the center (Outwards/Inwards).
Specify whether the frames on the border of the restriction area are touching the border, completely inside or having a center inside.
In Covering mode you can select the frame Overlap amount in percent.
For well plate loops, check the Auto option to set the optimal overlap to cover the rectangle inside the well automatically. To maximize the coverage to the edge of the well, combine the Auto option with the Frame inside option.
Set the number of points you want to generate. The maximum number is indicated in the bracket.
Uniform places points evenly and Prefer Center places most of the points into the center of the restriction area.
There is always a new point set generated whenever the task is performed.
Regenerates your random points.
 Predefined Points
 Specifies a list of XY points on the selected sample manually in a tabular way. Used for fixed samples. Find interesting scenes with a joystick and add them to the table one-by-one. | Requires: Task: Well Plates > Module: |
Please see Multi-point Acquisition for details about points predefining. There are some additional options available within the JOBs module:
Displays the Z-Stack definition column with the  Z-stack definition button enabling to define a Z-Stack for the currently selected point.
Displays the Camera column with the  Redefine Camera Setting button enabling to adjust the camera settings (please see: Optical Configurations >
  Adjust Camera Settings Manually in OC).
Displays the ROIs column with the  button. Click this button and draw ROI(s) for the selected multi-point.
Labels defined in Well Plates >  Label Wells task can be assigned to each multi-point. Select a label from the pull-down menu in the Label column.
Select the device for stimulation.
If checked, Laser Power Setting dialog window appears when drawing stimulation ROIs. This window defines the power of each laser line on each stimulation group. Each point from a MultiPoint experiment can carry a different definition of ROIs or laser lines and laser powers.
Any previously drawn stimulation ROIs (drawn by clicking or during Runtime) are cleared if this option is checked.
Note
The maximum number of generated points is limited to 30 000. For random points this limit is set to 1500. If you need to change this limit, run a job with the Stage XY Points > Predefined Points task, then open the Windows Registry Editor, search (Ctrl + F) one of the following functions: GeneratePoints_MaxPointCount
GeneratePoints_MaxRandomPointCount
and modify the esrData decimal value to a new value. Then click .
Creates an empty point set. Points shall be added to it later either by Stage XY Points > While looping an existing generated point set, only interesting scenes are added to the empty point set for later use. | Requires: Module: |

Figure 1288.
Name your point set.
 Loop over Points
 Runs the contained tasks on each XY point of the selected point set. Used for capturing XY(Z) nd2 files. | Requires: Task: Stage XY Points > Module: |
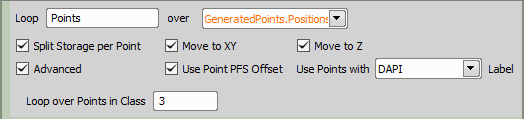
Figure 1289.
Name your point loop.
Select one of your active point tasks to be looped (Stage XY Points > Generate Points, Stage XY Points > Predefined Points, Stage XY Points > ![]() New Point Set).
New Point Set).
This option influences how the system stores the captured data on the disk. If checked, separate ND2 file will be created for each point.
If checked, the stage is moved to the XY points.
If checked, the Z-drive moves to the Z position assigned to the current well (e.g. Z value found by Autofocus + Focus Surface >  Autofocus during the first Well Plates >
  Loop over Wells).
Each point can be assigned to a class (by an expression). If you select this option, the Loop over wells in class field appears. Type the class number to which the current loop will be applied.
These options tells the system to set Z drive to a position previously assigned to the current point.
If you select a label defined by the System >  Create Labels task, the tasks inside Loop over Points will be executed only on points marked with this label.
 Move to Point
 This task can be used inside a point loop to move to a XY/Z position of a point. If a condition is met, move the motorized stage to a specific point. | Requires: Module: |
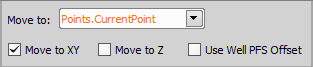
Figure 1290.
Defines in which point loop the movement will be performed.
Moves to the XY coordinates of the point.
Moves to the Z coordinate of the point.
PFS Offset of the well is incorporated into the movement.
 Move to Previous/Next Point
 Moves the XY stage to the previous/next well. When placed in runtime, the user can move to the previous/next point to check the procedure. | Requires: Module: |

Figure 1291.
Name of your task.
Select the point from which you want to move.
Specify the moving distance to the previous/next point.
Choose the direction you want to move.
 Offset Point Set
 This task can correct the XY offset between objectives. Used to offset all XYZ coordinates of the current stage position or of the selected point set. | Requires: Module: |
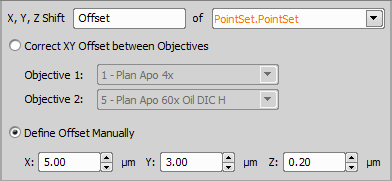
Figure 1292.
Name of the task.
Is used to select a point set (Stage XY Points > Generate Points, Stage XY Points > Predefined Points, Stage XY Points > ![]() New Point Set) or the Actual Stage Position to be shifted.
New Point Set) or the Actual Stage Position to be shifted.
If checked, XY correction between objectives is performed using the two objectives specified below. Please see Devices > Objectives XY Offset Setup for more information.
Specify distances of the manual shift in all three axes (X, Y, Z).
 Add Point to Point Set
 Adds a named XY point to the selected point set. Current XY position is used. Pause the job to manually find an interesting XY position using the joystick and include this point in the analysis. | Requires: Module: |

Figure 1293.
Name your new point.
Select a point set to which you want to add a new stage point.
 Remove Point from Point Set
 Removes the current XY point from the selected point set which is used in a point loop. Use this task in an XY point loop to remove points which are not useful for further analysis (e.g. do not produce any image signal). | Requires: Module: |

Figure 1294.
Select an active point loop from which your point will be removed.
 Add/Edit Points Manually
 Waits for the user to add or edit points to the selected point set manually during the runtime. May be used to check focus and offset the point set if needed. | Requires: Module: |

Figure 1295.
Enter the name of your manually defined points.
Check this function if you want to embed the Edit Points window into the bottom of the Job Execution Progress window.
Select a point set which you want to edit manually.
 Append Point Set to Point Set
 Appends points from a selected point list into another selected point list. Append interesting points to a list on which a high magnification capture will be made. | Requires: Module: |

Figure 1296.
Name of your task.
All points from this list will be appended.
Defines to which point list will the points selected from the first combo box be appended.
Removes all points from the selected point list. If the user decides to clear the point list e.g. because of an incorrect sample. | Requires: Module: |
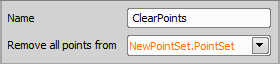
Figure 1297.
Name of your task.
Select the plate list which will be cleared.
 Export Point Set to ND
 Exports the selected point set definition to the ND Acquisition window. Find points of interest using a complex job and use them later in ND Acquisition. | Requires: Module: |
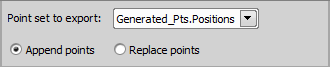
Figure 1298.
Select the point set you want to export to the XY tab of the ND Acquisition window.
Adds new generated points to the the XY tab of the ND Acquisition window right behind already existing points.
Replaces all existing points in the XY tab of the ND Acquisition window by newly generated points.
 Import Point Set from ND
 Imports the multi point definition from the ND Acquisition window to the selected point set. The existing point set settings will be overwritten. Use the multi points created in ND Acquisition to run a complex job. | Requires: Module: |

Figure 1299.
Select a point set to which data from the ND Acquisition window will be imported.
Adds newly generated points to your selected point set behind already existing points.
Replaces all existing points in your point set by newly generated points.
 Get Current XY Position
 Retrieves the current XY position of the stage device. Use the retrieved XY value to move the stage to this position later on in the job. | Requires: Module: |
 Move to XY Position
 Moves the stage to the previously remembered position. Use the retrieved XY value to move the stage to this position later on in the job. | Requires: Module: |
 Set XY Speed/Accuracy
 Sets the stage speed so that different speeds can be used throughout the job. Use a slower stage speed to prevent the sample shift and get stability for the PFS during acquisition. Then use faster speed when changing samples to reduce the total acquisition time. | Requires: Module: |
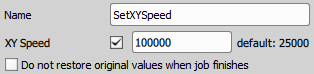
Figure 1300.
Name of your task.
Select the check box and enter a new speed value of the stage. Otherwise the default value will be used.
Select the check box and select a different value to be used. Better accuracy (lower value) usually results in longer movement times. If you select the Open value, the stage position will not be corrected at all. It is the fastest but least precise option.
If selected, default speed and accuracy values are set after the job is finished.
 Import ROI From Sample Navigation
 Imports ROI data from the View > Acquisition Controls > Sample Navigation |
