If the application does not run as expected and you do not know how to fix it, the best way to start solving this problem is to send a LOG file to your technical support specialist. Correct procedure of obtaining and sending log files is described in the subchapters.
Start NIS-Elements.
Select
 Help > Enable Logging.
Select
Help > Log Per Session.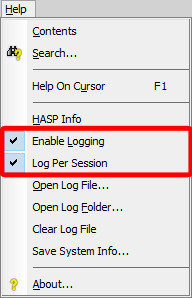
Figure 254.
Close NIS-Elements.
Start NIS-Elements again and reproduce the issue you want to report to Technical Support (techsupp@lim.cz)
Note
Please, try to create a log file regarding the reproduction of the issue. If you send many log files or all the log files from the Platform folder it is very time consuming to analyze them and find an appropriate sequence.
If NIS-Elements is still properly working after the problem was reproduced, go to
Help > Open Log Folder and save the log file to the desired location. Then just attach this file to the e-mail with the description of the problem.If an application error occurs, go to the location
C:\ProgramData\Laboratory Imaging\Platform\Logfilesusing Windows Explorer or any other file manager and attach to the e-mail the latest log file with the “.log” extension and also the latest file with the “.bin” extension if available.Note
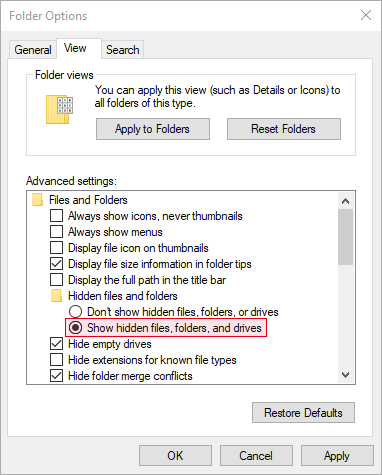
The folder ProgramData is hidden by default. To unhide it, please follow the steps described here: Displaying hidden files in Microsoft Windows 10.
Navigate to the hidden folder
C:\ProgramData\Laboratory Imaging\Platform\Logfiles. All the log files use the same naming convention: lxapp_YYYY-MM-DD_(CNTR).ext.Example 6. Log file name example
lxapp_2012-09-18_(0004).log
Description of the naming convention and the example:
lxapp – prefix
2012 – year (YYYY)
09 – month (MM)
18 – day (DD)
(0004) - counter (CNTR)
log – file extension (ext)
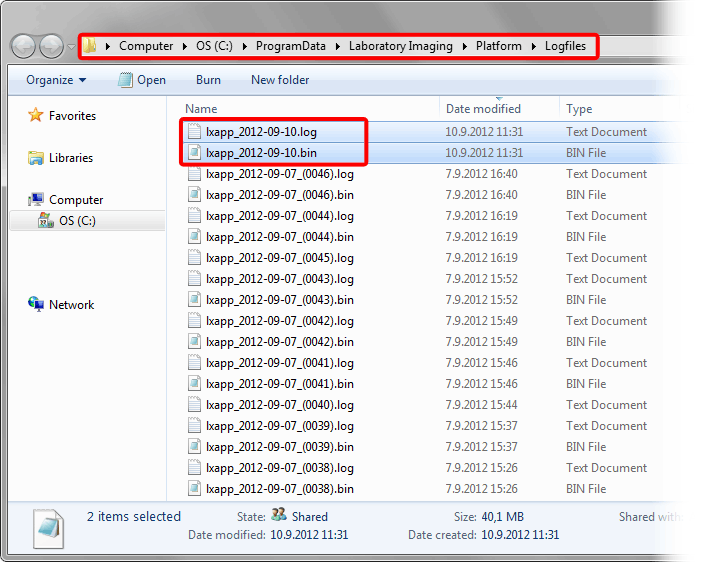
Figure 255. Example files
Find the two following files:
latest .LOG file named: “lxapp_YYYY-MM-DD_(#session).log”
latest .BIN file named: “lxapp_YYYY-MM-DD_(#session).bin”
Note
Choose the correct files named according to the date with the highest counter.
Send these two files to your Technical Support (techsupp@lim.cz).
Note
The .BIN file is created only during ND acquisition and other specific procedures, therefore if the .BIN file is not available, send the .LOG file only.
To enable communication logging between devices and NIS-Elements follow these steps:
Unzip the Devices_communication_logging.zip available here.
Browse to the unzipped files and double-click on the
Enable_communication_logging.regto turn the communication logging function ON.Follow steps from the first chapter of this document: Application LOG files.
When done with communication logging, double-click on the
Disable_communication_logging.regfile to turn this function OFF.Note
The device communication log file is specific to the particular device and contains more details than the application log file. It is saved into the Logfiles folder, closely described here: How to choose the latest log files.
To get the LOG file for Hamamatsu camera devices follow these steps:
Unzip Hamamatsu_communication_logging.zip available here.
Browse to the unzipped files and double click the
Enable_Hamamatsu_logging.regfile, click Run and Yes to enable logging.Run NIS-Elements.
Open your windows explorer and find
dcampsy.logfile in the root of your C: drive.Note
If you can't see it, set your windows explorer to show hidden files (described here: Displaying hidden files in Microsoft Windows 10).
Send the
dcampsy.logfile to Technical Support (techsupp@lim.cz).Double click the unzipped
Disable_Hamamatsu_logging.regfile, click Run and Yes to stop logging.Note
The
dcampsy.logfile is generated automatically (and overwritten) with every start and deleted after closing the NIS-Elements application.
Warning
Native Andor SDK2 logging is enabled since SDK2 2.102.30003.0, distributed with NIS-Elements version 5.11.01 and higher.
To get the LOG file for Andor camera devices follow these steps:
Download the detector.zip file containing the detector.ini file.
Unzip the file to the NIS-Elements installation folder (e.g.: C:\Program Files\NIS-Elements).
Run NIS-Elements and duplicate the issue in the most straightforward way.
Close NIS-Elements.
Each time the NIS-Elements application communicates with the Andor CCD camera a new file named andorsdk2.log is generated. You can locate this file in the TEMP folder (C:\Users\[user.name]\AppData\Local\Temp). If a user types %TEMP% in the Windows Explorer address bar, it will redirect them to the user's personal temp folder.

Figure 256. Type in %TEMP% in the Windows Explorer address bar and press ENTER.
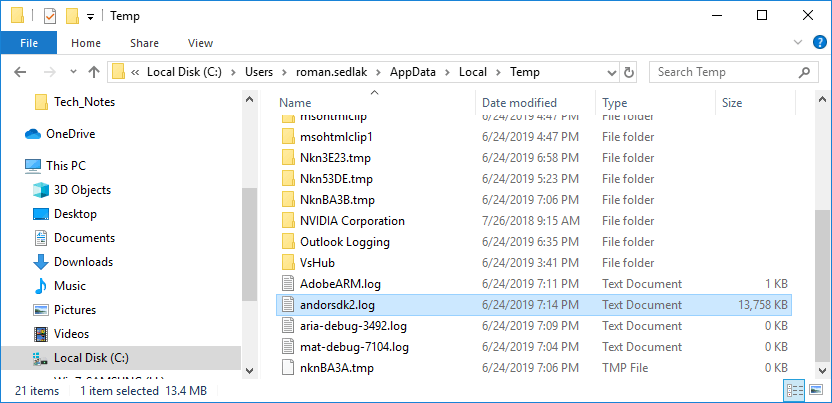
Figure 257. Temp folder for the user roman.sedlak, where andorsdk2.log file is located.
The andorsdk2.log file will contain all SDK2 calls and their corresponding error codes. It will be overwritten each time the NIS-Elements application is run.
Nikon Ti2 microscope SDK log files are saved into C:\ProgramData\Nikon\Shared\Data\Ti2\Log. All other Nikon microscope and Nikon device SDK log files are saved to C:\Users\user.name\AppData\Roaming\Nikon\Shared\Data.