

Figure 157. A Time-lapse image.
When an ND2 file is opened, its structure is pictured at the bottom of the image window.
There is a time line with all captured images indicated by gray markers. The blue-highlighted marker indicates the currently observed image frame. You can browse the ND2 file by clicking inside the time line.
Below the time line, loops of each dimension are indicated by blue rectangles.
Note
In case of a simple single channel time-lapse ND2 image, one time loop = one image frame = one blue rectangle.
Each dimension can be browsed frame-by-frame or you can use the playback controls on the right side.
In specific cases the ND2 file control bar looks differently.
If the number of channels exceeds 10, the image is considered to be a spectral image and a lambda dimension is displayed instead of the standard channel tabs.

Figure 158. T/Z/multi-channel image containing 11 channels and the time line hidden

Figure 159. HDR multi-exposure image

Figure 160. Multi-channel image containing 11 channels
Playback Controls
 Stop Playing
 Previous Position (Left),
  Next Position (Right)
 First Frame,
  Last Frame
 Decrease Playing Speed,
  Increase Playing Speed
 Home Position
Tips
Detailed info about dimensions will be displayed after you click the leftmost button of the control bar (T>, Z>, ...).
Place the cursor over one of the dimensions. A tool-tip which displays statistics of the dimension appears.
Playing options
Right-click the speed bar to display the following context menu and select the playing mode.
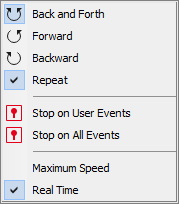
Figure 161.
 Back and Forth,
  Forward,
  Backward
 Defines the direction how the image sequence will be played.
Sets the repetitive infinite playback.
 Stop on User Events
 When you select this option and then press the  Play Sequence button, a dialog window appears once the first user event is reached. The dialog window displays information about the reached user event. Use the Continue button to continue playing to the next event, or press the Stop button to stop the playback at the current frame. Within the window, you can also select the Do not ask again in this session (Always stop) option. Playing will then stop automatically on every user event but the window will not be shown.
Stop on All Events Works as the stop function described above but stops the sequence on all types of events (events inserted from a macro, autofocus, stimulation, pause, etc.).
This command corresponds to the  button described above.
This command corresponds to the  button described above.
There are several views which can display the ND2 files in various ways. Some views are available for some dimensions only. If a view is available for two or three dimensions of the ND2 file, a pull-down menu appears in the top image toolbar. There you can select the dimension to be displayed.
Note
When you switch the view, a new image window opens by default. This behavior can be changed within the  Edit > Options
  command window so that only one view of an image will be opened at a time.
 Main View
 Slices View
 (requires: Extended Depth of Focus)
This view displays orthogonal XY, XZ, and YZ projections of the image sequence. (Requires Z or T dimension)
Figure 163. Slices View
Information about current frame of an ND2 document or live image can be displayed using the Show ND Information command from the image contextual menu. It displays information about current frame of the ND2 document or live image. All possible information (metadata) are displayed by default.
You can edit which information is displayed in the Label Properties dialog window. Right click the ND2 information field and select ND Info Properties.... Select displayed features from the Available ND information area and use the button to insert them into the ND information text scheme area which defines the visible information. Use Format options tools to specify the data format (e.g. numeric precision, date format, etc.) and adjust the text appearance in the Text Box tab. Always show Acq. Time forbids removing the Acquisition Time information from the ND information text box.
To view the physical zoom of your image (how many times the image is magnified on your monitor compared to the real dimensions of the calibrated sample), click on Show Physical Zoom in the context menu over your image. The magnification is placed as an overlay information in the corner of your image.