
A layout in the context of NIS-Elements is a set of options describing the arrangement of control panels, tool bars and menu items.
To Create a New Layout
Run  View > Layout > Layout Manager to display the Layout Manager. The list of currently available layouts is placed on the left side of the layout manager. Each layout may contain information about controls, toolbars, menu, and commands to be performed when switching between layouts.
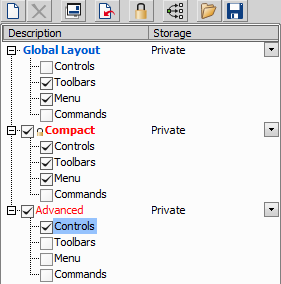
Figure 39. List of Layouts
Modifying the Layout Settings
Select items within the Global Layout list which you want to be shared by all layouts.
The check marks on the left of the layout names indicate the layout visibility. Select the ones you want to display in the application status bar.
If an item within some particular layout is not selected, it means you do not want to customize it and the global settings - if selected within the Global Layout - will be used. If the item is not selected within the Global Layout either, the settings of the most recently active layout will be used.
Set whether the layout is Private or Shared. If set Private, it will not be visible for other users. See User Rights.
Customize each item according to your needs (see below).
Note
When upgrading to NIS-Elements version 5.30, only the modified layouts from the older version are loaded into the new Layout Manager.
Making a Layout Default for All Users
Create the layout you would like to propagate to all NIS-Elements users.
Right-click the command name and select the Propagate this layout to command (you can choose either to All Users, or to a specific Group).
Restart NIS-Elements.
Note
No apparent change will be visible in the Layout Manager after propagating the layout. However, after the software is restarted, the layout will be present.
Caution
Users who have the privilege to Modify shared layouts can remove the layout via a context-menu, but this action will also affect all users!
Layout Manager Tools
Right-click a layout name to display this command and select a group of users. When the software starts, the layout will be activated for users of the selected group.
 Create Layout
 Remove Layout
 Set Layout as Active
 Load Default
 Loads original settings of the selected pre-defined layout (Full Screen, Docked Controls, Measurement) so that it looks just like after the program installation.
 Lock Layout
 Select a layout component and click this button to lock these elements so that they cannot be moved or closed. To unlock these components, click the button again or right-click the locked layout tab at the bottom and click Unlock Layout.
 Apply to All
 Changes made on the currently edited layout are applied to all other layouts using this button. Global layout is not affected however changes made on the global layout are applied to other layouts.
 Import Layouts
 Export Layouts