
Some image analysis data and measurement results can be transferred out of NIS-Elements so they could be used further. There is a standard Export pull-down menu in some of the control panels (intensity profile, histogram, measurement, etc...) which enables the export.
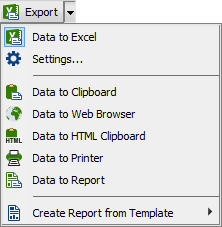
Figure 266.
The set of commands of the menu differs according to the type of data (tables or graphs) which can be exported. Click the arrow button to display the pull-down menu. When you select the destination, the pull down menu hides and the icon of the selected export type appears on the Export button. The export action is performed after the button is pressed once more.
It is possible to export tabular data or a graph:
(requires: MS Excel) Tabular data can be exported to MS Excel. A new XLS sheet opens and the table is copied to it automatically. There may be also the Export All To Excel option, which copies the data table, measurement table, and the graph image into Excel at once.
Tabular data can be exported to an MS Excel sheet (.xls) or a text file (tab delimited .txt).
Graphs can be saved as a *.bmp image file. A save as dialog appears each time so you can name the file properly.
Data tables and graphs can be exported (copied) to MS Windows clipboard. Then the data or the image can be inserted into any appropriate application (text editor, spreadsheet processor, graphics editor) typically by the Paste command.
Some tabular data can be exported as a HTML table. It can be displayed in a default Internet browser (the Web Browser option), or the HTML code can be copied to Windows clipboard - ready to be inserted to any HTML/text editor.
Tabular data can be printed directly. This option opens a standard Print dialog window where it is possible to select a printer and print the data.
Tabular data and graphs can be exported to NIS-Elements report. If a report is already opened for editing, the data/graph will be appended to it. Otherwise, a new report will be created and the exported data inserted to it.
The Create Report from Template option Inserts the result data into an existing report template. Choose an existing report template from the list in the pull-down menu or click on to open a report template file (.rtt) from your hard drive. The report opens and dynamic data are inserted automatically. Then you can adjust the report, save it, print it, or export it to PDF using the menu commands.
If this option is checked, button exports each measured feature into a separate MS Excel sheet.
If this option is checked, button exports all measured features into one MS Excel sheet.
Run the  Edit > Options
  command and switch to the Data Export tab to display the following options:
Global Settings
Select this option if you want to export the data to MS Excel application. You can choose if the data will be exported into currently opened file or a new file will be created. Or you can set to export the data to a specific file. If this file does not exist, it will be created. Choose the path and name of the file to be created/opened.
Set the Start at column values (column and row indexes). These values mark the first cell in the MS Excel application which will hold the exported data.
Select this item if you prefer to export the data to a text file. Press the ... button and specify the target folder and the file name. Below, choose the File type, Data delimiter (character used to separate distinct pieces of data used when exporting data to MS Excel or clipboard) and Encoding.
If you check this item the existing data will not be overwritten by the new data. Column headers will be included with the first export only (if turned on by the next option).
Include the titles of columns in the files which are being created or overwritten. Statistics will not be included.
Data export
You can modify the amount of data included in each export type.The control panels which contain the Export to file functionality are listed in the top pull-down menu. Select the control panel of which the export shall be modified.
A control panel such as View > Analysis Controls > Annotations and Measurements  stores information about the measurement in multiple tables according to the measurement type (area, length, etc.). In this column, you can select the table you would like to modify.