Run the  View > Image > ND View > Volume View
  command to display the current Z-stack as a 3D model using perspective projection.
Select a rotation mode, e.g.
 Free Rotation, in the toolbar.
Drag the volume by the primary mouse button and rotate it.
Click the
 Show bounding box button.
Press the Ctrl key, place the cursor over one side of the 3D model (it gets red) and move the cutting plane.
Use the secondary mouse button to move the model within the screen.
Use the mouse wheel to zoom the model.
The basic workflow is this:
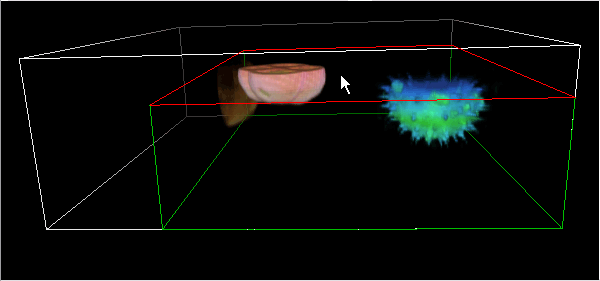
Figure 202.
Tip
Use the Ctrl + Shift + secondary mouse button to move parallel cropping planes at the same time.
Tip
Or, you can enter the cropping mode by selecting the  tool. In this mode, you don't need to hold Ctrl for cropping.
Select one of the “subvolume” buttons on the right tool bar and proceed with the cropping.
Hold Ctrl to select multiple channels.
 Show Axis
 Show Grid
 Shows or hides the graticule. Define visible graticule planes in the Grid & Scale section of the Volume Options panel.
 Show Z Scale
 This button displays/hides the Z scale in the image window. Press the arrow button to open a menu with additional options.
 Show volume dimensions
 This button displays information about the calibration and volume dimensions at the bottom of the image window.
 Show centroid instead of binary
 Displays/hides a centroid for each binary object in the 3D image. Adjust the Centroid size in the nearby pull-down menu.
 Show Movie Maker
 This button runs the Movie Maker application. It enables the user to create AVI movies of the 3D model.
 Show Help
 Displays the help page.
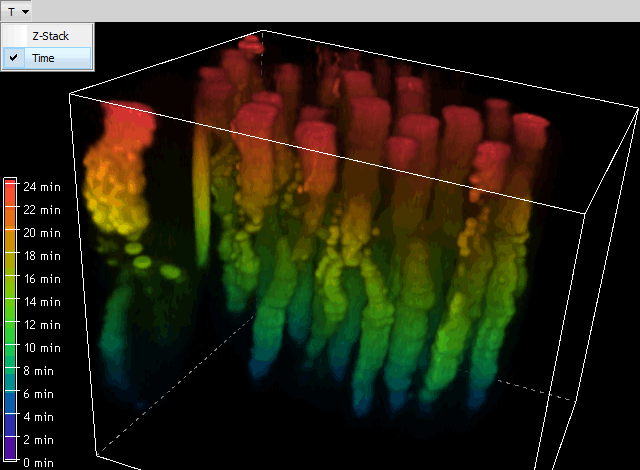
Figure 203. Timelapse displayed using the volume view
Timelapse images can be projected inside the volume viewer to illustrate time displacements. If more dimensions are available, select Time from the first drop-down menu in the Volume Options (Standard renderer) and choose a suitable blending mode. Click 
 to set the first timelapse frame as the highest/lowest one in the sequence.
Note
For renderers other than Optimal, select the time dimension in the first combo box found in the top toolbar.


 , Rotation around the selected axis
 Restricts rotation direction only to the selected object axis.
Display the pull-down menu in the top image tool bar and select which plane will be facing you from the six predefined views (side views and horizontal projections). The Default view is slightly rotated so that the structure of the sample can be overviewed.
Adjusts the Z-step height of the image Z sequence.
Different rendering techniques can be used to display the Z sequence as a volume. Some combinations of the following techniques are available depending on which renderer is selected.
Uses the physical principles of light absorbing so that only the surface voxels are visible.
Alpha blending in combination with the Shaded Volume (see below).
Only voxels with the highest intensity in the observation direction are displayed.
Only voxels with the lowest intensity in the observation direction are displayed.
Accumulates voxel intensities in the observation direction. The result is often over-saturated, therefore you can adjust the display intensity in the  3D Settings window.
A gradient selected in the nearby pull-down menu is used to colorize the volume.
Uses the physical principles of light absorbing and reflectance. The object surface becomes more distinguishable.
Lighting appearance can be changed via the 3D Settings button.
 Anaglyph 3D stereo (left / right eye)
 This button enables/disables the anaglyph 3D view. Press the arrow next to the button to display the menu with possible color combinations (depending on the type of your anaglyph glasses).
 Toggle light visibility
 Press the button to switch the light on. Move the light freely around using the left mouse button. Double-click on the light to pin it to the scene (stays in its place, 3D volume moves) or to the volume (light moves together with the 3D volume). Change the light intensity with the mouse wheel when the cursor is over the light. Context menu over the light can be used to Reset Light Settings.
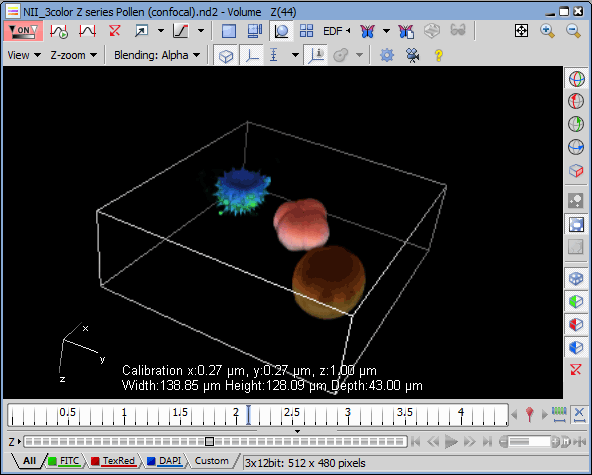
Figure 204.
Click the 3D Settings button on the image toolbar to adjust the settings of the volume renderer.
Note
The 3D Settings button only if you have a high-performance graphic card with DirectX 9.0c support, Shader Model 3.0.
Check this item to display detailed tool tips.
If an advanced graphic card is detected in your computer, this option becomes available. Choose it to make use of the extra capabilities of the card. The resulting image will be nicer and the performance faster.
Note
If this option is turned off, a stripe pattern may appear in the volume render.
This resolution is used for static viewing (which usually allows the highest quality).
This resolution is used when moving with the 3D model.
Choose one of the lighting modes: Balanced, Matte, or Shiny.
Select the intensity of accumulating the pixel values: High, Medium, or Low.
Help Opens this help page.