
(requires: Stage Z axis)
Automatic capturing of images from different focal planes using a motorized Z drive can be performed. Run the  Acquire > Capture Z-Series > Capture Automatically command to display the setup window. There are three different approaches of how to set the experiment:
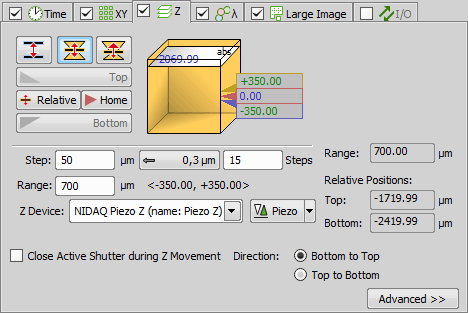
Figure 190.
Note
This mode assigns the Home position automatically to the middle step (e.g. the third step out of the whole 5 steps).  Reset discards the Top, Home, and Bottom position settings.
Depending on the direction of Z-acquisition, the last Z position (top or bottom) may slightly differ from the user settings. However, you can select which position will be preserved exactly. Right-click on one of the buttons ( or ) and select Keep exact Top Position / Keep exact Bottom Position. This setting is indicated by underlining/overlining the button text.
Symmetric mode defined by range
Required value: range.
Run the
 Live camera signal.
Move the Z drive to the absolute home position (center of your Z series) and click
 Home. If you do not know the exact center position yet, you can then switch to
  Relative and the home position will be taken from the current Z position prior to the actual acquisition.
Enter the Range to be captured and then adjust the Step size in µm (distance between adjacent steps, for the recommended value click
 Use suggested step size) or enter the number of Steps to be captured within this range.
Asymmetric mode defined by range
Required values: above position, below position.
Run the
Live camera signal.Move the Z drive to the absolute home position (center of your Z series) and click
Home. If you do not know the exact center position yet, you can then switch to Relative and the home position will be taken from the current Z position prior to the actual acquisition.Specify the range from the home position by entering the Below and Above values and adjust the Step size in µm (distance between adjacent steps, for the recommended value click
Use suggested step size) or enter the number of Steps to be captured within this range.
Enable TIRF by checking the TIRF check box within the Z-Series experiment settings.
At least one value of the Z Pos column of the Multi-channel acquisition setup has to be set to TIRF (see: Multi-channel Acquisition).
When the TIRF system is enabled, the TIRF option appears in the right portion of the window. To set the TIRF position:
If a Piezo Z drive device is connected, the Piezo button appears in the panel. Use the pull-down menu to select the action which will be performed upon pressing the button:
This option moves the Piezo Z drive to the home position, but compensates the movement by the second Z drive in order to keep the original absolute Z position (sum of Z1 and Z2).
Moves the Piezo Z drive to the home position regardless of the absolute Z drive position.
You can define the Z-stack scanning direction - either from Top to Bottom, or vice versa (Bottom to Top).
Two Z devices (Main Z + Piezo Z) can be used for Z-Series acquisition. Z device combination is used automatically if AF/Z-Stack range exceeds the range of Piezo Z. Combining two Z devices speeds up the Z stack acquisition, however the user can still decide whether or not to use the Z device combination. Only the Main Z device is used if it is selected in the Z device combo box. Only the Piezo Z device is used if it is selected in the Z device combo box and the defined Range is within the device range. Combination of both Main Z and Piezo Z is used if Piezo Z is selected in the Z device combo box and the defined Range is bigger than the device range.