
Cameras and devices called “legacy” are no longer officially supported but should work with the current version of NIS-Elements. Drivers for these accessories are still available within the program setup, but are not tested any more.
It is possible to change DS-U3/L3 controller settings. Appearance of the dialog changes according to the currently selected camera head:
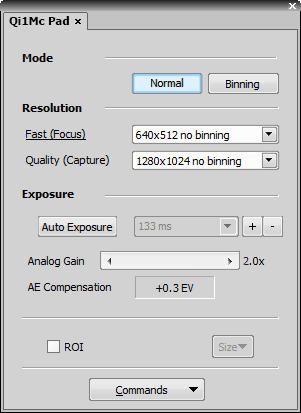
Figure 130. Camera settings - 8bit mode
Select whether to use binning or not.
The binning mode provides considerably enhanced camera chip sensitivity by integrating more elements (pixels) together. E.g.: binning 4x4 integrates the signal from the area of 4x4 chip elements to one pixel of the resulting image. Smaller resolutions and faster frame rates are achieved using the binning modes.
The software provides two resolution presets. The first is used for live image and focusing and the second used for capturing. The formats then differ in image size and in frame rate (number of frames per second - fps). The higher the resolution is, the lower frame rate can be achieved. Available resolutions depend on the camera type.
Note
When switching between the formats while observing the live image, the size of the image on the screen is maintained - the zoom setting is changed instead. Only in some special cases, the behavior changes and the image size is changed instead of the zoom setting which is maintained.
1280x1024 and 640x512 resolutions are available in 8bit mode.
In 12bit mode, 320x240 and 640x480 resolutions are also available.
Automatically calculates the exposure time in order to achieve optimal brightness of the scene. Image quality is the priority, therefore longer exposure times are preferred.
Note
Depending on particular light conditions, the result of auto exposure may not be optimal for image acquisition.
Warning
Under- over-saturation may occur when switching between optical configurations. Please see Using Auto Exposure while Switching between Optical Configurations.
Controls the Gain (Sensitivity) of the camera and strength of the camera analog signal before it is digitized. This setting affects image brightness.
In automatic exposure modes, the compensation affects how optimum exposure settings (Exposure time and Gain) are calculated. The Compensation value is expressed in Exposure Values (EV). Setting the compensation to + 1.0 EV makes the image twice brighter (e.g. doubles the Exposure time or Gain).
Commands > Advanced
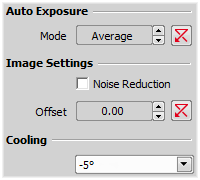
Figure 131. Advanced settings - 8bit mode
If activated, it reduces noise generated by higher gain. NR works on interframe basis so you may notice some shadows on moving objects.
Sets the brightness of the image. It is a constant additive (positive or negative) changing all pixel values of the image. With negative offset value the dark image areas become pure black. Considering fluorescence microscopy, an appropriate offset setting can create continuous black background and thus help to enhance (together with gain or illumination enhancement) the contrast.
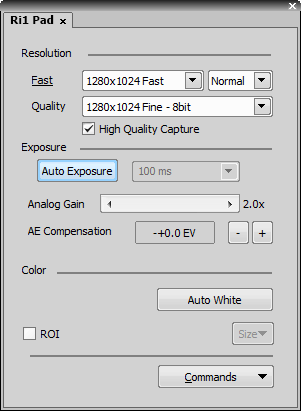
Figure 132.
The software provides two resolution presets. The first is used for live image and focusing and the second used for capturing. The formats then differ in image size and in frame rate (number of frames per second - fps). The higher the resolution is, the lower frame rate can be achieved. Available resolutions depend on the camera type.
Note
When switching between the formats while observing the live image, the size of the image on the screen is maintained - the zoom setting is changed instead. Only in some special cases, the behavior changes and the image size is changed instead of the zoom setting which is maintained.
Select whether to use binning or not in the Fast mode.
The binning mode provides considerably enhanced camera chip sensitivity by integrating more elements (pixels) together. E.g.: binning 4x4 integrates the signal from the area of 4x4 chip elements to one pixel of the resulting image. Smaller resolutions and faster frame rates are achieved using the binning modes.
The High Quality Capture mode is also supported. If the Quality is 16bit or the resolution of pixel shift mode is selected, you cannot uncheck the High Quality Capture check box.
When this option is checked, images are not processed by the camera control unit, but are sent to the computer in a RAW format. The computer then processes the images into the RGB format. This mode produces images with less noise and better color fidelity. Of course, transfer of the RAW data is slower than the normal mode which causes a lower maximal frame-rate.
Automatically calculates the exposure time in order to achieve optimal brightness of the scene. Image quality is the priority, therefore longer exposure times are preferred.
Controls the Gain (Sensitivity) of the camera and strength of the camera analog signal before it is digitized. This setting affects image brightness.
In automatic exposure modes, the compensation affects how optimum exposure settings (Exposure time and Gain) are calculated. The Compensation value is expressed in Exposure Values (EV). Setting the compensation to + 1.0 EV makes the image twice brighter (e.g. doubles the Exposure time or Gain).
Commands > Advanced
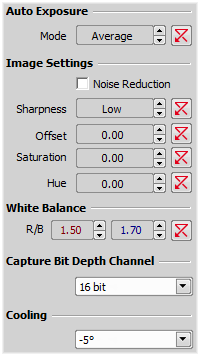
Figure 133.
Defines how the Auto Exposure is performed. Average is suitable for bright field and Peak is better used for dark field.
If activated, it reduces noise generated by higher gain. NR works on interframe basis so you may notice some shadows on moving objects.
Some camera settings provide the sharpness control which affects how sharp edges in the image appear. Too much sharpness leads to over-saturated edges.
Sets the brightness of the image. It is a constant additive (positive or negative) changing all pixel values of the image. With negative offset value the dark image areas become pure black. Considering fluorescence microscopy, an appropriate offset setting can create continuous black background and thus help to enhance (together with gain or illumination enhancement) the contrast.
The amount of saturation determines how colors are rendered. More saturation produces richer colors. Less saturation makes the colors gray.
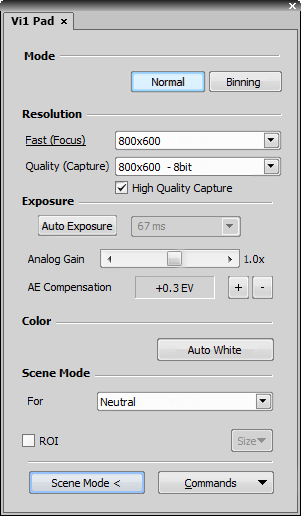
Figure 134. Camera settings
Select whether to use binning or not.
The binning mode provides considerably enhanced camera chip sensitivity by integrating more elements (pixels) together. E.g.: binning 4x4 integrates the signal from the area of 4x4 chip elements to one pixel of the resulting image. Smaller resolutions and faster frame rates are achieved using the binning modes.
The software provides two resolution presets. The first is used for live image and focusing and the second used for capturing. The formats then differ in image size and in frame rate (number of frames per second - fps). The higher the resolution is, the lower frame rate can be achieved. Available resolutions depend on the camera type.
Note
When switching between the formats while observing the live image, the size of the image on the screen is maintained - the zoom setting is changed instead. Only in some special cases, the behavior changes and the image size is changed instead of the zoom setting which is maintained.
When this option is checked, images are not processed by the camera control unit, but are sent to the computer in a RAW format. The computer then processes the images into the RGB format. This mode produces images with less noise and better color fidelity. Of course, transfer of the RAW data is slower than the normal mode which causes a lower maximal frame-rate.
Automatically calculates the exposure time in order to achieve optimal brightness of the scene. Image quality is the priority, therefore longer exposure times are preferred.
Note
Having a DS-L3+Fi1(c)/Fi2 configuration, there are the following restrictions when the Camera ROI is turned ON:
Controls the Gain (Sensitivity) of the camera and strength of the camera analog signal before it is digitized. This setting affects image brightness.
In automatic exposure modes, the compensation affects how optimum exposure settings (Exposure time and Gain) are calculated. The Compensation value is expressed in Exposure Values (EV). Setting the compensation to + 1.0 EV makes the image twice brighter (e.g. doubles the Exposure time or Gain).
Commands > Advanced
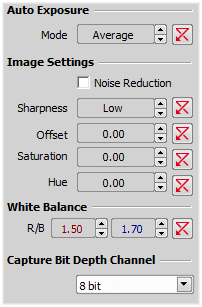
Figure 135. Advanced settings
Defines how the Auto Exposure is performed. Average is suitable for bright field and Peak is better used for dark field.
If activated, it reduces noise generated by higher gain. NR works on interframe basis so you may notice some shadows on moving objects.
Some camera settings provide the sharpness control which affects how sharp edges in the image appear. Too much sharpness leads to over-saturated edges.
Sets the brightness of the image. It is a constant additive (positive or negative) changing all pixel values of the image. With negative offset value the dark image areas become pure black. Considering fluorescence microscopy, an appropriate offset setting can create continuous black background and thus help to enhance (together with gain or illumination enhancement) the contrast.
The amount of saturation determines how colors are rendered. More saturation produces richer colors. Less saturation makes the colors gray.
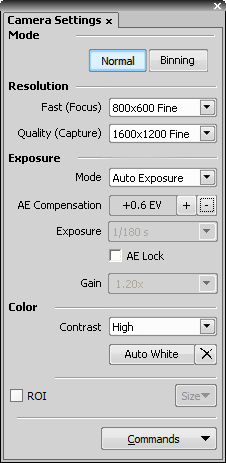
Figure 136.
Select whether use binning or not.
The binning mode provides considerably enhanced camera chip sensitivity by integrating more elements (pixels) together. E.g.: binning 4x4 integrates the signal from the area of 4x4 chip elements to one pixel of the resulting image. Smaller resolutions and faster frame rates are achieved using the binning modes.
The software provides two resolution presets. The first is used for live image and focusing and the second used for capturing. The formats then differ in image size and in frame rate (number of frames per second - fps). The higher the resolution is, the lower frame rate can be achieved. Available resolutions depend on the camera type.
Note
When switching between the formats while observing the live image, the size of the image on the screen is maintained - the zoom setting is changed instead. Only in some special cases, the behavior changes and the image size is changed instead of the zoom setting which is maintained.
Exposure mode determines how the Exposure time is calculated. Usually, the user can select between the automatic and the manual mode:
In automatic exposure modes, the compensation affects how optimum exposure settings (Exposure time and Gain) are calculated. The Compensation value is expressed in Exposure Values (EV). Setting the compensation to + 1.0 EV makes the image twice brighter (e.g. doubles the Exposure time or Gain).
Exposure time is the time of charge accumulation in a camera chip between two adjacent frames. Prolonging the exposure time increases brightness of the image as well as its quality (there will be less noise).
Commands > Advanced Settings
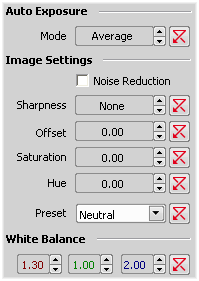
Figure 137.
If activated, it reduces noise generated by higher gain. NR works on interframe basis so you may notice some shadows on moving objects.
Some camera settings provide the sharpness control which affects how sharp edges in the image appear. Too much sharpness leads to over-saturated edges.
Sets the brightness of the image. It is a constant additive (positive or negative) changing all pixel values of the image. With negative offset value the dark image areas become pure black. Considering fluorescence microscopy, an appropriate offset setting can create continuous black background and thus help to enhance (together with gain or illumination enhancement) the contrast.
The amount of saturation determines how colors are rendered. More saturation produces richer colors. Less saturation makes the colors gray.
There are several camera settings presets optimized for a specific usage. You can reset the settings using the Reset button.
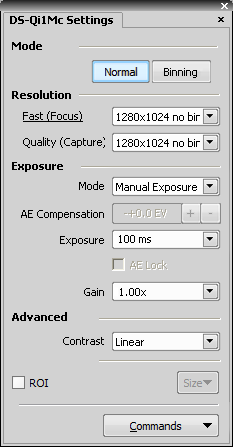
Figure 138. Camera settings - 8bit mode
1280x1024 and 640x512 resolutions are available in 8bit mode.
In 12bit mode, 320x240 and 640x480 resolutions are also available.
The exposure time on Live image is emulated in order to achieve higher frame rates (the exposure time is reduced while the software gain is increased). The true (specified) exposure time is used only with the  Acquire > Capture and Acquire > Auto Capture
  commands.
Qi1 Advanced Settings
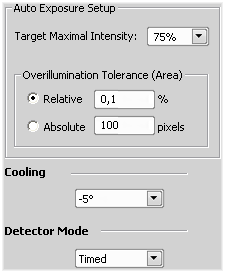
Figure 139. Advanced settings - 12bit mode

Figure 140.
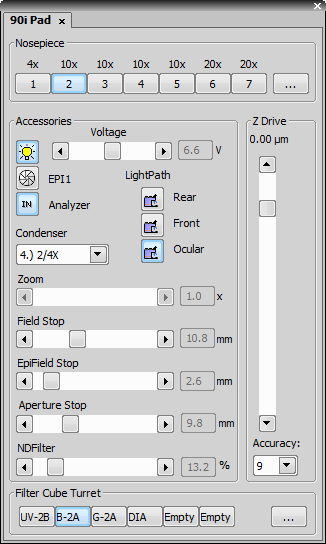
Figure 141.
The 80i/90i (fully armed) Microscope Control Pad consists of the following portions:
If manual nosepiece is used, this portion of the panel remains hidden.
The light path accessories that affects illumination intensity can be controlled here. The condenser turret is controlled by selecting the desired condenser from the pull-down menu.
The Z drive movements are indicated/performed via the scrollbar. Tolerance (precision) can be set in the pull-down menu. The higher the tolerance is, the faster the Z drive moves, though less precisely.
The standard motorized filter changers control.
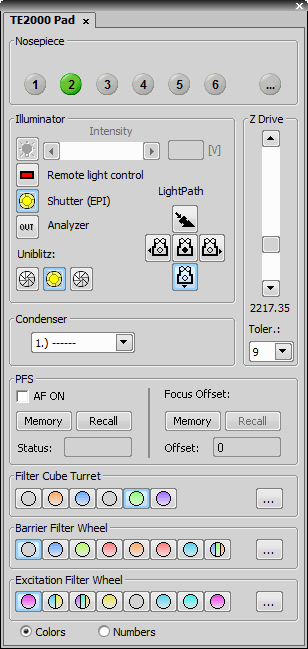
Figure 142.
The TE2000 (fully armed) Microscope Control Pad consists of the following portions:
The motorized objective changer can be controlled via this portion of the window. If a move from position 1 to position 5 is ordered a warning appears. This behavior shall prevent high magnification objectives from striking the XY stage.
Complete light path accessories can be controlled here. Switch the illuminator between ports as needed.
The condenser turret is controlled by selecting the desired condenser from a pull-down menu.
The Z drive position is indicated, or can be controlled via a scrollbar.
The functionality of the PFS-section of the control pad corresponds to the hardware controller.
Standard motorized filter changer controls. You can select whether filter colors or position numbers are displayed on the buttons.
Note
When you change objective, filter, and other microscopic settings of the ECLIPSE TE2000 via NIS-Elements, the microscopic settings displayed on the remote control pad (T-RCP) will not be updated until the TE2000 main unit is turned off and back on. To update the information displayed on the T-RCP, turn the TE2000 main unit off and back on.
After the NIS-Elements is terminated, it may take several seconds for the ECLIPSE TE2000 hub information to be updated.
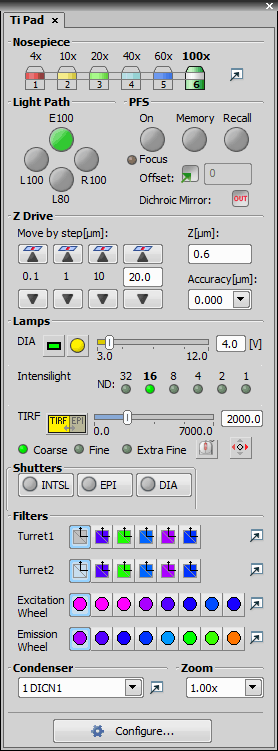
Figure 143.
The Ti (fully armed) Microscope Control Pad consists of the following portions:
The nosepiece can be controlled here. The objective settings are shared between NIS-Elements and the microscope RCP. Press  to display the Nosepiece and Objectives window.
The light path control buttons correspond to the buttons placed on the microscope body.
This optional accessory can be controlled via the pad. The offset value can be typed right in the edit box. When you are about to turn the PFS ON, make sure the Focus indicator shines. It indicates that the PFS is ready to get to the defined offset position. The Memory and Recall buttons equal the buttons on the microscope body. Vast shift of the Z drive can cause that PFS will not be able to refocus. This is indicated by the Focus indicator which stops shining by then.
Movements of the integrated Z drive are performed by the up/down arrows. Accuracy can be set in the pull-down menu on the right. The Accuracy setting affects the Z drive speed slightly.
Three types of illumination devices can be attached: Diascopic lamp, Intensilight fiber illuminator and TIRF illuminator. All these devices are controllable via the control pad.
TIRF - A shutter can be assigned to close every time the TIRF position is being changed. To do so, right-click the TIRF logical device within the Device Manager window and select the shutter type from the context menu. You can set the TIRF control sensitivity (coarse, fine, or extra fine) in the Microscope Control Pad. TIRF can also be controlled by mouse wheel or joystick X axis (or both). Use the corresponding buttons to activate these functions. When using mouse wheel, press the button, the function is active only in the Control Pad window, not outside.
Register the correct shutter types in the RCP. Then, the shutters can be controlled by NIS-Elements.
Note
When you connect the Intensilight by both RS232c and Shutter cable, two logical devices will appear in the Device manager for the Intensilight shutter and you will be able to operate it from two Shutter buttons (for ex. INTSL and EPI). In such case you should not set any of these shutters as the Active Shutter within the “Optical Configurations” window because NIS-Elements would get confused about its state (open/closed). So if you connect the Intensilight by both RS232c and Shutter cable, please disable one of the shutter logical devices within the device manager.
An optional piezo stage is controlled equally to the Z Drive device. The piezo Z component should be registered via RCP, and direct USB cable must be used between PC and the microscope body (not the HUB connection).
The standard motorized filter changer control. The Analyzer button appears, when the ANALYZER filter type is assigned to one position of the turret. Press the IN/OUT button to insert/extract the analyzer.
The condenser turret is controlled by selecting the desired condenser from the pull-down menu.
 Configure
 A configuration window appears where it is possible to specify microscope options such as XYZ Software limits, speed, accuracy, filter turret torque or the Ti Recipe speed-up feature.
This function guards the stage position in between stage movements so that the stage stays perfectly in its last position thus improving the overall experiment accuracy.
The function cannot be used and is automatically turned off when using PFS.
Note
All the commands used in Ti pad for moving Ti accessories are recorded in Command History.
This option speeds-up acquisition experiments.
See Ti Recipe - acquisition speed up by parallel device movement.
Saves the configuration settings into a .txt file using and imports the dialog settings from a .txt file using . During the import, it is possible to select which parameters are imported using the check boxes.
Setting Software Limits to Stage Movement
This microscope enables you to reduce the range of movement of the motorized stage by setting limits within the configuration window. Please see for details.
Ti Recipe is a special acquisition mode which can accelerate all experiments within NIS-Elements.
Highlights
Faster acquistion
Supported for any experiment (Timelapse, XY, Z, Large Image, Lambda, any combinations)
Compatible with all cameras supporting the exposure TTL signal
Compatible with all devices controlled by NIS-Elements
Principle
The TiE HUB-A detects the falling edge of the camera exposure signal and notifies (sends the SW callback to) NIS-Elements. Thus a set of hardware operations can be performed promptly afterwards simultaneously with the camera readout phase. The camera Exposure signal TTL line should be connected to the TiE DSC port.
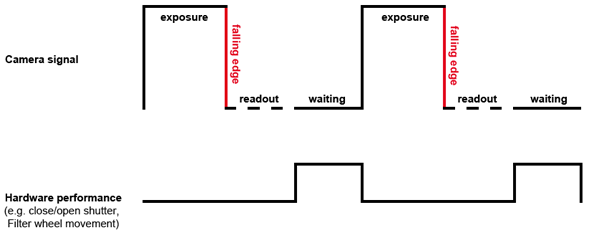
Figure 144. Acquisition without speed up
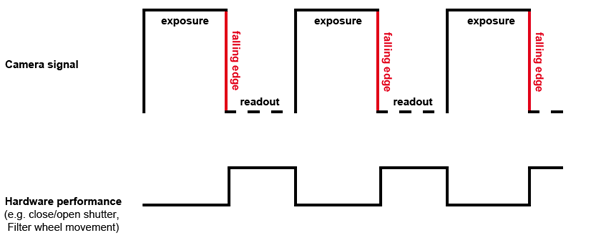
Figure 145. Acquisition with speed up
Using the speed up with Nikon Ti-E
Connect the camera exposure/fire TTL line to the Ti-E DSC1 or DSC2 port of the HUB-A. See What You Need to Run Triggered Acquisition.
In the TI-RCP Remote Control Pad go to the tab and tap .
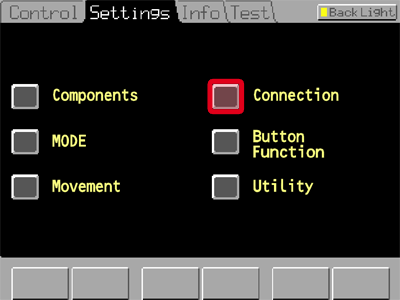
Figure 146. Nikon TI-RCP Remote Control Pad - Settings tab
Tap the camera icon and select the DSC port you are using (DSC1 = 1 on the left, DSC2 = 2 on the right).
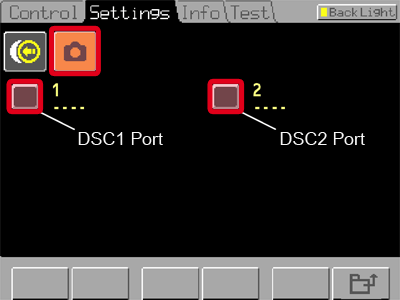
Figure 147. Nikon TI-RCP Remote Control Pad - Settings tab
Use the arrow buttons in the bottom left corner to select the camera you are using from the list. Confirm the selection by tapping .
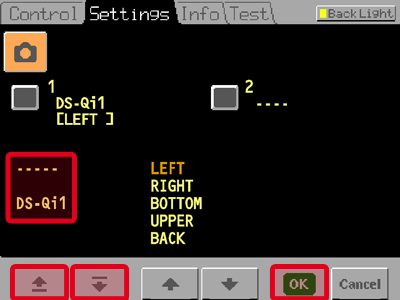
Figure 148. Nikon TI-RCP Remote Control Pad - Settings tab
You will be asked to save the changes. Tap now or later in the tab.
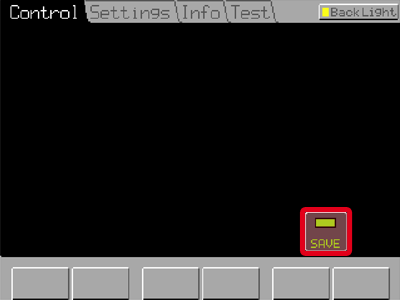
Figure 149. Nikon TI-RCP Remote Control Pad - Control tab
Open the Ti Pad control panel and click the at the bottom.

Figure 150.
Check the checkbox highlighted on the following picture and make sure you select the correct DSC port from the pull-down menu.
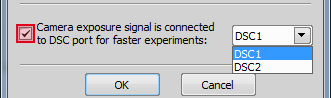
Figure 151.
Once the Recipe is enabled a notification is displayed within the ND Acquisition control panel:
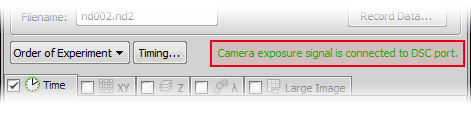
Figure 152.
When the acquisition is started, the experiment settings are sent to HUB-A where they are converted to a set of hardware instructions. The acquisition is then controlled by these instructions instead of being controlled by the software. The communication times are reduced to minimum.
Speed up mode with NIDAQ board is described here: Using speed up with NIDAQ board .