
Open a Z-Stack image and use the
 Applications > EDF > Create Focused Image
  . See EDF Step by Step.
 Display the surface view by the
Applications > EDF > Show Surface View  command.
Run the Movie Maker by the
 button.
Adjust the movie settings by the Settings button a window appears where the movie duration and frame rate can be defined.
You can use one of the predefined presets or import some previously defined key frames by the Export / Import button.
Either enable or disable the Director's mode by the clapper button. See Directors Mode.
Go to the beginning of the time line and define the initial zoom, position, rotation or component appearance of the object. This step is not necessary, but very much recommended. Press the Add/Update key frame button to fix the initial appearance.
Browse the time line, modify the object position each time, and set key frames by clicking the Add/Update key frame button. Press the Play Movie button for a preview.
When all the key frames are properly set, press the Create Movie button. The movie is created and the AVI file will open in a new image window.
Save the new file by the standard
File > Save As command.
When you start the movie maker, the following bar appears at the bottom of the image view. The user is supposed to create a set of key-frames. The rest of the movie will be created by interpolation between these key frames. This gives the user absolute freedom in how the movie will look like.
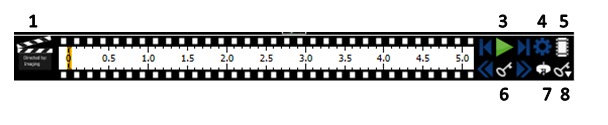
Figure 345.
The Clapper button. By this button, the director's mode can be turned on/off. See Directors Mode.
Time line. By clicking to the time line you can browse the movie frames. When a key frame is added, a bold line appears in the time line to indicate its position.
Settings - by this button, you can define the movie length and the frame rate.
The key frame buttons. The existing key frames may be browsed by pressing the Previous frame / Next Frame buttons. The Add/Update Key frame button inserts a key frame to the current position on the time line.
Presets - a predefined rotation can be loaded. When you press the button and select the rotation type, the existing key frames settings will be overwritten.
Import/Export Keyframes - this enables you to save and load the key frame settings. A file with the *.KEY extension will be created during the export.
In the directors mode it is not needed to press the Add/Update key frame button every time the position of the object is changed. The director's mode detects all changes made to the object position and adds a key frame to the time line whenever such change is detected. A typical work-flow would look like this:
Turn ON the directors mode by the Clapper button. The time line gets highlighted with red color.
Click to the time line where a certain position of the object shall occur.
Move the object by mouse or adjust it in some way (zoom, crop, etc.) - at this moment, the key frame will be added to the time line automatically.
Click to the time line where another position shall occur, and so on...
The director's mode shall be used when you know precisely how the movie shall look.
A contextual menu appears whenever you right-click on any key frame or between two key frames (a segment) within the time line.
Sets the selected key frame as the first frame of the movie and moves all other key frames proportionally. Key frames prior to the selected one will be deleted.
Sets the selected key frame as a new end of the movie and moves all other key frames proportionally. Key frames past the selected one will be deleted.
Sets the segment duration. Positions of all other key frames will be moved proportionally.
Select the type of interpolation to be used between two key frames. Set Spline for smooth changes (motion, lightness, etc.)
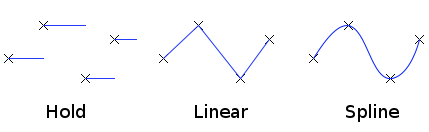
Figure 346. Interpolation Types
Easing defines the interpolation rate between two key frames. No easing means constant rate of interpolation. Use the Ease in option for the first time segment to increase slowly the rate of change. On the contrary, the Ease out option serves the best at the end of the movie to make the motion slowly stop. Of course, you can get the benefit of combining them.
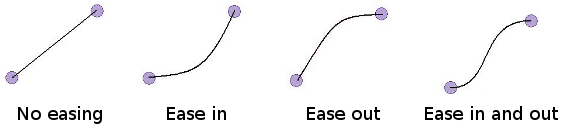
Figure 347. Interpolation Rate Types
Simple and fast way how to make a movie is to use any of the predefined presets.