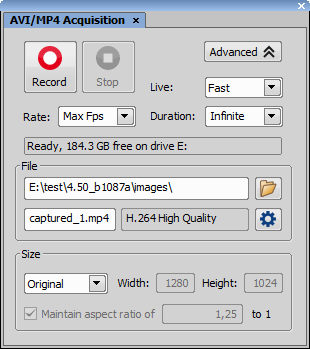
Display the AVI Acquisition control panel by the
 Acquire > AVI/MP4 Acquisition command.
Adjust the advanced settings, especially define the file name and the destination folder.
Click the Record button. The live image appears and recording starts according to the settings.
Stop recording by the Stop button, or wait until the time defined in the Duration field passes.
When stopped, the AVI file remains opened in a new image window.
Settings
Press the Advanced button to view the whole control panel and set the following options:
Choose the format of the camera. The Live-Fast or Capture-Quality mode settings will be used while capturing the AVI movie.
The number of frames per second of the movie can be defined. Possible values range from 1 to 50 fps. There is also the Max Fps option. When selected, the system captures every frame sent from a camera. If the frame rate is beyond hardware capabilities of your system, some frames will be omitted.
Several predefined lengths of the movie may be selected (60 min, 10 min, 1 min, 10 s) or the Infinite option is available. When selected, the movie will be captured until the Stop button is pressed or the hard drive is filled to capacity.
Define the path to a directory and the file name of the AVI file. If you capture more than one movie without changing the file name setting, the other files will be numbered automatically.
It is common to encode (compress) movies in order to save some disk capacity. This can be done using various types of codecs. Press the  button on the right and a window appears. Select one of the codecs available in the system or use the Default option. Remember that the codec you choose will be required for the AVI playback as well (when playing the video on other computers). See About Video Compression
The size is determined by the resolution of the connected camera, but can be adjusted by the following options:
Sizes counted from the applied camera resolution
Standard TV resolutions
an arbitrary Width and Height in pixels may be defined.
No matter what size is selected, the video always displays the whole scene. If the defined size has different aspect ratio than the live image, the empty space is filled with black.
If the Free Size option is selected, the aspect ratio may be defined. One of the width and height dimensions are then counted automatically.
