
Detailed studying of long-lasting processes is enabled by the time lapse acquisition mode of NIS-Elements. The achievable experiment duration is limited by the hardware abilities of your PC only. Invoke the  Acquire > Capture Timelapse > Capture Automatically command to set the experiment up:
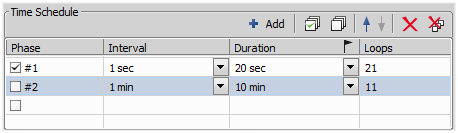
Figure 183.
The table enables you to define consecutive time phases.
Duration, interval between images or number of Loops of the phase can be adjusted. The cells are bound together, so you just need to set two of these parameters and the remaining parameter will be calculated automatically.
Only the time phases selected in the first column will be captured.
The flag mark indicates the Duration/Loops priority. For example: if the camera exposure time exceeds the defined Interval between frames, than the experiment settings are not achievable - only the marked column will be pushed to be correct. You can set the priority column by clicking on its caption.
The following options can be used with this type of ND acquisition. Options common to all types are described here.
Mark one event as default by selecting a radio button in the right-most column marked with the
 icon. The default event is inserted to an ND2 image sequence every time the Insert button is pressed. See Events.
(requires: Incubator NIS Special No.8)
This option is available when an incubator is properly connected. Press the  Add Temperature/Gas button to add an incubation phase to the time schedule list. You can connect the incubation phase to the previous time phase which makes the incubation run parallel with the selected time phase. To connect an incubation phase, press the up arrow button that appears in the Phase column next to the phase name. To cancel the connection, press the cross button that has replaced the arrow button.
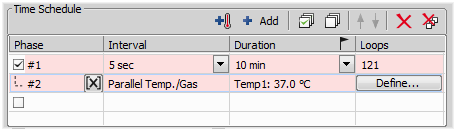
Figure 184. Connected Incubation Phase
The Duration column displays value defined in the Incubation Phase Settings window that appears after you press the Define button. Incubator parameters (temperature and gas) can be set within this window.
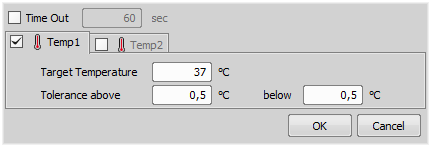
Figure 185.
If this option is selected, the lamp is turned off whenever there is a long-enough gap between two acquisitions.
Warning
It takes a little time for some lamps to reach the set intensity. In such case, we recommend to use the Wait(); macro function before the capture is performed.
Checking this item turns on the FRET View for ND2 file which will be acquired. You can open the FRET View dialog by pressing the Define FRET button.
This option is available only for A1 confocal microscope. If checked, A1 HW sequencer will be used for acquisition. It provides the ability to define two experimental setups for HW Sequencer on and off.
Press the button to display the following window:
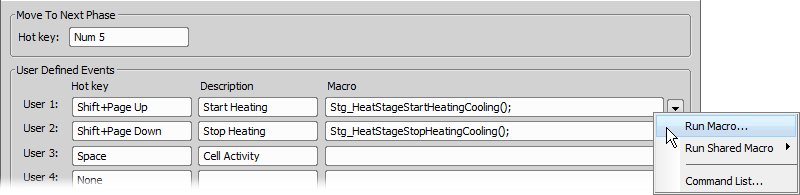
Figure 186.
Define user hot keys which run user events during time-lapse acquisition. Simply click inside the Hot key field of the User events window and press any key combination you want to assign to the event. Then you can enter the event description. A macro command can be specified which will be executed when the event occurs (is triggered by the user). When the event occurs, the specified command is run and a marker is placed to the time line of the ND2 file.
Tip
Note
When the time measurement runs on live image, an ND acquisition is in progress, or the Time ND document is active, the hot keys of the defined events take priority over all other hot keys.
These options are shown after clicking . Following features are available.
See Common ND Experiment Options.
Note
It can be determined whether the focusing shall be performed at the beginning of the whole experiment or at the beginning of each phase. If the auto-focus is set to be performed Before each Phase and the ND Experiment contains just a single time phase, the automatic focus will not be performed. To run auto focus, use the At the Beginning option.
See Executing macro commands during ND acquisition. Runs a command which is executed before or after each time loop.