In laboratory imaging experiments, users are often interested in just a part of the image. To define such an interesting part of the image we use one or more Regions of Interest (ROIs). These regions are used later in analysis and measurements.
Note
Do not confuse image ROIs with Camera ROI which is used to reduce the active area to just a part of the camera sensor (CCD or CMOS). Such reduction usually results in higher frame rate. See Camera ROI.
Individual ROIs (ROI objects) are 2D objects. They can have different shape: rectangular, elliptical polygonal or Bezier. One shape can be created with one or more tools. For instance polygon ROI can be defined using both “Draw Polygonal ROI” and “Autodetect ROI”.
In case of an ND file which has time axis (e.g. time-lapse) individual ROI objects can be defined as “Global ” or as “Changing over time”. Global objects do not change any of their characteristics over time. Objects that are defined as changing over time can change their position and shape in time (however objects cannot change their shape - e.g. from ellipse to polygon). This feature is useful for track moving or warping objects.
In case of Multi Point ND2 file there is one more option: ROI can be defined per Multi Point (which is the default). It means that ROIs from one point are completely independent of ROIs defined on the other point (even if they have the same number). This applies also to ROIs defined as “Changing over Time” (in case the image has time axis too). On the other hand if the ROI is changed to a “Global” it will be shared among all points of the Multi Point set.
Depending on the application purposes ROI objects can have different usage. NIS-Elements can handle “Background ROIs”, “Reference ROIs”, “Stimulation ROIs” and “Standard ROIs”.
ROIs can be manipulated anytime directly in the image window. Many of the following techniques work in ROI editors too. Objects cannot be moved or resized when they are Locked (some analysis tools or users may lock them to prevent accidental modification). They must be unlocked (from the ROIs' context menu) before any manipulation. Note that the mouse cursor changes over the ROI to indicate which action will be started after mouse button is pressed (it changes when modification keys like Alt and Ctrl are pressed).
ROI objects can be selected by clicking on an unselected object (other previously selected are unselected). Clicking on a ROI object with Ctrl key pressed results in altering the selection state. More than one object can be selected in this way. Double-clicking on any object results in only that object being selected. All objects can be selected by pressing Ctrl+A or by choosing “Select All ROIs” from the menu over any ROI. Alternatively, it is also possible to select a set of objects by dragging a rectangle around them with Ctrl key being pressed.
Objects are moved by simply dragging them (cursor indicates that). When more objects are selected, only the one below the cursor position is moved by default. This can be changed by pressing the Alt key and move all selected objects. When object is changing over time, any moving results in a new key-frame. Individual dots representing the key-frames can be moved too. It is possible to duplicate existing objects by Shift dragging. It works on selected objects. In case of a key-framed object, object is duplicated with all its' key-frames unless Alt is pressed.
Resizing a ROI is done by dragging its' contour (the cursor changes accordingly). Note that the hot-zone (the area where mouse cursor changes into different tool) for resizing is outside of the object contour while the hot-zone for moving is inside. Resizing always affects only one object (selection is not taken into account). The behavior slightly varies depending on the object shape. By default resize does not hold aspect of the object - width and height can be changed independently. By holding Shift key aspect is maintained (useful for circles) and the center is not moved. Rectangle can be also rotated by using Alt key while dragging.
Exact values can be entered in “ROI Properties” dialog which is accessible from the ROI context menu.
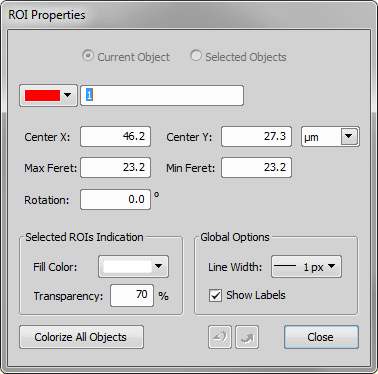
Figure 239.
When creating more than one ROI, the Simple ROI editor is the tool of choice. With this tool it is possible to make all possible shapes with different methods. All interaction techniques work here as well.

Figure 240. Simple ROI Editor toolbar
Note that many actions have a hot-key (P for Pointing tool, R for Rectangle, E for ellipse, L for Polygon, B for Bezier, A for Auto detection, H for drawing holes and others) to speed up the process of interaction.
Auto-detect tool is available from ROI menu, Simple ROI editor and some other places. It produces a Polygon ROI. Using the tool is two step process: The first click on an image structure results in preliminary object contour, that is drawn on the screen. After that, user can further tweak the object contour and then finish whole auto-detect by confirming with right mouse button. User can always cancel auto-detect by pressing the Esc key.
The very first click is important, because these pixels under the cursor determine intensities from which the algorithm guesses the whole object. As a general rule it is better to choose brightest pixels in the bright objects (fluorescence) and dimmest in the dark object. It is also good to click near the center of the object.
After the click the algorithm presents its guess of the object contour and goes into the interactive phase. In this phase it is possible to:
by clicking again in the image
by pressing Esc key
(changes the intensity range of pixels making the object) by scrolling mouse wheel or pressing PageUp/PageDown (for finer steps use Ctrl + mouse wheel)
morphologically the object by 'E'/'D' or Down/Up keys
morphologically the object by 'O'/'C' keys
portions of the object by 'S' or 'P' key (if it is not possible to separate the key does nothing)
ROIs are used mainly in the following procedures:
Changing image intensity inside the ROIs is measured.
Selected object features or numbers of objects inside each ROI are measured.
ROIs are used to restrict areas of interest where the objects are counted,
ROIs are used to measure intensities interactively.
In all these cases ROI selection is taken into account as well as intersection options in Measurement Options.
Additionally the Time measurement interprets the ROI usage type. Background ROIs are used for offset subtraction and Reference ROIs can be used for bleaching correction.
To define a moving ROI:
Open or capture a time-lapse ND2 file.
Display the first frame of the image and open the vector ROI editor by the
 ROI > Simple ROI Editor command.
With one of the editor tools, draw the ROI around an object. Close the ROI editor.
Right-click the ROI and select ROI Changes Over Time from the context menu.
Play the image sequence and if the object of interest starts to move out of the ROI, pause the replay.
Now it is possible to drag the ROI to the new position. If the ROI is created by the vector editor, its size and rotation can be also modified.
Play the sequence further and drag the ROI to a new position each time the object in the image moves.