
Many features are common to multiple cameras (see Camera Settings). Only the camera-specific features are described in this chapter.
Note
The complete list of cameras and devices supported by NIS-Elements is available in a separate document.
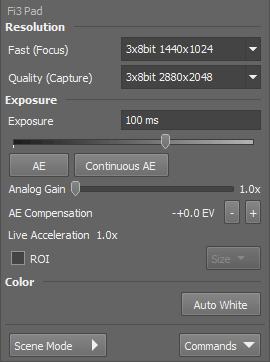
Figure 62. Nikon DS-Fi3 panel
Resolution
The software provides two resolution presets. The first is used for live image and focusing and the second used for capturing. The formats then differ in image size and in frame rate (number of frames per second - fps). The higher the resolution is, the lower frame rate can be achieved. Available resolutions depend on the camera type.
Note
When switching between the formats while observing the live image, the size of the image on the screen is maintained - the zoom setting is changed instead. Only in some special cases, the behavior changes and the image size is changed instead of the zoom setting which is maintained.
Note
Normal mode offers 1440x1024 and 2880x2048 resolutions whereas Full HD mode offers 1920x1080 and 960x540. The resolution mode can be set in the  Commands > Advanced Setup... > Resolution Mode window.
| Camera mode | Active pixels | Max. frame rate |
|---|---|---|
| Full area / Full pixel | 2880×2048 | 15 fps |
| Full area / 1/2 resizing | 1440×1024 | 30 fps |
| Full area / Full pixel | 1920×1080 | 15 fps |
| Full area / 1/2 resizing | 960×540 | 30 fps |
Exposure
Type the exposure time in the field manually or use the slider.
Automatically calculates the exposure time in order to achieve optimal brightness of the scene. Image quality is the priority, therefore longer exposure times are preferred.
When selected, the automatic exposure time is calculated continuously. If brightness of the scene changes, the exposure time is adjusted so that the live image is not over- or under- saturated.
Controls the Gain (Sensitivity) of the camera and strength of the camera analog signal before it is digitized. This setting affects image brightness.
In automatic exposure modes, the compensation affects how optimum exposure settings (Exposure time and Gain) are calculated. The Compensation value is expressed in Exposure Values (EV). Setting the compensation to + 1.0 EV makes the image twice brighter (e.g. doubles the Exposure time or Gain).
If the exposure time is too long, Live Acceleration helps you to make it shorter. The system automatically shortens the exposure time (so the frame rate rises), and the loss of intensity is compensated by increasing the gain (software multiplication). This procedure is not used upon Capture.
Color
Note
The camera supports an emulated monochromatic mode. It can be turned on in the device manager. Right click the camera and click Select Camera Mode.
Scene Mode
There are several camera settings presets optimized for a specific usage.
Neutral preset.
Wafer IC-Chip.
Metal or ceramic.
Circuit boards.
Flat panel displays.
Illuminated bright field.
Illuminated Hematoxylin and eosin stain.
Illuminated enzyme labeled antibody method.
LED illuminated bright field.
Asbestos.
Keeps linearity of the intensity when using a color camera.
Commands > Advanced Setup
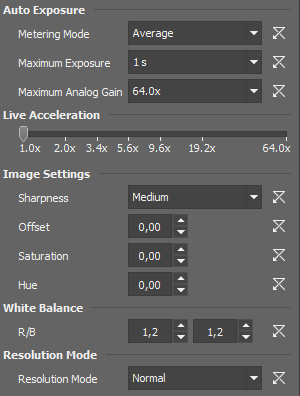
Figure 63.
If this option is available, auto exposure can be calculated with an emphasis on overexposed peaks (Peak) or average pixel intensity (Average).
This is a safeguard of the time of the Auto Exposure. For quick exposure, it is convenient not to set this value too high.
Sets the maximum gain (sensitivity) of the camera and strength of the camera analog signal before it is digitized.
If the exposure time is too long, Live Acceleration helps you to make it shorter. The system automatically shortens the exposure time (so the frame rate rises), and the loss of intensity is compensated by increasing the gain (software multiplication). This procedure is not used upon Capture.
Some camera settings provide the sharpness control which affects how sharp edges in the image appear. Too much sharpness leads to over-saturated edges.
Sets the brightness of the image. It is a constant additive (positive or negative) changing all pixel values of the image. With negative offset value the dark image areas become pure black. Considering fluorescence microscopy, an appropriate offset setting can create continuous black background and thus help to enhance (together with gain or illumination enhancement) the contrast.
There are Red and Blue (R/B) gain properties that control how colors are rendered. It is used to eliminate a color cast from white areas.
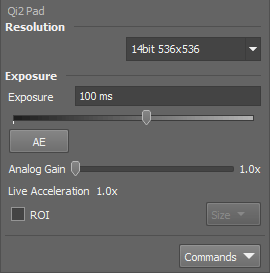
Figure 64.
By default, a single-resolution mode is turned on. The dual-resolution mode (Fast and Quality) can be enabled in Commands > Advanced Camera Settings > Fast and Capture Mode.
This camera provides different resolutions depending on the attachment used to mount it to a microscope (1x, 1.8x or 2.5x). Click Change Camera Zoom in the context menu over the camera in the device manager and select the correct attachment:
This attachment restricts FOV, only a part of the chip can be used. Resolutions 1608x1608 and 536x536 (binning 3x) are available.
The whole FOV is available with resolutions 4908x3264 and 1636x1088 (binning 3x).
The software provides two resolution presets. The first is used for live image and focusing and the second used for capturing. The formats then differ in image size and in frame rate (number of frames per second - fps). The higher the resolution is, the lower frame rate can be achieved. Available resolutions depend on the camera type.
Note
When switching between the formats while observing the live image, the size of the image on the screen is maintained - the zoom setting is changed instead. Only in some special cases, the behavior changes and the image size is changed instead of the zoom setting which is maintained.
Automatically calculates the exposure time in order to achieve optimal brightness of the scene. Image quality is the priority, therefore longer exposure times are preferred.
Controls the Gain (Sensitivity) of the camera and strength of the camera analog signal before it is digitized. This setting affects image brightness.
If the exposure time is too long, Live Acceleration helps you to make it shorter. The system automatically shortens the exposure time (so the frame rate rises), and the loss of intensity is compensated by increasing the gain (software multiplication). This procedure is not used upon Capture.
Commands > Advanced Setup
If the exposure time is too long, Live Acceleration helps you to make it shorter. The system automatically shortens the exposure time (so the frame rate rises), and the loss of intensity is compensated by increasing the gain (software multiplication). This procedure is not used upon Capture.
Restricts the maximum of image intensity after the auto exposure was applied. The value represents a percentage of the whole camera dynamic range.
This is a safeguard of the time of the Auto Exposure. For quick exposure, it is convenient not to set this value too high.
Sets how many pixels should be white after the Auto exposure is performed. Use lower values (0.01%) for very bright (shining) objects (fluorescence). For common bright field, even 1% may be a good value.
Select the correct FOV size to prevent vignetting.
Suits most conventional microscopes.
Suits the Nikon Ti2-E microscope equipped with two filter-turrets.
Suits the Nikon Ti2-E microscope equipped with a single filter-turret.
See FOV Size.
Sets the exposure method.
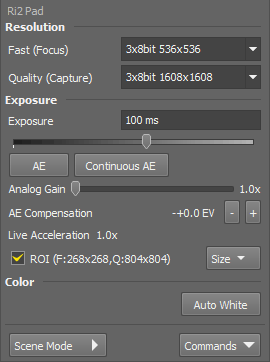
Figure 65.
Please see the description of common camera features in the Camera Settings chapter.
This camera provides different resolutions depending on the attachment used to mount it to a microscope (1x, 1.8x or 2.5x). Click Change Camera Zoom in the context menu over the camera in the device manager and select the correct attachment:
This attachment restricts FOV, only a part of the chip can be used. Resolutions 1608x1608 and 536x536 (binning 3x) are available.
The whole FOV is available with resolutions 4908x3264 and 1636x1088 (binning 3x).
The software provides two resolution presets. The first is used for live image and focusing and the second used for capturing. The formats then differ in image size and in frame rate (number of frames per second - fps). The higher the resolution is, the lower frame rate can be achieved. Available resolutions depend on the camera type.
Note
When switching between the formats while observing the live image, the size of the image on the screen is maintained - the zoom setting is changed instead. Only in some special cases, the behavior changes and the image size is changed instead of the zoom setting which is maintained.
Automatically calculates the exposure time in order to achieve optimal brightness of the scene. Image quality is the priority, therefore longer exposure times are preferred.
When selected, the automatic exposure time is calculated continuously. If brightness of the scene changes, the exposure time is adjusted so that the live image is not over- or under- saturated.
Controls the Gain (Sensitivity) of the camera and strength of the camera analog signal before it is digitized. This setting affects image brightness.
In automatic exposure modes, the compensation affects how optimum exposure settings (Exposure time and Gain) are calculated. The Compensation value is expressed in Exposure Values (EV). Setting the compensation to + 1.0 EV makes the image twice brighter (e.g. doubles the Exposure time or Gain).
If the exposure time is too long, Live Acceleration helps you to make it shorter. The system automatically shortens the exposure time (so the frame rate rises), and the loss of intensity is compensated by increasing the gain (software multiplication). This procedure is not used upon Capture.
There are several camera settings presets optimized for a specific usage.
Neutral preset.
Wafer IC-Chip.
Metal or ceramic.
Circuit boards.
Flat panel displays.
Illuminated bright field.
Illuminated Hematoxylin and eosin stain.
Illuminated enzyme labeled antibody method.
LED illuminated bright field.
Asbestos.
Keeps linearity of the intensity when using a color camera.
Commands > Advanced Setup
If this option is available, auto exposure can be calculated with an emphasis on overexposed peaks (Peak) or average pixel intensity (Average).
This is a safeguard of the time of the Auto Exposure. For quick exposure, it is convenient not to set this value too high.
If the exposure time is too long, Live Acceleration helps you to make it shorter. The system automatically shortens the exposure time (so the frame rate rises), and the loss of intensity is compensated by increasing the gain (software multiplication). This procedure is not used upon Capture.
Some camera settings provide the sharpness control which affects how sharp edges in the image appear. Too much sharpness leads to over-saturated edges.
Sets the brightness of the image. It is a constant additive (positive or negative) changing all pixel values of the image. With negative offset value the dark image areas become pure black. Considering fluorescence microscopy, an appropriate offset setting can create continuous black background and thus help to enhance (together with gain or illumination enhancement) the contrast.
The amount of saturation determines how colors are rendered. More saturation produces richer colors. Less saturation makes the colors gray.
There are Red, Green and Blue Gain properties that control how colors are rendered. It is used to eliminate a color cast from white areas.
Select the correct FOV size to prevent vignetting.
Suits most conventional microscopes.
Suits the Nikon Ti2-E microscope equipped with two filter-turrets.
Suits the Nikon Ti2-E microscope equipped with a single filter-turret.
See FOV Size.
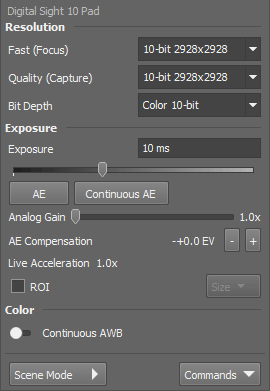
Figure 66.
The software provides two resolution presets. The first is used for live image and focusing and the second used for capturing. The formats then differ in image size and in frame rate (number of frames per second - fps). The higher the resolution is, the lower frame rate can be achieved. Available resolutions depend on the camera type.
Note
When switching between the formats while observing the live image, the size of the image on the screen is maintained - the zoom setting is changed instead. Only in some special cases, the behavior changes and the image size is changed instead of the zoom setting which is maintained.
Automatically calculates the exposure time in order to achieve optimal brightness of the scene. Image quality is the priority, therefore longer exposure times are preferred.
When selected, the automatic exposure time is calculated continuously. If brightness of the scene changes, the exposure time is adjusted so that the live image is not over- or under- saturated.
Controls the Gain (Sensitivity) of the camera and strength of the camera analog signal before it is digitized. This setting affects image brightness.
In automatic exposure modes, the compensation affects how optimum exposure settings (Exposure time and Gain) are calculated. The Compensation value is expressed in Exposure Values (EV). Setting the compensation to + 1.0 EV makes the image twice brighter (e.g. doubles the Exposure time or Gain).
Select this option to activate the camera ROI defined via the Size drop-down menu. When active, the current ROI size is displayed in brackets. The user can define a custom ROI via Size > Define ROI. The ROI can also be saved/loaded to/from a .camroi file (Size > Save ROI/Load ROI).
If the exposure time is too long, Live Acceleration helps you to make it shorter. The system automatically shortens the exposure time (so the frame rate rises), and the loss of intensity is compensated by increasing the gain (software multiplication). This procedure is not used upon Capture.
There are several camera settings presets optimized for a specific usage.
Neutral preset.
Wafer IC-Chip.
Metal or ceramic.
Circuit boards.
Flat panel displays.
Illuminated bright field.
Illuminated Hematoxylin and eosin stain.
Illuminated enzyme labeled antibody method.
LED illuminated bright field.
Asbestos.
Keeps linearity of the intensity when using a color camera.
Commands > Advanced Setup
If this option is available, auto exposure can be calculated with an emphasis on overexposed peaks (Peak) or average pixel intensity (Average).
This is a safeguard of the time of the Auto Exposure. For quick exposure, it is convenient not to set this value too high.
If the exposure time is too long, Live Acceleration helps you to make it shorter. The system automatically shortens the exposure time (so the frame rate rises), and the loss of intensity is compensated by increasing the gain (software multiplication). This procedure is not used upon Capture.
If InterLock is turned on, COLOR Filter is automatically used for the color format and IR Filter for the mono format. If turned off, COLOR and IR Filter settings can be set independently from the color and mono format.
Some camera settings provide the sharpness control which affects how sharp edges in the image appear. Too much sharpness leads to over-saturated edges.
Sets the brightness of the image. It is a constant additive (positive or negative) changing all pixel values of the image. With negative offset value the dark image areas become pure black. Considering fluorescence microscopy, an appropriate offset setting can create continuous black background and thus help to enhance (together with gain or illumination enhancement) the contrast.
The amount of saturation determines how colors are rendered. More saturation produces richer colors. Less saturation makes the colors gray.
There are red (R) and blue (B) gain properties that control how colors are rendered. It is used to eliminate a color cast from white areas.
Select the correct FOV size to prevent vignetting.
Suits most conventional microscopes.
Suits the Nikon Ti2-E microscope equipped with two filter-turrets.
Suits the Nikon Ti2-E microscope equipped with a single filter-turret.
See FOV Size.
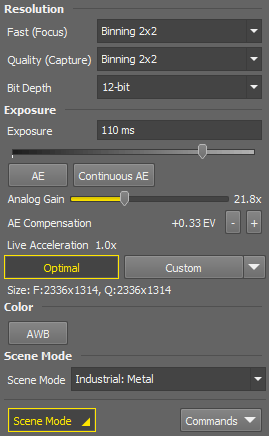
Figure 67. Digital Sight 100 Pad
Resolution
The software provides two resolution presets. The first is used for live image and focusing and the second used for capturing. The formats then differ in image size and in frame rate (number of frames per second - fps). The higher the resolution is, the lower frame rate can be achieved. Available resolutions depend on the camera type.
Note
When switching between the formats while observing the live image, the size of the image on the screen is maintained - the zoom setting is changed instead. Only in some special cases, the behavior changes and the image size is changed instead of the zoom setting which is maintained.
Exposure
Type the exposure time in the field manually or use the slider.
Automatically calculates the exposure time in order to achieve optimal brightness of the scene. Image quality is the priority, therefore longer exposure times are preferred.
When selected, the automatic exposure time is calculated continuously. If brightness of the scene changes, the exposure time is adjusted so that the live image is not over- or under- saturated.
Controls the Gain (Sensitivity) of the camera and strength of the camera analog signal before it is digitized. This setting affects image brightness.
In automatic exposure modes, the compensation affects how optimum exposure settings (Exposure time and Gain) are calculated. The Compensation value is expressed in Exposure Values (EV). Setting the compensation to + 1.0 EV makes the image twice brighter (e.g. doubles the Exposure time or Gain).
If the exposure time is too long, Live Acceleration helps you to make it shorter. The system automatically shortens the exposure time (so the frame rate rises), and the loss of intensity is compensated by increasing the gain (software multiplication). This procedure is not used upon Capture.
ROI
Sets the ROI to cover the maximum camera resolution.
Sets the ROI to a computed size which ensures that no shading is visible on the image edges.
Color
Scene Mode
There are several camera settings presets optimized for a specific usage.
Default preset.
Wafer IC-Chip.
Metal or ceramic.
Circuit boards.
Flat panel displays.
Illuminated bright field.
Bright field illuminated with white LED.
Asbestos.
Keeps linearity of the intensity when using a color camera.
Commands > Advanced Camera Settings
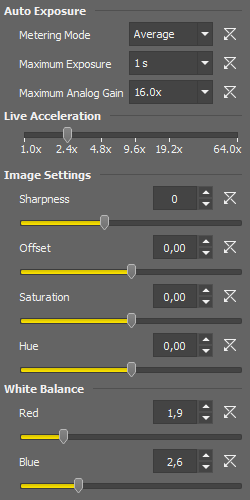
Figure 68. Advanced Camera Settings
If this option is available, auto exposure can be calculated with an emphasis on overexposed peaks (Peak) or average pixel intensity (Average).
This is a safeguard of the time of the Auto Exposure. For quick exposure, it is convenient not to set this value too high.
Sets the maximum gain (sensitivity) of the camera and strength of the camera analog signal before it is digitized.
If the exposure time is too long, Live Acceleration helps you to make it shorter. The system automatically shortens the exposure time (so the frame rate rises), and the loss of intensity is compensated by increasing the gain (software multiplication). This procedure is not used upon Capture.
Some camera settings provide the sharpness control which affects how sharp edges in the image appear. Too much sharpness leads to over-saturated edges.
Sets the brightness of the image. It is a constant additive (positive or negative) changing all pixel values of the image. With negative offset value the dark image areas become pure black. Considering fluorescence microscopy, an appropriate offset setting can create continuous black background and thus help to enhance (together with gain or illumination enhancement) the contrast.
There are Red and Blue (R/B) gain properties that control how colors are rendered. It is used to eliminate a color cast from white areas.
Note
Switching the camera aspect ratio (16:9 / 4:3) involves changing between two different hardware units, which requires reconnecting the NIS-Elements camera driver. To do so, open the Device Manager, reveal the context menu over the Digital Sight 100 camera, select Change Camera..., choose Nikon Digital Sight 100, click , select a hardware unit with a suitable aspect ratio and click .
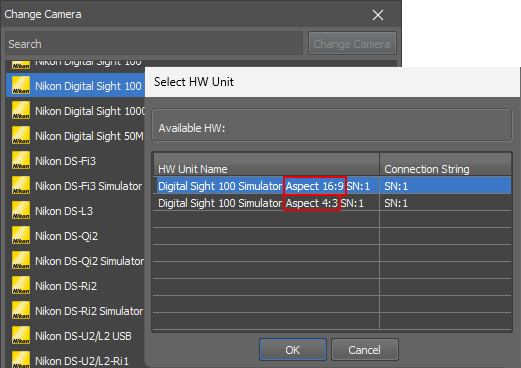
Figure 69.
Note
To select the output image color space, open the Device Manager, reveal the context menu over the Digital Sight 100 camera, select Change Camera Color Space... and choose either sRGB (default) or Adobe RGB.
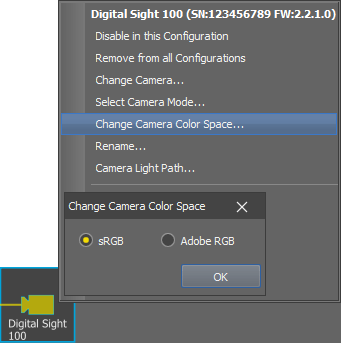
Figure 70.
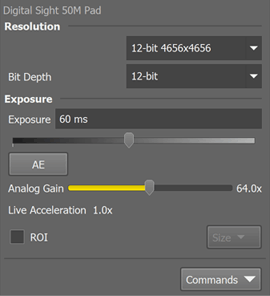
Figure 71.
By default, a single-resolution mode is turned on. The dual-resolution mode (Fast and Quality) can be enabled in Commands > Advanced Setup... > Fast and Capture Mode.
The software provides two resolution presets. The first is used for live image and focusing and the second used for capturing. The formats then differ in image size and in frame rate (number of frames per second - fps). The higher the resolution is, the lower frame rate can be achieved. Available resolutions depend on the camera type.
Note
When switching between the formats while observing the live image, the size of the image on the screen is maintained - the zoom setting is changed instead. Only in some special cases, the behavior changes and the image size is changed instead of the zoom setting which is maintained.
Note
For HD size in the 16-bit mode, the maximum brightness value from the camera is 65520.
Automatically calculates the exposure time in order to achieve optimal brightness of the scene. Image quality is the priority, therefore longer exposure times are preferred.
Controls the Gain (Sensitivity) of the camera and strength of the camera analog signal before it is digitized. This setting affects image brightness.
If the exposure time is too long, Live Acceleration helps you to make it shorter. The system automatically shortens the exposure time (so the frame rate rises), and the loss of intensity is compensated by increasing the gain (software multiplication). This procedure is not used upon Capture.
Commands > Advanced Setup
If this option is available, auto exposure can be calculated with an emphasis on overexposed peaks (Peak) or average pixel intensity (Average).
This is a safeguard of the time of the Auto Exposure. For quick exposure, it is convenient not to set this value too high.
If the exposure time is too long, Live Acceleration helps you to make it shorter. The system automatically shortens the exposure time (so the frame rate rises), and the loss of intensity is compensated by increasing the gain (software multiplication). This procedure is not used upon Capture.
Select the correct FOV size to prevent vignetting.
Suits most conventional microscopes.
Suits the Nikon Ti2-E microscope equipped with two filter-turrets.
Suits the Nikon Ti2-E microscope equipped with a single filter-turret.
See FOV Size.
The software provides two resolution presets. The first is used for live image and focusing and the second used for capturing. The formats then differ in image size and in frame rate (number of frames per second - fps). The higher the resolution is, the lower frame rate can be achieved. Available resolutions depend on the camera type.
Note
When switching between the formats while observing the live image, the size of the image on the screen is maintained - the zoom setting is changed instead. Only in some special cases, the behavior changes and the image size is changed instead of the zoom setting which is maintained.
The binning mode provides considerably enhanced camera chip sensitivity by integrating more elements (pixels) together. E.g.: binning 4x4 integrates the signal from the area of 4x4 chip elements to one pixel of the resulting image. Smaller resolutions and faster frame rates are achieved using the binning modes.
Automatically calculates the exposure time in order to achieve optimal brightness of the scene. Image quality is the priority, therefore longer exposure times are preferred.
Within this option you can select a combination of these parameters - readout speed and bit depth. The settings influences frame rate and image quality. Higher frequencies increase frame rate, lower frequencies offer better image quality.
Readout modes having the EM Gain prefix engage the EM Gain Multiplier. Other modes ignore it.
EM gain allows weak signals to be multiplied before any readout noise is added by the output amplifier, hence rendering the read noise negligible. There is a complex relationship (approximated to an exponential) between the value set and the actual level of multiplication. Typically, optimal signal-to-noise ratio and dynamic range is achieved between x1 to x300 EM Gain. When the setting exceeds the value of 300, the field gets highlighted red in order to notify you.
These buttons change camera ROI size.
Sets the ROI to a custom value. Use the Define ROI command in the pull-down menu to set the size manually.
Sets the ROI to a computed size which ensures that no shading is visible on the image edges.
Note
The position of this automatic ROI can be adjusted in the Devices > Service Settings  window.
Note
Depending on the actual system configuration, some of the buttons may be hidden.
Commands > Advanced Setup
If the exposure time is too long, Live Acceleration helps you to make it shorter. The system automatically shortens the exposure time (so the frame rate rises), and the loss of intensity is compensated by increasing the gain (software multiplication). This procedure is not used upon Capture.
Restricts the maximum of image intensity after the auto exposure was applied. The value represents a percentage of the whole camera dynamic range.
Commands > Advanced Camera Settings
Sets the exposure method.
The exposure time and the beginning of each frame acquisition is controlled by the software.
In this mode, the beginning of each frame exposure is being controlled by external signal.
The exposure time and frames timing are controlled by external signal connected to the camera.
Having a dual camera system (or a special triggering device connected to the camera), you can use this mode. If the cameras Interval setting is set to No delay within the experiment or if the Live mode is run, the slave camera will be triggered only once so that both cameras will run simultaneously while single frames will not be synchronized. For all other settings, the trigger will be engaged once and all the subsequent frames will be controlled by the software as in the Internal mode.
This option sets behavior of the camera internal shutter.
This option turns on the Isolated Crop Mode described within the Andor documentation. In this special mode, the size of chip is reduced and very high frame-rates can be achieved.
Connect the Arm and the Ext. Trig connectors of the camera and enable this option. When you run triggered acquisition with the Use different exposures option enabled, it will speed up the performance (the camera will not have to wait for software triggers but will be controlled by the Arm triggering signal).
Unlike most other cameras, the camera region of interest cannot be defined on the live image but can be selected from this pull-down. Several predefined resolutions are available, all of them placed in the center of the sCMOS chip.
Automatically calculates the exposure time in order to achieve optimal brightness of the scene. Image quality is the priority, therefore longer exposure times are preferred.
Apart from common selection of time values, there is an extra option called 1 frame . When selected (by the  button), the exposure time is calculated automatically in order for achieve maximum frame rate transferable by the camera link to the computer.
The camera head is equipped with 4 GB of memory available for fast capturing. Use this button to run acquisition with maximum available frame rate. However, the size of image sequence is limited to 4 GB.
Note
The actual frame rate depends on other settings (readout mode, sensor mode) and is limited by the read-out speed of the camera sCMOS chip. Maximum frame rate can be achieved with the combination of Rolling shutter and Overlap sensor mode.
Within this option you can select a combination of these parameters - readout speed and bit depth. The settings influences frame rate and image quality. Higher frequencies increase frame rate, lower frequencies offer better image quality.
These buttons change camera ROI size.
Sets the ROI to a custom value. Use the Define ROI command in the pull-down menu to set the size manually.
Sets the ROI to a computed size which ensures that no shading is visible on the image edges.
Note
The position of this automatic ROI can be adjusted in the Devices > Service Settings window.
Note
Depending on the actual system configuration, some of the buttons may be hidden.
This option sets the method of reading the sCMOS chip.
Insert maximum frame rate (frames per second) you would like to use, this will prolong the total duration of the time-sequence in exchange for the reduced frame rate. This option may be useful especially when using the 1 frame for Fast Timelapse button with a small region of interest. Then the frame rate could get unreasonably high.
Note
The Limit MAX FPS is possible only when camera is in Normal mode (not overlapped), the maximum fps in normal mode is shown next to the edit box.
Sets resolution of the image.
The binning mode provides considerably enhanced camera chip sensitivity by integrating more elements (pixels) together. E.g.: binning 4x4 integrates the signal from the area of 4x4 chip elements to one pixel of the resulting image. Smaller resolutions and faster frame rates are achieved using the binning modes.
Automatically calculates the exposure time in order to achieve optimal brightness of the scene. Image quality is the priority, therefore longer exposure times are preferred.
The camera head is equipped with 4 GB of memory available for fast capturing. Use this button to run acquisition with maximum available frame rate. However, the size of image sequence is limited to 4 GB.
Note
The actual frame rate depends on other settings (readout mode, sensor mode) and is limited by the read-out speed of the camera sCMOS chip. Maximum frame rate can be achieved with the combination of Rolling shutter and Overlap sensor mode.
Within this option you can select a combination of these parameters - readout speed and bit depth. The settings influences frame rate and image quality. Higher frequencies increase frame rate, lower frequencies offer better image quality.
Dynamic range of a camera sensor is defined by the largest possible signal that it can generate divided by the smallest possible signal. Higher bit dynamic ranges bring wider ranges of grayscale levels from each camera pixel.
Insert maximum frame rate (frames per second) you would like to use, this will prolong the total duration of the time-sequence in exchange for the reduced frame rate. This option may be useful especially when using the 1 frame for Fast Timelapse button with a small region of interest. Then the frame rate could get unreasonably high.
Note
The Limit MAX FPS is possible only when camera is in Normal mode (not overlapped), the maximum fps in normal mode is shown next to the edit box.
This option reduces spurious noise. Try whether it has desirable influence on image quality.
These buttons change camera ROI size.
Sets the ROI to a custom value. Use the Define ROI command in the pull-down menu to set the size manually.
Sets the ROI to a computed size which ensures that no shading is visible on the image edges.
Note
The position of this automatic ROI can be adjusted in the Devices > Service Settings window.
Note
Depending on the actual system configuration, some of the buttons may be hidden.
This pad is used to control the simple generic HDMI camera.
Sets resolution of the image.
Use the Acquire > Camera Settings  command to display the camera settings window.
The software provides two resolution presets. The first is used for live image and focusing and the second used for capturing. The formats then differ in image size and in frame rate (number of frames per second - fps). The higher the resolution is, the lower frame rate can be achieved. Available resolutions depend on the camera type.
Note
When switching between the formats while observing the live image, the size of the image on the screen is maintained - the zoom setting is changed instead. Only in some special cases, the behavior changes and the image size is changed instead of the zoom setting which is maintained.
This button performs an automatic white balancing. It calculates the right values and then adjusts the red, green, and blue image components in order to get a neutral white color. The Auto White gives the best results on color neutral (gray) scenes.
Automatically calculates the exposure time in order to achieve optimal brightness of the scene. Image quality is the priority, therefore longer exposure times are preferred.
Controls the camera sensitivity. Increasing the gain increases brightness of the image, but decreases quality (the more random noise, the more streaky noise and color unevenness), and increases the frame rate indirectly by enabling shorter exposure times.
Sets the brightness of the image. It is a constant additive (positive or negative) changing all pixel values of the image. With negative offset value the dark image areas become pure black. Considering fluorescence microscopy, an appropriate offset setting can create continuous black background and thus help to enhance (together with gain or illumination enhancement) the contrast.
Commands > Auto Exposure Setup
Sets how many pixels should be white after the Auto exposure is performed. Use lower values (0.01%) for very bright (shining) objects (fluorescence). For common bright field, even 1% may be a good value.
When automatic exposure is run, the system calculates the exposure time and gain values. With this option you can modify strategy of the calculation:
Exposure and gain are balanced.
Bright image is achieved by increasing exposure time. This strategy produces minimum noise.
Bright image is achieved by increasing gain. This strategy produces image noise, but allows maximum frame rate.
Advanced Options
Advanced users may modify the camera behavior by modifying the following registry key. Assuming your user account is named “Joe.Roberts”, find the following key in the registry editor:
[HKEY_LOCAL_MACHINE\SOFTWARE\Laboratory Imaging\Platform\Joe.Roberts\Platform.INI\Misc\grabber_imaging_source]
There you can set the following DWORD values:
SupportedCamerasMode
Having one of the models supported by NIS-Elements, set this value to 0 to turn the FilterFormats and CameraTypeMono values ON. If set to 1 these values are ignored.
FilterFormats
Set this value to 0 to display all available camera resolutions in the camera settings dialog. By default (SupportedCamerasMode = 1), a reduced set of resolutions is displayed (the smallest/fastest resolution and the maximum quality resolution).
CameraTypeMono
Set this value to 1 if an unsupported monochromatic camera is mis-detected and offers you to select a color version. This selection and the resolutions suitable only for the color camera version will be hidden.
The software provides two resolution presets. The first is used for live image and focusing and the second used for capturing. The formats then differ in image size and in frame rate (number of frames per second - fps). The higher the resolution is, the lower frame rate can be achieved. Available resolutions depend on the camera type.
Note
When switching between the formats while observing the live image, the size of the image on the screen is maintained - the zoom setting is changed instead. Only in some special cases, the behavior changes and the image size is changed instead of the zoom setting which is maintained.
The binning mode provides considerably enhanced camera chip sensitivity by integrating more elements (pixels) together. E.g.: binning 4x4 integrates the signal from the area of 4x4 chip elements to one pixel of the resulting image. Smaller resolutions and faster frame rates are achieved using the binning modes.
Automatically calculates the exposure time in order to achieve optimal brightness of the scene. Image quality is the priority, therefore longer exposure times are preferred.
These buttons change camera ROI size.
Sets the ROI to a custom value. Use the Define ROI command in the pull-down menu to set the size manually.
Sets the ROI to a computed size which ensures that no shading is visible on the image edges.
Note
The position of this automatic ROI can be adjusted in the Devices > Service Settings window.
Note
Depending on the actual system configuration, some of the buttons may be hidden.
Commands > Advanced Camera Settings
Note
Denoising is performed by the camera itself and works in the central ROI with a size of 1000x1000 px. The position and size of the ROI cannot be adjusted.
Please see the description of common camera features in the Camera Settings chapter. Only the camera-specific features are described below.
Sets up video capture board parameters. The Camera Settings dialog box appears.
The software provides two resolution presets. The first is used for live image and focusing and the second used for capturing. The formats then differ in image size and in frame rate (number of frames per second - fps). The higher the resolution is, the lower frame rate can be achieved. Available resolutions depend on the camera type.
Note
When switching between the formats while observing the live image, the size of the image on the screen is maintained - the zoom setting is changed instead. Only in some special cases, the behavior changes and the image size is changed instead of the zoom setting which is maintained.
The binning mode provides considerably enhanced camera chip sensitivity by integrating more elements (pixels) together. E.g.: binning 4x4 integrates the signal from the area of 4x4 chip elements to one pixel of the resulting image. Smaller resolutions and faster frame rates are achieved using the binning modes.
Influences the image contrast. It is a hardware multiplication constant that controls the color dynamics (especially with lower illumination levels).
Orca-ER offers times from 10µs to 10 seconds. (See below the exposure ranges of other Orca camera types).
These buttons change camera ROI size.
Sets the ROI to cover the maximum camera resolution.
Sets the ROI to a custom value. Use the Define ROI command in the pull-down menu to set the size manually.
Sets the ROI to a computed size which ensures that no shading is visible on the image edges.
Note
The position of this automatic ROI can be adjusted in the Devices > Service Settings window.
Note
Depending on the actual system configuration, some of the buttons may be hidden.
Supported Camera Models
Resolution 2048 x 2048. 16-bit, 12-bit and 8-bit digital output with programmable LUTs. Binning 2 x 2 / 4 x 4. 100 fps with Camera Link output, 40 - 80 fps with USB 3.0 output depending on the bit depth.
Resolution 2304 x 2304. 100 fps at 8-bit and 12-bit. Exposure time 17 µs - 10 s (fast scan), 65 µs - 10 s (standard scan), 280 µs - 10 s (ultra-quiet scan). Three bit-depth modes are available: Sensitive (12-bit lower), Normal (12-bit higher), and Balanced (shifted 2-bits above lower).
Resolution 2304 x 2304. 89.1 fps at 16-bit. 16-bit, 12-bit and 8-bit digital output. Exposure time 17 µs - 10 s (fast scan), 65 µs - 10 s (standard scan), 280 µs - 10 s (ultra-quiet scan).
Resolution 4096 x 2304. 120 fps at 16-bit. 16-bit, 12-bit and 8-bit digital output. Exposure time 7.2 µs - 1800 s (standard scan), 172.8 µs - 1800 s (ultra-quiet scan).
Note
Hamamatsu cameras can be used in multi-camera mode.
The probe  enables you to determine a small image area that serves as the data source area for LUTs, histogram etc. It also affects the AWB (auto white balance) and the AE (Auto Exposure) functions of cameras which support it. When the probe functionality is not supported, the AWB and AE algorithms are computed from the whole image.
Table 1. Camera support of computation from probe
| Camera | Auto Exposure | Auto White Balance |
|---|---|---|
| Nikon Digital Sight 10 | | |
| Nikon DS-U3/L3 | | |
| Nikon DS-U2/L2 | | |
| Andor - all models | | |
| Hamamatsu ORCA | | |
The CCD chip is divided into two areas - the sensor area which captures the image and the storage area, where the image is stored prior to read out. The transfer between these two areas is much faster than the readout speed. The following phenomena may occur under certain camera settings.
Blooming occurs when the charge in a pixel exceeds the saturation level and the charge starts to fill adjacent pixels. You should keep in mind, that saturated pixels often do not appear as overexposed in the image due to the CCD structure. Increasing the exposure time does not further brighten the image then.
Figure 72. Blooming
To reduce blooming, you should try the following procedure:
You can also increase the Vertical Clock Voltage Amplitude. The higher voltage will increase the CIC (Clock Induced Charge) but since we speak about a bright field situation the CIC will be insignificant.
Figure 73. Blooming corrected
Suppose you have a short exposure, say 10ms, and the recorded signal level is quite strong but none of the pixels gets saturated. While the image is being read out from the storage area, light continues to fall on the sensor area and accumulates. If the read out speed is for example 3MHz it will take ~300ms to read out the full image. The sensor area have been exposed to 30 times more light than during the exposure before the readout is finished, the pixels saturate and the blooming effect causes the charge to overflow from the sensor area to the readout area.
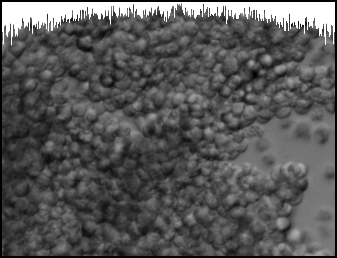
Figure 74. Vertical blooming
To cure the vertical blooming, you can:
If the exposure time is very short - similar to the speed of the transfer between the two halves of the CCD, and the intensity of the illumination source is high, a trail can appear in the image due to the smearing effect.
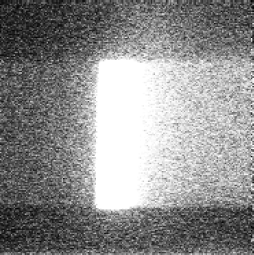
Figure 75. Horizontal Smearing
To cure smearing, you can:
Note
Obviously, the changes to camera settings suggested above will lead to some intensity/contrast changes in the image. These changes shall by compensated by other means such as Multiplier, Conversion Gain, Binning, Vertical Clock Voltage Amplitude or LUTs.