
 ND Processing & Conversions

Change directory to NIS-Elements.
CD \Program Files\NIS Elements
Install package using pip.bat.
pip.bat install <package>
or (alternatively pip can be called using python.bat)
python.bat -m pip install <package>
Run the interpreter and try to import the package.
python.bat
>>> import <package>
Call the bootstrappip.bat from NIS-Elements\Python folder.
Check pip.bat from C:\Program Files\NIS Elements\ and if successful end here. Otherwise continue with the steps below.
Go to NIS Elements Python folder C:\Program Files\NIS Elements\Python
Delete pip*.exe (pip.exe, pip3.exe, pip3.12.exe) from Scripts folder if present.
Delete pip and pip-XX.Y.Z.dist-info (e.g. pip-23.2.1.dist-info) from Lib\site-packages if present.
From C:\Program Files\NIS Elements\Python call
.\python.exe -m ensurepip --default-pip
Check pip.bat from C:\Program Files\NIS Elements\
Text is a basic text input field.
{"control":"Text"}Selection is a drop-down with labeled choices.
control: "Selection"
list — array of items
each item:
text — string (label)
value — string
{"control":"Selection", "list": [{"text":"A" , "value": "a"}, {"text":"B" , "value": "b"}]}Path is an input field with a browse button that opens the file or folder dialog.
control: "Path"
type — one of “file”, “folder”. Type chooses whether the dialog targets files or folders.
mode — one of “open”, “save”. Mode affects both the dialog for “file” type (Open or Save as) and how relative paths are resolved during a GA3 execution.
“open”: relative paths are resolved against the input file.
“save”: relative paths are resolved against the output file.
{"control":"Path", "type": "file", "mode": "save"}Number is a basic numeric input field.
control: "Number"
{"control":"Number"}
Slider is a range slider for continuous values with fixed precision, accompanied by an input field.
control: "Slider"
decimals — integer ≥ 0 (number of decimal places)
min — number (lower bound)
max — number (upper bound)
{"control":"Slider", "decimals": 3, "min": 0.0, "max": 100.0}Selection: a drop-down with labeled choices.
control: "Selection"
list — array of items
each item:
text — string (label)
value — number (float value)
{"control":"Selection", "list": [{"text":"P" , "value": 1.0}, {"text":"N" , "value": -1.0}]}Number is a basic numeric input field.
control: "Number"
{"control":"Number"}
Selection is a drop-down with labeled choices.
control: "Selection"
list — array of items
each item:
text — string (label)
value — integer
{"control":"Selection", "list": [{"text":"True" , "value": 0}, {"text":"False" , "value": 1}]}Simple segmentation:
Add one input channel and one binary:
Threshold objects using otsu threshold.
More complex:
Add one input channel and one output table:
Threshold the input using otsu threshold, then use scikit image to compute following per-object features: - mean channel intensity under each object, - object area in pixels, - object area in microns, - object perimeter in microns. Put the features into the output table as columns after loop and object cols.
Dimension reduction:
Add one input and output channel:
Create a MaxIP over time.
output(inp, out, par): Defines the node outputs
build(par, loops): Specifies how the run is called (e.g., two-pass processing).
run(inp, out, par, ctx): Defines how each frame or volume is processed.
what is the node output output(...),
how each frame/volume is processed run(...) and
how the run is called build(...)
the node should accept any bit-dept on input (it can be as low as uint8).
for computations it may convert to higher bit-depth (e.g. float64).
depending on the algorithm it should output the original bit-depth or use higher if necessary.
UInt8 means unpainted binaries where non-zero pixel is an object and zero is background.
Int32 means painted binaries where every pixel contains object id or zero for background.
stack reduction, and
two-pass algorithms
2D (depth=1),
300x200 pixels (remember the order is reversed dept, height, width, components),
mono (one component).
unsigned integer
uint8 where values are in range <0, 256) maximum being 255
uint16 where values are in range <0, 65536) maximum being 65535
floating point
float32 where values are unrestricted
uint8 interpreted as 0 - background and all other values as object
int32 interpreted as 0 - background and all other values as object ID
the node dialog when called from within the output(), build() and run() functions, otherwise it goes to
the log file.
Drag the Python node (in the ND Processing & Conversions section) into the graph.
Open the node settings dialog by clicking on the and add one color input
 and one binary output
  .
.Connect the input pin to the blue channel.
Connect the output pin to the SaveBinaries node.
Paste the code below inside the dialog.
Imports filters from the skimage package.
In the output() function defines the output to be a new binary named “otsu” and cyan color (0, 255, 255) or “#00FFFF”.
In the run() function:
takes the image from the inp array,
calculates the threshold calling threshold_otsu,
creates the binary by directly comparing the values from the image with the threshold value (in this example objects are dark), and
sets the binary data into the out array while converting to the proper format (uint8 or int32 for binary IDs).
Reduces N source frames into one resulting frame. Each pixel value in the resulting frame is an average of corresponding pixels in N source frames.
Based on the type:
All frames in the loop are reduced into one frame (all to 1).
For each frame in the loop reduces surrounding N frames into the current one (all to all).
Reduces every consecutive N frames into one frame (all to all/N).
Finds the best focus plane in the whole loop and effectively reduces the loop into single frame.
Select the method matching the acquisition modality.
Loop to be reduced.
In case there are more channels (All) select the one to use for criterion calculation.
(requires: Extended Depth of Focus)
Creates an Extended Depth of Focus (EDF) image from the selected Z-Stack Loop similarly to the Applications > EDF > Create Focused Image  . For more information about EDF, please see Extended Depth of Focus.
Integration uses multiple source frames to create one resulting image by integrating their pixel intensities. This is useful especially for low-signal (dark) scenes.
All frames in the loop are reduced into one frame (all to 1).
For each frame in the loop reduces surrounding N frames into the current one (all to all).
Reduces every consecutive N frames into one frame (all to all/N).
Loop to be reduced.
Displays ND document in the maximum intensity projection. See ND Views for more information.
Reduces the specified loop by taking a pixel from Channel stack A from the frame where the Reference channel stack Ref has maximum intensity.
Performs median on the connected result based on the specified parameters.
All frames in the loop are reduced into one frame (all to 1).
For each frame in the loop reduces surrounding N frames into the current one (all to all).
Reduces every consecutive N frames into one frame (all to all/N).
Loop to be reduced.
Performs quantile on the connected result based on the specified parameters.
Displays ND document in the minimum intensity projection. See ND Views for more information.
This action is used for selecting a specific frame(s) in the source image.
Loop where the frame will be selected.
Specifies the selection from the current loop.
Starting frame.
Number of frames.
Step size.
Selects one frame (Index) from the specified dimension (Loop).
Returns binary from a selected frame (Index) chosen from the specified dimension (Loop).
Captures a shading image of the selected Type on the selected Loop. See also Image > Background > Shading Correction.
(requires: Stage XY axis)
Stitches frames of the connected image into a large image. Select the stitching method from the Stitching via drop-down menu (see Methods Used for Stitching Large Images). Optionally the Precise stitching (Image Registration) can be checked but be aware that it is more computationally demanding.
Distortion Correction.ai corrects geometrical image distortion to eliminate duplicated structures in overlapping image tiles. It is closely described in Distortion Correction.ai.
Deshading from file runs the shading correction from a shading map.
Deshading automatic performs the shading correction on captured images automatically without capturing the shading image. Check this option and select the type of correction which best represents the background of your sample image.
(requires: General Analysis 3) (requires: Local Option)
Reduces N source frames into one resulting frame. Each binary pixel in the resulting frame means that every frame has this binary pixel. The function behaves like Min IP but on the binary.
All frames in the loop are reduced into one frame (all to 1).
For each frame in the loop reduces surrounding N frames into the current one (all to all).
Reduces every consecutive N frames into one frame (all to all/N).
Loop to be reduced.
(requires: General Analysis 3) (requires: Local Option)
Reduces N source frames into one resulting frame. Each binary pixel in the resulting frame means that at least one frame has this binary pixel. The function behaves like Min IP but on the binary.
All frames in the loop are reduced into one frame (all to 1).
For each frame in the loop reduces surrounding N frames into the current one (all to all).
Reduces every consecutive N frames into one frame (all to all/N).
Loop to be reduced.
Moves the frames with respect to each other in order to stabilize the motion of the image.
Previous / First frame.
Loop to stabilize.
In case there are more channels (All) select the one to use for calculation.
This command enhances the dynamic range of any connected channel of an image which contains at least a Z dimension. It analyses the image, calculates values similar to auto-contrast values common for the whole time sequence and then processes all frames of the ND2 file. This method is robust to noise and preserves the original trends of the histogram.
Histograms are reshaped to match the histogram of the first frame.
For every frame a local Bottom and Top is computed, then the global bounds are computed as minimum of bottoms and maximum of tops. Finally all histograms are stretched so their bottom and top match the global bounds.
Defines the document loop over which the histograms are equalized (T, Z, MP).
Resizes the image by a given ratio.
Resizes the image by a percentage of its current size.
Resizes the image so that the largest dimension (width or height) fits within a given value, maintaining proportions.
The check box toggles whether the image aspect ratio is locked, while the edit box lets you type in a ratio value to preserve.
Determines the algorithm used for resizing, which affects quality and smoothness.
(requires: General Analysis 3) (requires: Local Option)
Rotates the image using the following tools:
 Draw a horizontal reference line
 Draw a horizontal reference line in the image to set the proper angle.
 Draw a vertical reference line
 Draw a vertical reference line in the image to set the proper angle.
 Rotate counterclockwise
 Rotates the image counterclockwise.
 Rotate clockwise
 Rotates the image clockwise.
Manually adjust the angle [°].
Specifies how the output image is cropped/preserved.
Connected binary image is converted into a color image. Pixels of the binary objects are equal to one and background pixels become zeros.
Creates a new channel with a binary filled with the measured object feature (Object value ).
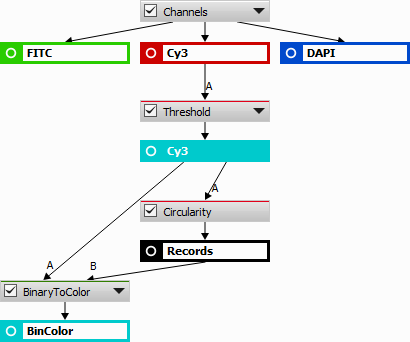
Figure 817. Convert Using Table Example

Figure 818. Bottom right area of the image showing the binary layer with the assigned circularity value (0,16 in this example)
Creates a new channel with a binary filled with the measured object feature (Object value).
Changes the bit-depth of the connected result.
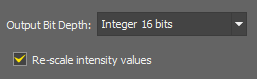
Figure 819.
Sets a new color depth of your image. 8-bit/16-bit integer or a floating-point. Intensity values can be rescaled.
If checked the pixel values are mapped to the new range. E.g. when you convert an 8bit image to 16bit and you do not rescale the values, it results in a completely black image. If the check box was selected, the 8bit 255 value would become 65535 in 16bit etc.
Changes the bit-depth of the connected result to the bit-depth of the connected reference image. Intensity values can be rescaled.
Splits the connected results back to the state before the channel merge.
Creates an intensity channel from the connected color source.
Converts multiple binary inputs into a color class image where every pixel belongs to exactly one class defined by its value (zero being background). Binaries are taken one-by-one from A parameter each setting a value (A -> 1, B -> 2, ...) to pixels under the corresponding binary. If binaries overlap the later is preserved.
Converts class image into multiple binaries based on the pixel values.
Number of binaries created.
Connected color image is rendered into a single RGB image.
Connected binary image is rendered into a single RGB image.
Overlay of the connected color (bottom) and binary layer (top) is rendered into a single RGB image.
Renders Channel A and Binaries B1, ..., Bn and stores it in the table as a row. If Filter is connected to a table it renders only frames present in the table.
Defines the size (in microns if calibrated) of the center portion of the frame that is cropped and rendered.
Maximum Size (in pixels) is a limit to which the rendered image is stretched down if being bigger.
(requires: General Analysis 3) (requires: Local Option)
This node enables visualization and extraction of segmented objects.
Size of the rendered image in pixels.
Specifies the image file format (jpg or png) and image quality in percent.
Preserve object scale maintains the original scale size of the objects whereas Stretch objects resizes the objects to fill the available space.
Converts the connected RGB result into an intensity channel.
Converts the connected RGB result to its HSI representation.
Converts the connected HSI result to its standard RGB representation.
(requires: General Analysis 3) (requires: Local Option)
Python 3.12 is embedded inside NIS-Elements in such a way that NIS-Elements can call the python interpreter and pass python code to it.
The python program and all its modules live in NIS-Elements folder so that it does not contaminate host environment that may be using different version of Python:
C:\Program Files\NIS Elements\Python\
Furthermore, two bat files pip.bat and python.bat exist in NIS-Elements folder to enable interacting with the python.
Installing packages using pip
Python packages can be managed using pip from the NIS-Elements folder.
Upgrading pip
Be careful and call .\python.exe from the NIS-Elements Python folder to be sure to upgrade the local NIS-Elements pip not the system pip.
CD \Program Files\NIS Elements\Python
.\python.exe -m pip install --upgrade pip
Troubleshooting pip
When pip.bat is not working:
Solution 1: instead use
python.bat -m pip install <package>
Solution 2: bootstrap pip
Python stdout - where print() text goes
NIS-Elements installs hook to both python stderr and stdout and routes it to the Log file. To see it go to  Help > Open Log File).
Run out of process
NIS-Elements utilizes certain libraries that may conflict with the built-in Python environment, preventing it from loading packages that require different versions of those libraries. To bypass this issue, you can use your own independent Python installation. Enable the "Run out of process" option, and specify the path to pythonw.exe (windowless). Additionally, copy the files limnode.py and limtabletabledata.py from C:\Program Files\NIS Elements\Python\Lib\site-packages to your Python installation's site-packages folder.
For example, if you select Python from the path: C:\ProgramFiles\Python312\pythonw.exe, then move both files to: C:\ProgramFiles\Python312\Lib\site-packages.
For optimal compatibility, it's recommended to use Python version 3.12 in “out of process” mode, as this is the version used by NIS-Elements.
There are two Python nodes. 2D node operates on frame data and a 3D node operates on volume data. They share the same look and behavior and appear empty when inserted into GA3. They allow the user to process and transform any inputs into any outputs using the Python interpreter. The whole ecosystem of Python packages can be used inside GA3.
To get started, see the Python workflow examples.
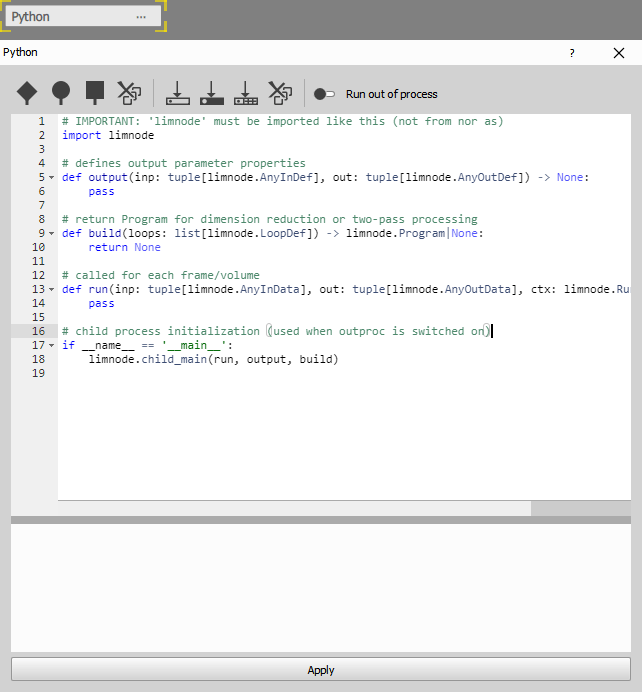
Figure 820.
The nodes allow for any number and type of inputs and ouftputs. Inputs and outputs can be added and removed by buttons on the toolbar. The tooltip on both inputs and outputs suggests how to access it in the code (e.g. inp[0], out[1]).
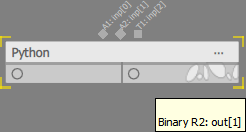
Figure 821.
Inputs & Outputs
Add image channel(s) input  Add binary input
  Add table input
  Add image channel(s) output Add binary output
  Add table output
  User Parameters
 Edit user parameters “P#” that allow to customize python script by the user. The parameters are available to the script in all three function in the par tuple.
The definitions for controls are provided as JSON strings:
{"control":"Text"}
{"control":"Number"}
{"control":"Slider","decimals":2,"max":100,"min":1}
{"control":"Selection","list":[{"text":"True","value":1},{"text":"False","value":0}]}
After switching to the  User mode (always in the wizard), the GA3 will present a user GUI instead of the python code. To go back to the developer mode click on the Developer mode link in the bottom right corner. The developer mode can also be protected with a password (enter the password and click ).
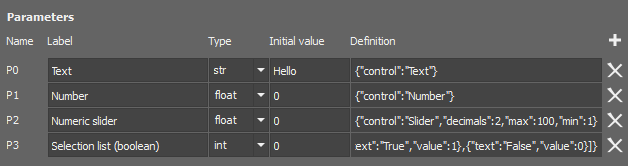
Figure 822. Setting up user parameters.
When the node is set to  Show in wizard and run, the GA3 will present a user GUI instead of the python code.
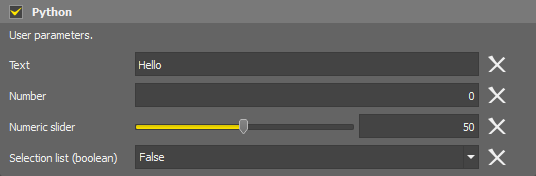
Figure 823. User mode.
This node supports three user parameter types: str, float and int. Each type has its own set of available GUI controls. The description below lists the controls for each type and the required fields.
Controls for string type are text, selection and path.
Controls for float type are number, slider and selection.
Controls for int type are number and selection.
Python interpreter
There are three option which python is invoked and how:
This option is for when the Python scripts run inside the NIS-Elements process in an embedded python interpreter. It is faster but limited to modules shipped with NIS-Elements.
This option is for when the user specifies which python interpreter to run. This option is for when additional python packages or modules have to be installed. In order not to disrupt the NIS-Elements environment a completely different python environment is created with its python interpreter. Select pythonw.exe windowless form. This option is to be used with environment managers like conda or mamba.
This option is for when an environment has to be transferred with the GA3 node. It is en extension of the previous option. Instead of specifying which python to run, the environment definition YAML is provided. Thus it can be then installed from the node GUI. This option is for advanced users. It is intended either as a last step in development of a python node or to be used in the user-mode entirely.
 Copy prompt for a LLM
 It is possible to ask large language models (LLMs) like ChatGPT, 5 Gemini or Copilot 5 to generate a python code. To simplify the interaction with the LLMs, use this button which prepares a prompt ready to be pasted into the LLMs. The user has to add a query at the end below the “Task provided by user”.
Some examples of prompts:
 Setup code editing in Visual Studio Code
 It is possible to edit and debug the code in VS Code by clicking the button. After selecting a working folder the the python file with the configuration is copied to that folder.
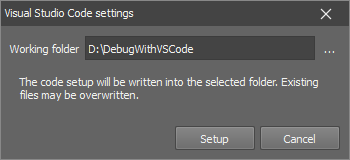
Figure 824. Setting up.
Another icon opens the VS Code.
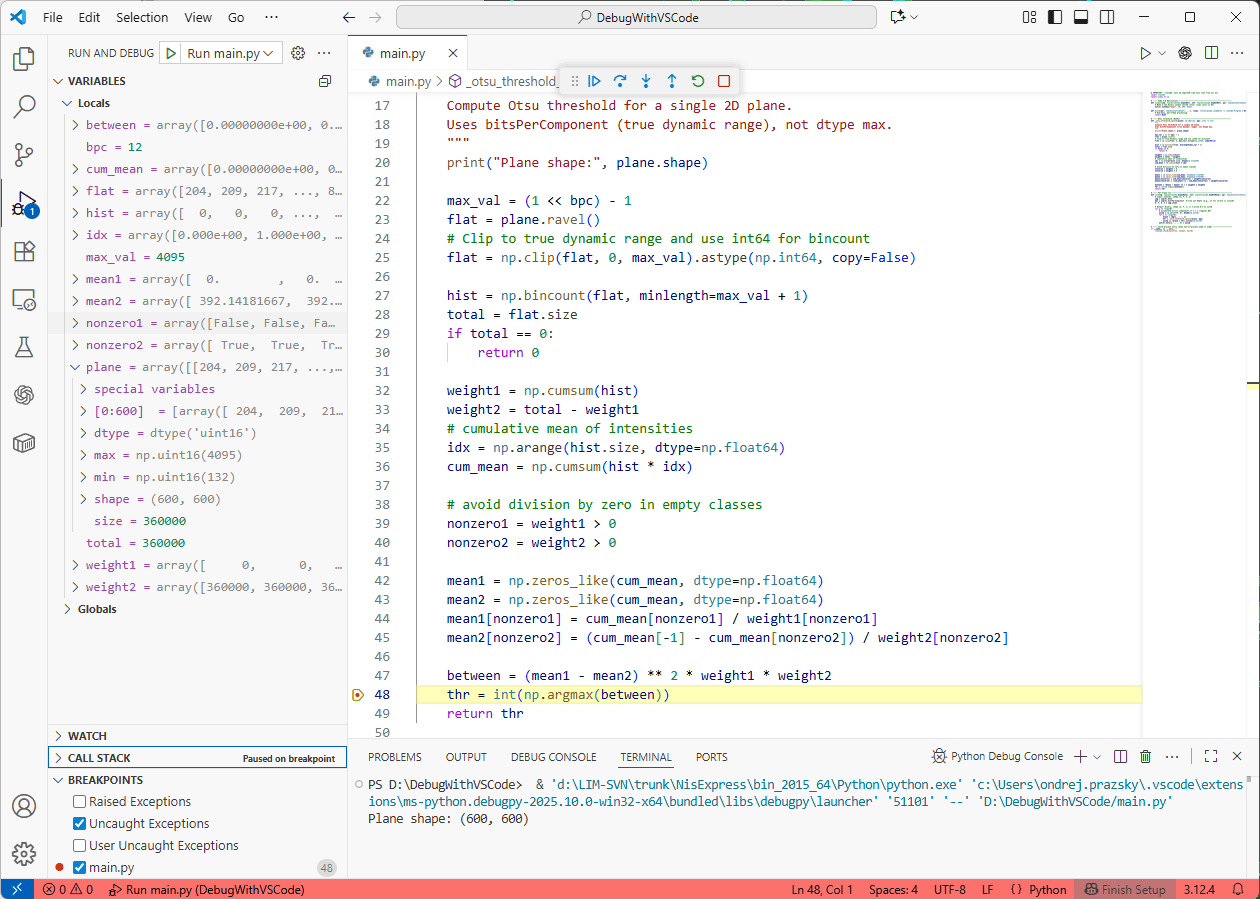
Figure 825. Debugging in VS Code.
The GA3 node dialog hides the code as the editing happens elsewhere. The node can copy the code and run the code from the working folder automatically after any change change or manually. While doing so it copies the data (inp, out, …) parameters to the data folder to be accessible for the script.
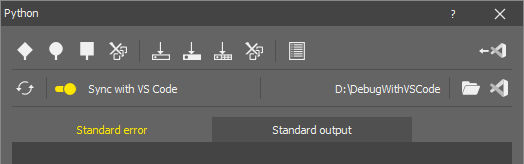
Figure 826. Node dialog when in VS Code.
The code in VS Code behaves as if it was called from the GA3 node.
The script
The default script looks like this:
# IMPORTANT: 'limnode' must be imported like this (not from nor as)
import limnode

# defines output parameter properties
def output(inp: tuple[limnode.AnyInDef], out: tuple[limnode.AnyOutDef]) -> None:
    pass

# return Program for dimension reduction or two-pass processing
def build(loops: list[limnode.LoopDef]) -> limnode.Program|None:
    return None

# called for each frame/volume
def run(inp: tuple[limnode.AnyInData], out: tuple[limnode.AnyOutData], ctx: limnode.RunContext) -> None:
    pass

# child process initialization (when outproc is set)
if __name__ == '__main__':
    limnode.child_main(run, output, build)
At the beginning of the script, always import limnode. This ensures that key functions are executed correctly.
import limnode
There are three key functions that must always be present and have the correct number of input parameters:
All important details about these functions can be seen inside:
%userprofile%\AppData\Local\Programs\NIS-Express\Python\Lib\site-packages\limnode.py
For any other option than Built-in python, following piece of code must be present at the end of the script:
if __name__ == '__main__':
    from limnode import print
    limnode.child_main(run, output, build)
There are three functions that define
All important details can be seen in the limnode.py inside C:\Program Files\NIS Elements\Python\Lib\site-packages.
The purpose of this function is to define all aspects of output parameters by modifying out tuple items.
Output() is typically called before the run of GA3 after some user change upstream the graph. The information provided is used by the downstream nodes in GUI and run (for example table columns defined here are listed dependent nodes).
In GA3 output parameters can have assigned input or can be create new output. When they have assigned input, they inherit name, color and the number of components from that input. The output changes as the input gets reconnected. New outputs however, must be fully defined.
For assigning all output items have assign(...) method which takes input of the same type. For creating new output there are dedicated makeNew*(...) methods. All these methods return self and can be safely concatenated.
By default the node tries to assign to every output the first input of the same type. It this is not possible a new output is made.
Here is a summary of the methods:
class OutputChannelDef:
    def assign(self, param: InputChannelDef) -> OutputChannelDef:
        ...
    def makeNewMono(self, name: str, color: AnyColorDef) -> OutputChannelDef:
        ...
    def makeNewRgb(self, name: str|None = None) -> OutputChannelDef:
        ...
    # change bitdepth
    def makeFloat(self) -> OutputChannelDef:
        ...
    def makeUInt16(self) -> OutputChannelDef:
        ...
    def makeUInt8(self) -> OutputChannelDef:
        ...

class OutputBinaryDef:
    def assign(self, param: InputBinaryDef) -> OutputBinaryDef:
        ...
    def makeNew(self, name: str, color: AnyColorDef) -> OutputBinaryDef:
        ...
    # change bitdepth
    def makeInt32(self) -> OutputBinaryDef:
        ...
    def makeUInt8(self) -> OutputBinaryDef:
        ...

class OutputTableDef:
    def assign(self, param: InputTableDef) -> OutputTableDef:
        ...
    # new empty table
    def makeEmpty(self, name: str) -> OutputTableDef:
        ...
    # optional InputTableDef to copy columns from or if None add just loopCols
    def makeNew(self, name: str, param: InputTableDef|None = None) -> OutputTableDef:
        ...
    # to add all necessary loop columns
    def withLoopCols(self) -> OutputTableDef:
        ...
    # to add Entity and ObjectID columns
    def withObjectCols(self) -> OutputTableDef:
        ...
    # and arbitrary data columns based on type
    def withIntCol(self, title: str, unit: str|None = None, feature:str|None = None, id: str|None = None) -> OutputTableDef:
        ...
    def withFloatCol(self, title: str, unit: str|None = None, feature:str|None = None, id: str|None = None) -> OutputTableDef:
        ...
    def withStringCol(self, title: str, unit: str|None = None, feature:str|None = None, id: str|None = None) -> OutputTableDef:
        ...
For channel data processing the bit-depth is very important:
For binary processing too as:
Do not take the max value from the numpy dtype as it can be misleading because of intermediate bit-depths such as 10, 12, 14 all encoded in UInt16. Always use appropriate bitsPerComponent such as:
max_val = 2 ** out[0].bitsPerComponent - 1
Example of assigning an input channel to output and changing it to float:
def output(inp: limnode.InDefTuple, out: limnode.OutDefTuple, par: limnode.UserParTuple) -> None:
    out[0].assign(inp[0]).makeFloat()
Example of creating a new YFP (yellow) 16bit channel:
def output(inp: limnode.InDefTuple, out: limnode.OutDefTuple, par: limnode.UserParTuple) -> None:
out[0].makeNewMono('YFP', "#FFFF00").makeUInt16() # color can be a RGB tuple too: (255, 255, 0)Example of adding two columns to an output table:
# by making new the table has only loop columns and the two columns added to it
def output(inp: limnode.InDefTuple, out: limnode.OutDefTuple, par: limnode.UserParTuple) -> None:
    unit_x, unit_y, _ = inp[0].units # inp[0] is InputChannelDef or InputBinaryDef
    out[0].makeNew("Records").withFloatCol("X coord", unit_x).withFloatCol("Y coord", unit_y)

# by assigning the table gets all columns from inp[0] and a new Ratio column of type float
def output(inp: limnode.InDefTuple, out: limnode.OutDefTuple, par: limnode.UserParTuple) -> None:
out[0].assign(inp[0]).withFloatCol("Ratio")It is called before run to inquire how to call the run method. By default it returns None to indicate that run will be called for each frame/volume once.
Other two possibilities are for:
For stack reduction return ReduceProgram(...) with appropriate loop overZStack() or overTimeLapse() method.
def build(par: limnode.UserParTuple, loops: limnode.LoopDefs) -> limnode.Program|None:
    return limnode.ReduceProgram(loops).overZStack()
For two-pass algorithms return TwoPassProgram with appropriate loop overZStack or overTimeLapse method.
def build(par: limnode.UserParTuple, loops: limnode.LoopDefs) -> limnode.Program|None:
return limnode.TwoPassProgram(loops).overZStack()It is called for every frame/volume (depending on return value of build) to fill the data of each out item.
For OutputChannelData and OutputBinaryData the data property is a numpy.ndarray of shape (z, y, x, ch) and dtype defined by output function. By default it is filled with zeros.
def run(inp: limnode.InDataTuple, out: limnode.OutDataTuple, par: limnode.UserParTuple, ctx: limnode.RunContext) -> None:
    out[0].data[:] = inp[0].data[:] * 2
In the python node the data ndarray for both Color Channels and Binaries have ndim=4 (rank of 4) and following shape:
0. z - depth of 3D Z stack volumes (1 - for 2D)
1. y - height of 2D image
2. x - width of 2D image
3. c - component (a.k.a channel) of image (1 for mono and binaries, 3 for RGB, n for all)
For example:
print(inp[0].data.shape) # output: (1, 200, 300, 1)
Means that inp[0] is:
Color Channel data are either:
Binary data is:
For OutputTableData the data property is a table (type LimTableDataBase defined in limtabledata.py). Table columns are defined by output function. By default the table is empty (there is no data in any column).
# for more columns at once
def run(inp: limnode.InDataTuple, out: limnode.OutDataTuple, par: limnode.UserParTuple, ctx: limnode.RunContext) -> None:
    out[0].withColData(["X coord", "Y coord"], [ [0.0, 0.5], [0.0, 0.5] ])  # list, list[list]

# for inp[0] being an assigned (has same columns) InputTableData
def run(inp: limnode.InDataTuple, out: limnode.OutDataTuple, par: limnode.UserParTuple, ctx: limnode.RunContext) -> None:
    a, b = inp[0].colArray(["MeanOfDiO", "MeanOfDiI"])
    out[0].withColDataFrom(inp[0]).withColData("Ratio", a/b)


# for inp[0] being an assigned (has same columns) InputTableData
def run(inp: limnode.InDataTuple, out: limnode.OutDataTuple, par: limnode.UserParTuple, ctx: limnode.RunContext) -> None:
    df = inp[0].dataFrame()
    temp_df = pd.DataFrame({ "Ratio": df["MeanOfDiO"] / df["MeanOfDiI"] }) # must have same name as new column to match
    out[0].withColDataFrom(inp[0], temp_df) # first copies columns from inp[0] remaining from temp_df
Each item has prefilled recdata (of type LimTableDataBase) with per-frame recorded data (e.g. AcqTime, X, Y, Z, …) which can be altered.
The context ctx provides more information about the current run:
@dataclass(kw_only=True)
class RunContext:
   inpFilename: str                            # full input filename
   outFilename: str                            # full output filename (typically same as inpFilename except in Cluster Computing)
   inpParameterCoordinates: tuple[tuple[int]]  # loop coordinates for every input parameter
   outCoordinates: tuple[int]                  # output loop coordinates
   programLoopsOver: list[str]|None            # loop names the program runs over
   programCoordinateIndexes: tuple[int]|None   # inner loops: indexes of loops that must be handled in Python (not by GA3) e.g. Z-Stack loop
   programPass: int
   finalCall: bool

   @property
   def shouldAbort(self) -> bool:              # abort is requested
       ...
ctx.shouldAbort should be checked whenever possible. However, it is not possible to abort calls into libraries. In such cases switch out of process execution ON.
When ReduceProgram was returned in build the run function must fill the out items only when ctx.lastCall == True.
Before lastCall it is expected to accumulate the result like in this maximum intensity example:
# IMPORTANT: 'limnode' must be imported like this (not from nor as)
import limnode, numpy as np

tmp = None

# defines output parameter properties
def output(inp: limnode.InDefTuple, out: limnode.OutDefTuple, par: limnode.UserParTuple) -> None:
    out[0].makeNewMono("DiY", (0, 0, 255))

# return Program for dimension reduction or two-pass processing
def build(par: limnode.UserParTuple, loops: limnode.LoopDefs) -> limnode.Program|None:
    return limnode.ReduceProgram(loops).overZStack()

# called for each frame/volume
def run(inp: limnode.InDataTuple, out: limnode.OutDataTuple, par: limnode.UserParTuple, ctx: limnode.RunContext) -> None:
    global tmp
    if tmp is None:
        tmp = np.zeros(inp[0].data.shape, inp[0].data.dtype)
    tmp = np.maximum(tmp, inp[0].data)
    if ctx.finalCall:
        out[0].data[:] = tmp

# child process initialization (when outproc is set)
if __name__ == '__main__':
    from limnode import print
limnode.child_main(run, output, build)When TwoPassProgram was returned in build the run function must fill the out items only when ctx.lastCall == True. The run can monitor the frame/volume being processed in ctx.inpParameterCoordinates and ctx.reducingCoordinateIndexes. During first pass the node analyses data and then during second pass if fills the out items.
In the example below the node accumulates a maximum intensity projection in the first pass and during the second pass it subtracts current frame from it:
import limnode, numpy as np

tmp = None

# defines output parameter properties
def output(inp: limnode.InDefTuple, out: limnode.OutDefTuple, par: limnode.UserParTuple) -> None:
    out[0].assign(inp[0])

# return Program for dimension reduction or two-pass processing
def build(par: limnode.UserParTuple, loops: limnode.LoopDefs) -> limnode.Program|None:
    return limnode.TwoPassProgram(loops).overZStack()

# called for each frame/volume
def run(inp: limnode.InDataTuple, out: limnode.OutDataTuple, par: limnode.UserParTuple, ctx: limnode.RunContext) -> None:
    global tmp
    if tmp is None:
        tmp = np.zeros(inp[0].data.shape, inp[0].data.dtype)
    if ctx.finalCall:
        out[0].data[:] = tmp - inp[0].data[:]
    else:
        tmp = np.maximum(tmp, inp[0].data)

# child process initialization (when outproc is set)
if __name__ == '__main__':
    from limnode import print
    limnode.child_main(run, output, build)
Important
All numpy.ndarray data properties are valid only during the particular run. If the algorithm has to to store it in a variable it has to make a copy of it.
tmp = numpy.copy(unp[0].data[0, :, :, 0])
NIS-Elements hooks into both Python stderr and stdout. The stderr is redirected into the log file and the stdout to:
The log file (log_YYYY-MM-DD.txt) can be found in:
%userprofile%\AppData\Roaming\Laboratory Imaging\NIS-Express\LogFiles
When “Out-of-process” is selected the print output can be redirected to the node dialog using the print() function from the limnode. It is enabled by default by importing the print function:
# child process initialization (when outproc is set)
if __name__ == '__main__':
    from limnode import print
    limnode.child_main(run, output, build)
There is also a log function:
limnode.log("Debug message:", value) # it has the same parameters as print()which always goes into into separate log file (pylog_YYYY-MM-DD.txt) in the folder as above.
Many times the required python modules are incompatible with NIS-Elements or lengthy operation dictate the need for out of process execution. In such scenario all three functions output, build and run are called in a separate process. Specifically the C:\Program Files\NIS Elements\Python\pythonw.exe is and the script is passed to it. All calls are forwarded to that process.
For details see limnode.py.
This example will show how to install an additional package (skimage) and use it for basic segmentation.
Install the package using pip.bat and check that it is installed and can be imported using python.bat:
CD \Program Files\NIS Elements
pip.bat install scikit-image
python.bat
>>> import skimage
Open the C:\Program Files\NIS-Elements\Images\agnor.tif.
In NIS-Elements GA3 Editor:
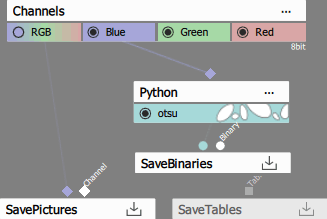
Figure 827.
# IMPORTANT: 'limnode' must be imported like this (not from nor as)
import limnode, numpy
from skimage import filters

# defines output parameter properties
def output(inp: tuple[limnode.AnyInDef], out: tuple[limnode.AnyOutDef]) -> None:
    out[0].makeNew("otsu", (0, 255, 255))

# return Program for dimension reduction or two-pass processing
def build(loops: list[limnode.LoopDef]) -> limnode.Program|None:
    return None

# called for each frame/volume
def run(inp: tuple[limnode.AnyInData], out: tuple[limnode.AnyOutData], ctx: limnode.RunContext) -> None:
    image = inp[0].data[0, :, :, 0]
    threshold = filters.threshold_otsu(image)
    binary = image < threshold
    out[0].data[0, :, :, 0] = binary.astype(numpy.uint8)

# child process initialization (when outproc is set)
if __name__ == '__main__':
    limnode.child_main(run, output, build)
The code:
The resulting thresholded binary image should look like this:
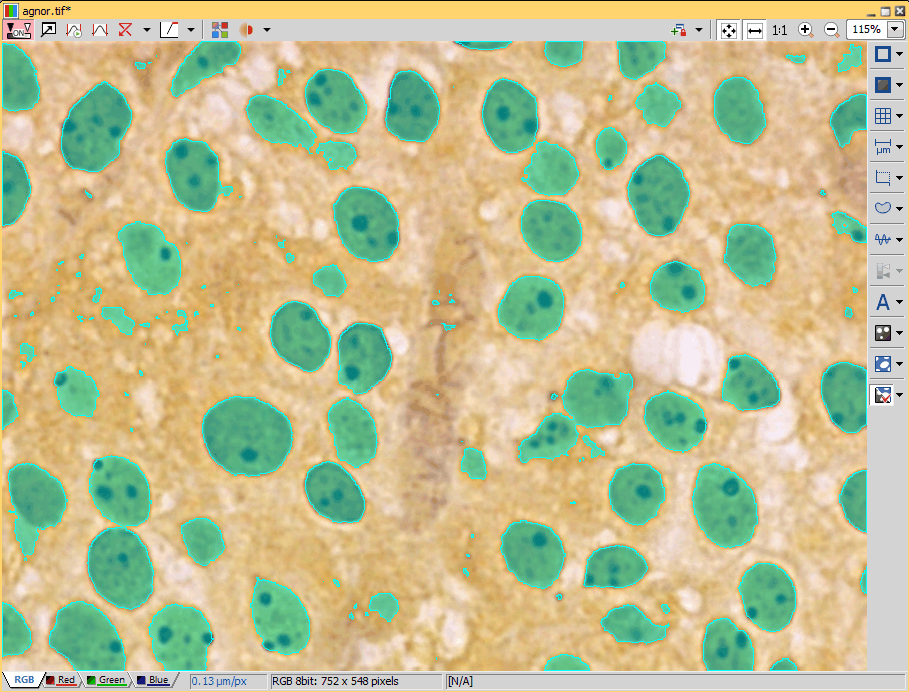
Figure 828.
Cellpose is well known package for cellular segmentation (see cellpose.org).
First install the cellpose module:
C:\Program Files\NIS Elements>pip.bat install cellpose[gui]
In NIS-Elements open an image, insert python node and set it up for segmentation (one channel input and one binary output) like so:

Figure 829.
Because the libraries used by cellpose collide with NIS-Elements, make sure to switch ON the Run out of process.
Then edit the python code as follow:
# IMPORTANT: 'limnode' must be imported like this (not from nor as)
import limnode, numpy
from cellpose import models

model = models.Cellpose(model_type='cyto3')

# defines output parameter properties
def output(inp: tuple[limnode.AnyInDef], out: tuple[limnode.AnyOutDef]) -> None:
    out[0].makeNew("cell", (0, 255, 255))

# return Program for dimension reduction or two-pass processing
def build(loops: list[limnode.LoopDef]) -> limnode.Program|None:
    return None

# called for each frame/volume
def run(inp: tuple[limnode.AnyInData], out: tuple[limnode.AnyOutData], ctx: limnode.RunContext) -> None:
    masks, flows, styles, diams = model.eval(inp[0].data[0, :, :, 0])
    out[0].data[0, :, :, 0] = masks.astype(numpy.uint8)

# child process initialization (when outproc is set)
if __name__ == '__main__':
    limnode.child_main(run, output, build)
And see the results:
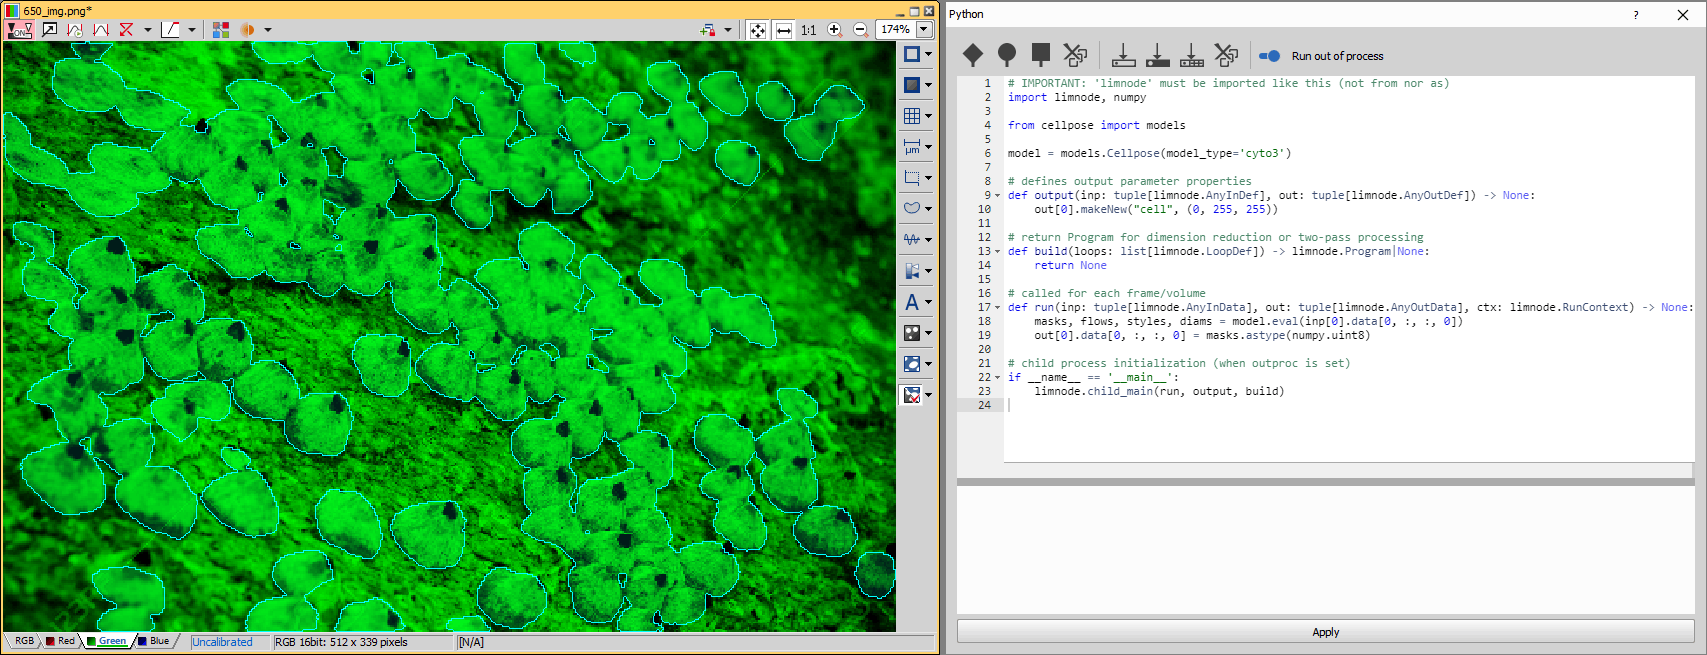
Figure 830.
All imports and processing defined in global scope is often run by GA3 editor and can result in frequent freezing of GA3 editor. To make GA3 editor more responsible, try to hide these in functions.
Here is short example how to rewrite Cellpose segmentation to make editor more responsive.
# IMPORTANT: 'limnode' must be imported like this (not from nor as)
import limnode

model = None

# defines output parameter properties
def output(inp: tuple[limnode.AnyInDef], out: tuple[limnode.AnyOutDef]) -> None:
    out[0].makeNew("cell", (0, 255, 255))

# return Program for dimension reduction or two-pass processing
def build(loops: list[limnode.LoopDef]) -> limnode.Program|None:
    return None

# called for each frame/volume
def run(inp: tuple[limnode.AnyInData], out: tuple[limnode.AnyOutData], ctx: limnode.RunContext) -> None:
    import numpy
    from cellpose import models

    global model
    if model is None:
        model = models.Cellpose(model_type='cyto3')

    masks, flows, styles, diams = model.eval(inp[0].data[0, :, :, 0])
    out[0].data[0, :, :, 0] = masks.astype(numpy.uint8)

# child process initialization (when outproc is set)
if __name__ == '__main__':
    limnode.child_main(run, output, build)
All imports except limnode are moved to function 'run' as its only place where they are needed. Global variable “model” is initially assigned to None and is reassigned in “run”.
BaSiCPy is a library "for background and shading correction of optical microscopy images" (see BaSiCPy @ github.com).
First install the basicpy module:
C:\Program Files\NIS Elements>pip.bat install basicpy
Setup the node for processing by adding Channel input and output. It is not necessary to run BaSiC in different process.
The python con be written like so:
# IMPORTANT: 'limnode' must be imported like this (not from nor as)
import limnode, numpy
from basicpy import BaSiC

basic = BaSiC(get_darkfield=True)
fitted: bool = False
imgcache: list[numpy.ndarray] = []

# defines output parameter properties
def output(inp: tuple[limnode.AnyInDef], out: tuple[limnode.AnyOutDef]) -> None:
   pass

# return Program for dimension reduction or two-pass processing
def build(loops: list[limnode.LoopDef]) -> limnode.Program|None:
   return limnode.TwoPassProgram(loops).overMultiPoint()

# called for each frame/volume
def run(inp: tuple[limnode.AnyInData], out: tuple[limnode.AnyOutData], ctx: limnode.RunContext) -> None:
   global imgcache, fitted, basic
   if ctx.finalCall:
       if not fitted:
           stk = numpy.stack(imgcache, axis=0)
           basic.fit(stk)
           imgcache = []
           fitted = True
       out[0].data[0, :, :, 0] = basic.transform(inp[0].data[0, :, :, 0])[0]
   else:
       imgcache.append(numpy.copy(inp[0].data[0, :, :, 0]))
       fitted = False

# child process initialization (when outproc is set)
if __name__ == '__main__':
   limnode.child_main(run, output, build)
The result looks like this:
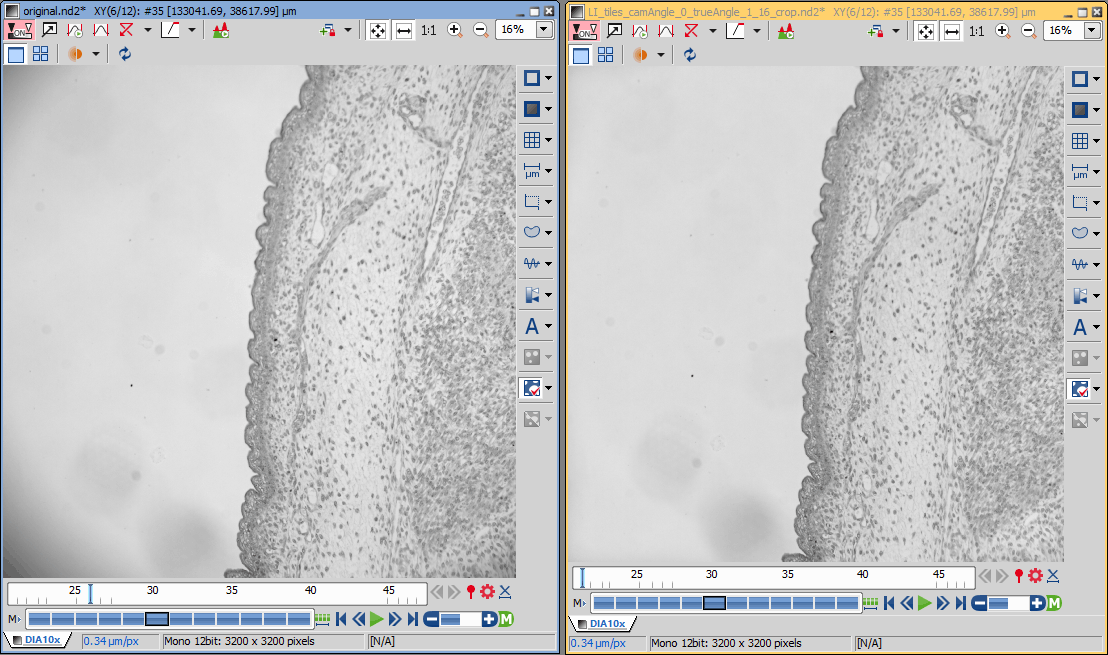
Figure 831.