
Follow the instructions below:
Move the XY stage so that the analyzed part of the filter is in the field of view of the camera.
Click
 Adjust Light to run the Check Illumination window. This window displays mean pixel intensities and ratio of overexposed pixels in the image. (See Filter Scanning).
Adjust the illumination so that the ratio of overexposed pixels is slightly higher than zero.
Start decreasing the intensity of illumination until the ratio equals zero. Stop decreasing the intensity at that moment.
Close the illumination check dialog window and go to the Scanning tab in the Setup window. (You can open the dialog by pressing the
 Options in the left toolbar).
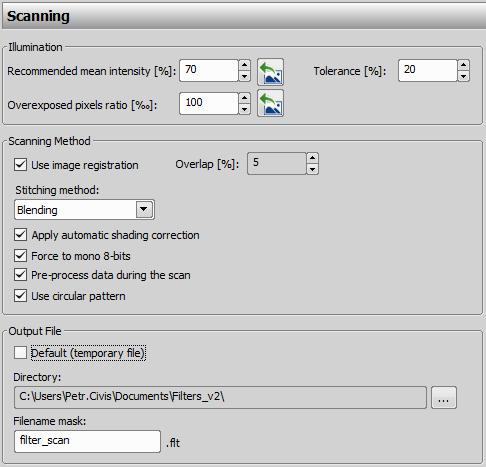
Figure 607. Setting parameters for scanning filters
Use the
 button to set the Recommended mean intensity [%] value. This function subtracts the mean intensity value of the scene which is currently in the camera field of view. Set the permitted deviation interval in the Tolerance [%] field. It is recommended to set a non-zero tolerance.
Adjust the maximal permitted Overexposed pixels ratio. It is recommended to set a non-zero value.
Fill in the recommended calibration value in the Calibration field. This prevents the user from scanning a filter with a wrong objective/calibration. If the current calibration on scanning start does not match the value within this field, you will be warned before the scanning starts.
In the Scanning Method section you can choose to Use image registration which automatically adjusts the position of the scanned images and helps If there are pixel-shifts between neighboring images.
Set the Overlap percentage of one frame overlapping its neighbor and Stitching. Stitching via Blending blends the overlapping image parts, Simple Overlap overlaps the images without blending and Optimal path method computes a contour in places where two overlapping images are least different and then they are stitched copying this contour.
See also: Methods Used for Stitching Large Images.
Apply automatic shading correction automatically corrects illumination inhomogeneities of the captured images.
Force to mono 8-bits converts images captured with a color camera to an 8-bit mono image. This function is turned on by default and disabled for mono cameras.
Pre-process data during the scan function processes the scanned images during the stage movement. If the stage is decelerated by the computer, turn this function off.
Use circular pattern acquires the images in a spiral direction which is recommended when Use autofocus is set in the Focusing tab of the
Options dialog. For None or Use manual focus options turn this function off.Set the output path where the filter image will be saved. The resulting file name will contain the Filename mask, the current user name, date and time of scanning.
If you check the Default (temporary file) option, the scanned filter has to be saved manually.
Confirm the setting by clicking .