Click  Automatic Deconvolution on the top of the image toolbar to display the following window.
See also NIS-Elements ER Package.
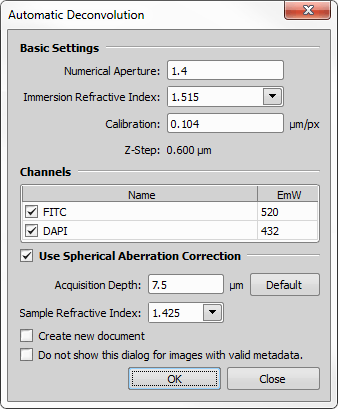
Figure 599.
Dialog window settings
Enter the refraction index of the immersion medium used. Predefined refraction indexes of different media can be selected from the pull-down menu.
Image channels produced by your camera are listed within this table. You can decide which channel(s) shall be processed by checking the check boxes next to the channel names. The emission wavelength value may be edited (except the Live De-Blur method).
Note
Brightfield channels are omitted automatically.
If turned on, spherical aberration of the PSF is calculated and used. Enter the Acquisition Depth (depth defining the center of the sample where the PSF is generated). Default value of the Acquisition Depth is taken from image metadata as a distance from the Z-Stack edge to the Z-Stack Home position. This distance is in most cases 1/2 of the Z-Stack depth. The only exception is the Asymmetric Z-Stack mode where the home position is explicitly defined by the experiment setting.
Adjust the number of Layers if you want to use the depth variant deconvolution. If you set Layers to a number bigger than one, the stack is internally split in the Z dimension into several sub-stacks (layers) and an aberrated PSF is computed separately for each one. For example a Z stack having a total range of 10 µm, 5 layers, and acquisition depth (set in the deconvolution dialog) of 10 µm will generate PSFs for the sub-volumes at 6 µm, 8 µm, 10 µm, 12 µm, and 14 µm.
Finally set the Sample Refractive Index value (refractive index of the medium used for sample acquisition). Default Sample Refractive Index is 1.35 (for water).
If Use Spherical Aberration Correction is turned off, PSF without any aberration is used.
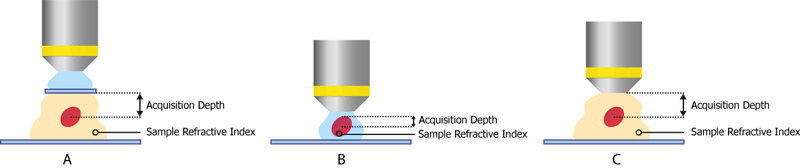
Figure 600. Acquisition depth and refractive index for different acquisition setups: left image - sample (red) with its surrounding solution; right image - sample with a coverslip and an immersion medium.
Water/oil/air objective with a sample (red) in a medium under the coverslip having a different refractive index that the objective was designed for.
Water objective with the sample matching the objective design.
Sample with its surrounding solution having a different refractive index than the objective was designed for. In this case acquisition depth = objective working distance.
Note
If using a correction collar on your objective, the space between the adjusted plane and the capturing plane defines the acquisition depth. Be sure to de-select the Use Spherical Aberration Correction option. On the contrary, when running deconvolution from the top image toolbar, 0 has to be filled into the Acquisition Depth field.