
Press the
 button.
Select a command from the Paste Command window. And press OK.
Selected command is inserted in the Macro Panel window.
Right-click the command and select the Properties command from the context menu. Change appearance properties (used bitmap, font properties, etc.) of the command's button and confirm.
Press the
 button.
The Add Macro window appears.
Select a macro. The Predefined, Shared and Recently used macros are listed in separate sections. When you need to import a macro from file, press the
button and choose proper file. To select multiple macros, use the  button to select them all within a section, or check their individual check-boxes.
When necessary, use the
 command to edit the selected macro in the Macro Editor.
Confirm by pressing the OK button.
Selected macros are inserted in the Macro Panel window.
Right-click the command and select the Properties command from the context menu. Change appearance properties (used bitmap, font properties, etc.) of the command's button and confirm.
Check the events you would like to assign a macro/command to.
Click the arrow button to invoke a pull-down menu. Select one of the following options to select a macro/command:
Run MacroAn open-like dialog appears allowing you to browse for a macro (*.mac) file on hard disk.
Command ListDisplays a complete list of commands available in the system. Select one and confirm it by (See Macro > Command).
Confirm the settings by .
This command repeats last performed command. When selecting this command the last executed function is called and appended to the list of executed functions.
This command opens a dialog window which manages a list of recently executed commands.
The main portion of the window contains a list of recently executed commands. Select a sequence of commands (or just a single command) which are useful for you and then use the commands in the top portion of the window to create a new macro, or to execute the sequence of commands again. You can also delete any of the commands present in the list by pressing the  Reset history button. You can copy or delete the selection of commands using the contextual menu which appears when you right-click the list.
In the information bar at the bottom of the dialog window you can see the total number of commands currently recorded in command history and info about available memory capacity.
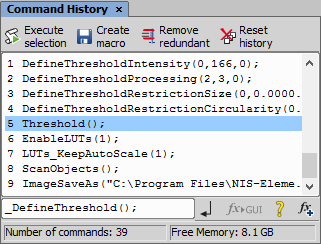
Figure 645.
 Execute selection
 Use this button to execute a selected command or sequence of commands.
 Create macro
 Use this button to create a macro. You will be prompt whether to use the selected commands or the whole commands history. Before the macro is created and opened within the macro editor, the Remove Redundant command is performed automatically.
 Remove redundant
 The sequence of commands that make no image changes will be automatically removed. Usually, it concerns commands that toggles the image between two states and were used several times. It can be for example ShowAnnotations(), ShowProbe(), or EnableLUTs(). No functionality gets lost when only the last command is kept.
Reset history Use this button to clear the history of executed commands.
This field displays currently selected command from the list. You can also paste or enter any command.
 Execute command
 Use this command to execute current command.
 Transform to interactive
 This command replaces selected command with an interactive one, that means a command which opens corresponding dialog window. Only commands related to some interactive commands can be transformed.
 Help on command
 This button opens the electronic help to the selected function.
Insert function This command opens the Paste Command dialog window. You can search and paste any command to the Current command field.
(requires: Interactive Advanced Macro - API)
This control window displays chosen macros and/or commands as buttons. Macros and commands can be run by clicking on their button representative, or using a hotkey defined in the Setup Macro Panel.
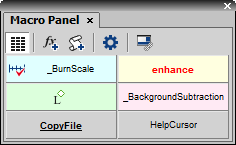
Figure 646.
Control Window Options
 Regular Buttons
 Use this command to change size of the buttons to be the same width. When this button is not pressed, buttons wrap the title (a text or an icon) of the button.
Add Command This command opens the Paste Command dialog. You can choose a command, which is added to the Macro Panel.
Add Macro This command opens the Add Macro dialog. You can select a predefined, shared or recently used macro or a macro from a file, which is added to the Macro Panel.
 Setup Macro Panel
 Opens the Setup Macro Panel window. You can manage the macros and commands and their properties.
 Associate with Current Layout
 When this button is pushed, different contents of the control panel are saved for each layout.
How to add a command
How to add a macro
The buttons can be rearranged in the panel by drag and drop. Title of the button can be renamed using the Rename command from the context menu.
Setup Macro Panel Options
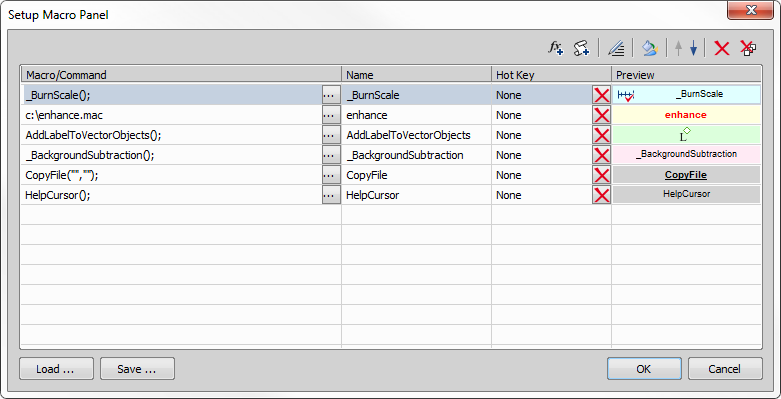
Figure 647.
Overview of added macros and commands is displayed in this window. Name of the command or full path to the macro is visible in the first column. The second column shows names of the commands/macros. The third column displays assigned hot keys. The forth column contains preview of the button in the Macro Panel. You can directly edit the name, hot key or preview, if you left-click the corresponding field of the selected command/macro.
Add Command Opens the Paste Command dialog.
Add Macro Opens the Add Macro dialog.
Edit Opens the Macro Editor window.
 Properties
 Opens the Properties dialog.
Moves the selected macro or command one line up/down.
 Remove
 Removes selected command or macro.
Remove All Removes all commands and macros.
Loads the saved definition from an external XML file.
Saves the definition to an external XML file.
Allows you to execute a single function. When selecting this command the Execute Command dialog box appears:
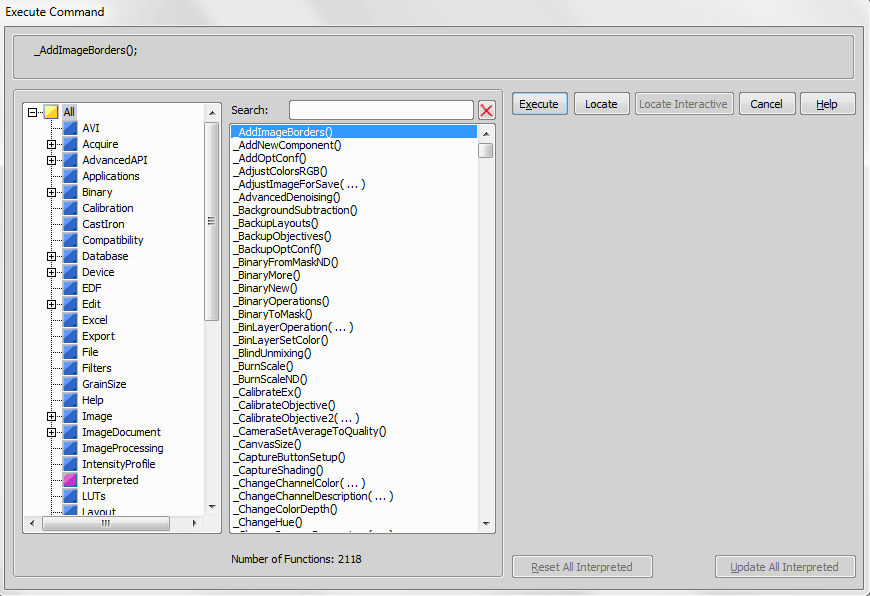
Figure 648.
Lists all NIS-Elements functions.
Executes the selected function.
Locates the selected function and displays it in the command tree view.
Use this button to search for interactive alternative of the selected command.
Some fields (e.g. TextColor, FillColor, BorderLine, ...) can have a color icon next to the edit box enabling to insert the color throughout a dedicated dialog window.
Removes interpreted functions from the list of functions.
Updates the interpreted functions. Use this button in case the definition of some interpreted function(s) changed.
Sends a string to a serial port.
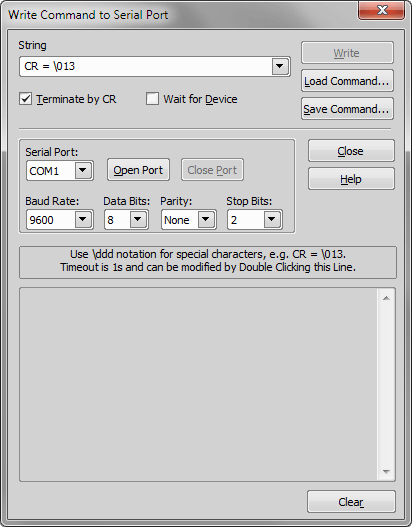
Figure 649.
If you want to use special characters use \ddd notation, where ddd are 3 decimal digits, e.g. CR=\013.
If checked, CR character (carriage return, 13 decimally) is appended to the end of the string. Most devices communicate with commands separated by CR.
If checked, the system is waiting for answer from the device. If Terminate by CR is checked, the system is waiting for the CR character. If Terminate by CR is not checked, the system is waiting for the string of characters terminated by 250 ms gap. If there is no answer from the device after time-out, (by default 60 s), it stops and displays an error message. You can change the time-out value by double clicking the bottom line of the dialog box.
A small database of commands is available; the name of command represents a string, Terminate by CR option and Wait for Device option. You can load a command, remove it from the list or directly execute it (send it to the port).
Assigns current string with Terminate by CR and Wait for Devices options to the description text. Do not use “=” character in the description text.
After pressing the Write button all defined commands are sent to the port.
COM1, COM2, COM3, COM4.
If disabled, the port is already opened with the parameters defined by four combo boxes below. If enabled, you can set the communication parameters and open the port.
If enabled, the port is opened and you can close it.
2400, 4800, 9600, 19600
7, 8
Even, Odd, None
1, 2
Note
If you use scanning stage or illuminator control unit with LIM drivers, these ports are opened automatically when you start NIS-Elements and it is strongly recommended not to close them manually.
Starts/stops the recording of commands to macro. The Rec text appears/disappears in the right part of the status bar.
Allows you to record (append/replace) commands to the active macro (either untitled macro or the last opened one). If the active macro is not empty, the Macro is not Empty dialog box appears to prompt you to select the recording option. In the case of empty active macro, there is no message.
Stops recording macro. This item replaces the item Record, if NIS-Elements is in recording mode.
Runs active macro.
Note
Besides the current active macro you can load and subsequently run up to 9 macros. Open the Macro > Options window. Flag up to 9 macros and use for instance <Ctrl+Alt+1> short cut key for loading and running Macro 1.
This command temporarily stops execution of a macro command. Press the Resume button to continue.
Runs macro from file. The Run Macro dialog box appears:
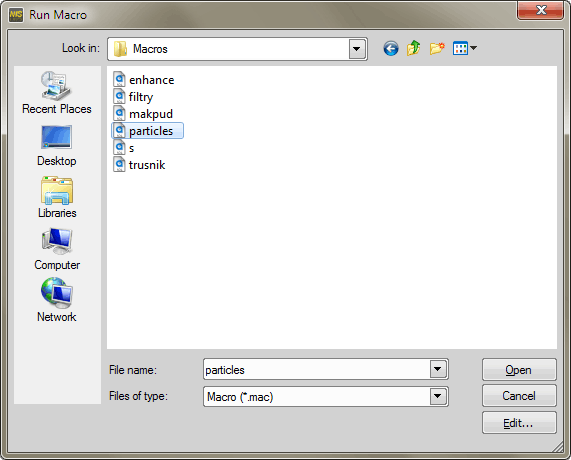
Figure 650.
Standard Windows list and combo boxes.
Allows you to view or edit the selected macro within the built-in macro editor.
Interrupts execution of the currently running macro.
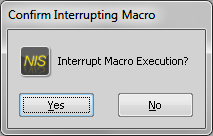
Figure 651.
Confirm the interruption by or continue the macro by clicking .
Creates a macro. The New Macro dialog box appears. Specify the target location of the macro file. After you type the name of a macro to be created, push , a new empty macro is created and loaded as the current one.
Loads a macro to NIS-Elements. The Open Macro dialog box appears. Browse for the *.mac file and press the button.
Allows you to view or edit the selected macro.
When you push Open button, the selected macro becomes active.
Note
The name of the opened macro is inserted to the list of recently used macros. The position of the last opened macro is checked (= the macro becomes active). Use the numbers and names to open one of the recently used macros. Select the number or name that corresponds to the macro you want to open.
Saves active macro in the file you have selected. The Save Macro dialog box appears.
Enables you to search a disk for macro files, view comments of macros or find macros containing user-defined string. The Browse Macro dialog box appears:
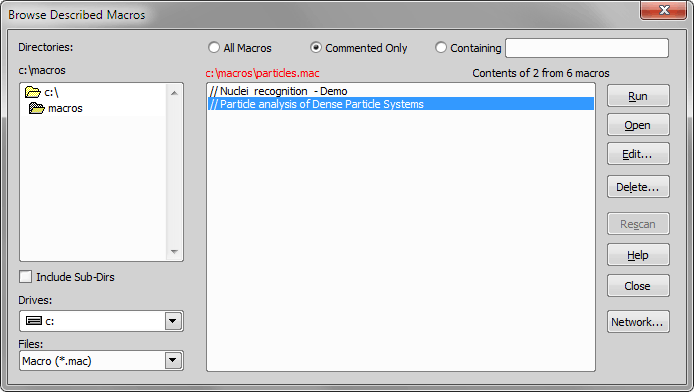
Figure 652.
Standard Windows list and combo boxes.
If checked, search is performed in all subdirectories of the selected directory.
Displays all macros
Displays only the macros beginning with comment lines.
Displays only the macros containing a specified string.
Runs the selected macro.
Loads a selected macro to the system.
Enables you to edit a selected macro.
Deletes a selected macro.
Enabled only when you edit Containing edit control. Refreshes contents of macros to match the string in Containing dialog box.
This command allows you to edit the active macro. The macro editor window appears:
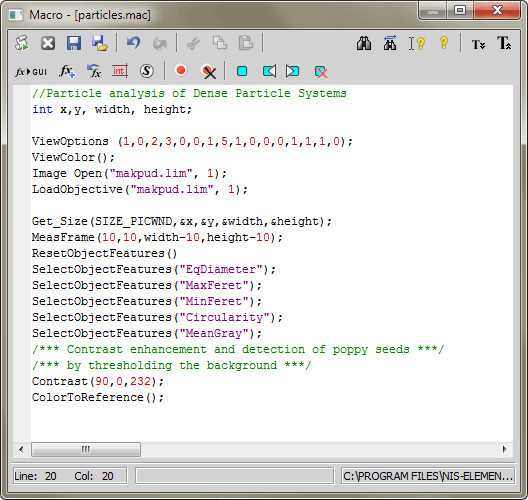
Figure 653.
Type sequences of NIS-Elements inside the window, or utilize the available buttons:
Close & Run Macro Saves the active macro on the disk and runs it. The macro editor closes.
 Close
Close closes the macro editor. If there were some unsaved changes in the macro, you would be prompt to save the macro first.
Save saves the active macro on the disk.
 Save As
 invokes a standard Save As window which enables you to select the destination folder and the macro name.
If checked, the macro is executed first, suspending any other tasks until the macro is finished.
 Undo / Redo
 moves back and forth through the history of changes.
 Cut
Cut Removes the selected text and copies it to clipboard.
 Copy
Copy Copies the current selection of text to clipboard.
 Paste
Paste Inserts a copy of the clipboard contents behind the current cursor position.
 Find
Find Push the button to search the macro for an expression.
 Replace
 Finds an expression and replaces it with another.
Opens the application help and displays the page corresponding to the currently selected command.
Help on Macro Editor Displays relevant help page.
 Font Zoom Out
 Makes the macro editor font smaller.
 Font Zoom In
 Makes the macro editor font bigger.
Transform to Interactive Transforms the selected command to its interactive alternative which opens corresponding dialog window.
Paste Command Displays the list of all NIS-Elements functions and enables you to paste one of them to the macro.
 Insert Commands from History
 Enables you to paste commands corresponding to the recently performed actions. It displays a wizard that will lead you.
 Show List of Variables
 Displays the list of all local and global variables and constants currently valid throughout NIS-Elements.
 Use Special Commands
 Displays a list of special commands, e.g. Pause Macro, Run Macro from File, Wait, etc. Select one and press the Insert button.
 Toggle Breakpoint
 Inserts/removes a breakpoint on the line where the cursor is.
Erases all breakpoints from the macro editor.
 Toggle Bookmark
 Inserts/removes a bookmark on the line where the cursor is.
 Go to Next Bookmark
 Moves cursor to the next bookmark.
 Go to Previous Bookmark
 Moves cursor to the previous bookmark.
Erases all bookmarks from the macro editor.
This command opens a window for sharing and managing macros. Users with a right to Modify shared macros can import, create, edit, and remove any of the shared macros. Users without this permission can only run the shared macros and utilize them as templates for macros of their own.
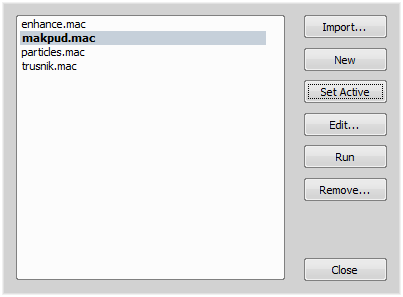
Figure 654.
This button adds an existing macro to the list of shared macros. A standard open-like window appears. Select the macro (*.mac) file to import to the list.
Note
The imported files are copied to NIS-Elements application data directory. The original file is not connected to the list of shared macros.
The New button adds a blank macro to the list of shared macros. Use the Edit button to open the macro editor and modify it.
Select a macro from the list and press the Set Active button to set the macro as "current". The active macro is run when the Macro > Run command is called.
A selected macro can be modified within the macro editor using this button. Users with the Modify shared macros right can modify them and save the changes. Other users can save the modified macro to a new file.
The Run button executes the currently selected macro.
Users with the Modify shared macros right can remove any selected macro from the list.
This command assigns macros/commands to various application events. Every time a particular event occurs, the assigned macro/command is run. The following window appears:
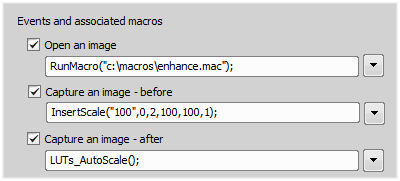
Figure 655.
Events
This is the list of events descriptions which a macro can be assigned to.
The macro is run before any of the Open... commands is performed (Open, Open Next, Open First, Open Last, Open from organizer).
The macro is run automatically before the Capture, Auto Capture, or the Capture Shading Correction Image commands and during the Grab Large Image and Scan Large Image procedures (before each frame).
The macro is run automatically after the Capture, Auto Capture, or the Capture Shading Correction Image commands and during the Grab Large Image and Scan Large Image procedures (after each frame).
The macro is run before any of the following commands is performed: Live Fast, Live Quality, Auto Capture, RAM Capture, Grab Large Image, Scan Large Image.
The macro is run before the Save or the Save As command are performed.
The macro is run before the RAM Capture command is performed.
The macro is run after the New Optical Configuration, Quick Calibration, or the Set As Active command is selected outside an ND experiment (e.g. by running a command in the main toolbar).
The macro is run after the New Optical Configuration, Quick Calibration, or the Set As Active command is selected inside an ND experiment.
The macro is run on NIS-Elements startup.
The macro is run before NIS-Elements is shut down.
The macro is run after the ND experiment has finished.
The macro is run before each frame is captured during an ND experiment.
The macro is run after each frame is captured during an ND experiment.
The macro is run after the Device Capture Button is pressed and an image is acquired. See Acquire > Capture Button Setup.
This event is triggered before the nosepiece position is changed.
Example: A macro can be created checking the current and the destination nosepiece position. If the user switches from an immersion objective to a dry one, the system can prompt him to clean the sample, or so.
Sets preferences concerning the macro execution.
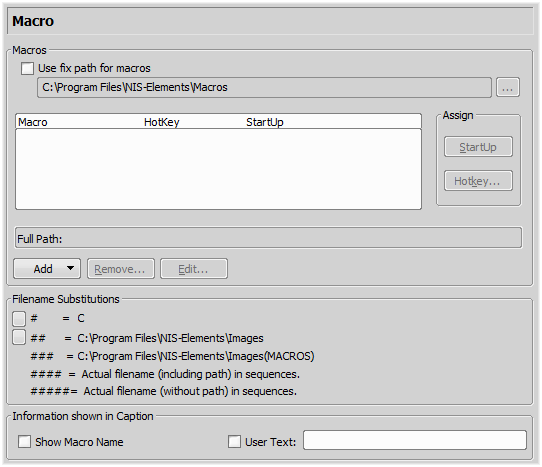
Figure 656.
Lists of macros that can be executed using hot keys or automatically at the beginning of the NIS-Elements session.
To launch a macro automatically after starting the NIS-Elements program, select it and press the StartUp button. StartUp field of the selected macro in the list box is filled.
To assign a hotkey to a macro, select the macro in the macro list box and press the button. Select among 9 pre-defined hot key combinations and press OK button.
Shows the full pathname of the selected macro.
Adds a macro to the macro list box. Select Macro dialog box appears and you can search the disk for the macro.
Removes a selected macro from the macro list box.
Edits a selected macro from the macro list box.
Select which file folder will be represented by the cross hatch signs.
Optionally, the name of the current macro (Show macro name) and an arbitrary User text can be displayed in the NIS-Elements caption.
Restores the default setting for Macro Options.

Loads Macro > Options .