
NIS.ai Explorer ( NIS.ai > Explorer) contains a list of all trained AI. These AIs can be executed, deleted or imported from an existing file. Additional information about the selected AI can be displayed below. By default, the list of AIs is shown in a tree view grouped by their type. It can be switched to Sort by date, then each day can be expanded to reveal a list of AIs created that day. An icon with the NIS.ai function type (
 Enhance.ai,
  Convert.ai,
  Segment.ai,
  Segment Objects.ai) is displayed next to each AI name.
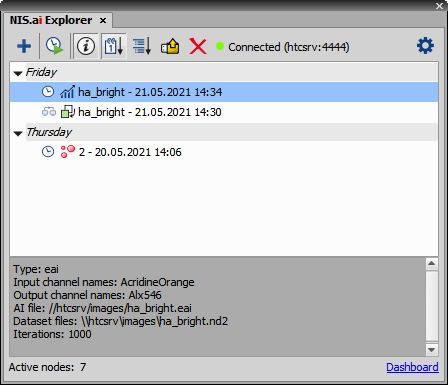
Figure 1517. NIS.ai Explorer window.
 Create New
 Enables the user to selected a NIS.ai function and train a new AI.
 Run
Run Runs the trained AI.
 Train All Queued
 Successively runs all AIs which were added to the queue using the button inside its training dialog. Each queued AI is marked by a clock icon in the AI list.
 Show Info Pane
 Displays information about the selected AI.
 Sort by Date
 Sorts the AIs by date.
 Sort by Type
 Sorts the AIs by the function type.
 Import From File
 Imports the AI from a file into your current project.
 Remove
 Removes the selected AI.
Displays the cluster connection status. Server name and port is shown when the connection is established.
 Cluster Settings
 Opens the Cluster Connection Settings dialog window. Start by filling in the Server Name and Port on which the NIS-Elements Compute Cluster is running. The default port number is 4444. Then click . Information about the computer cluster server is shown. The central field shows a summary of the computing capability of all nodes.
Shows the number of nodes (computers) connected to the cluster also shown in the dashboard.
Opens the NIS-Elements Compute Cluster Dashboard inside your primary web browser. Jobs tab shows an overview of all tasks sent to the cluster (computer network) to be processed. Currently the following processing types are supported: AI Training, Batch Deconvolution, Batch Ga3 Distributed. Nodes tab shows all computers involved in the processing. Please see the NIS-Elements Compute Cluster Manual for more information.