Pictures of a database together with the associated table data, or common images with the associated Image Info can be exported straight to a report.
Switch NIS-Elements to Organizer by the View > Organizer Layout
 command.
Select one or more images. These images will be inserted to the report.
Click the Report
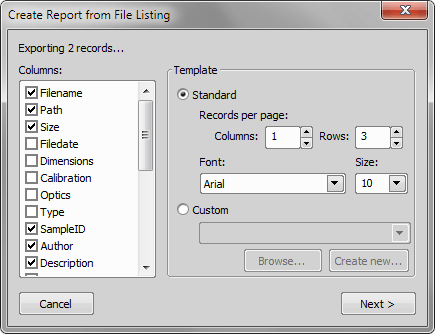
 button on the main toolbar. The following window appears:
In the Columns section, you can select fields, which will be included in the report. If you are exporting images from a database, the database table fields will be listed. If you are exporting images from a directory, image description items will appear.
The Template portion of the dialog specifies the layout details. If you select the Standard template, images will be organized in rows and columns. It is possible to set the number of columns and rows. If you select the Custom report template, a user report template (*.rtt) can be opened and used for the report creation. If such report does not exist yet, you can create it using the Create New button.
If You Pressed the Create New Button
A wizard appears. Select number of columns and rows of the new report template. Click Next.
Select the paper size, page orientation, and define margins. Click .
An untitled report template opens containing a grid of images spaced according to the columns / rows settings.
Edit the top-left cell of the image grid. You can change the text/image boxes position, size, and mapping. During report creation, all the other cells of the grid will be filled automatically according to the settings of the first one.
A custom header or automatic page numbering can be added to the report.
