
Drag-drop a laser line into the Illumination row of the Phase table and double-click on it. A new dialog window appears. In the first combo box you can change your illumination, set its power or assign the power value from the device pad. The middle section contains a preview of the defined illumination cycle.
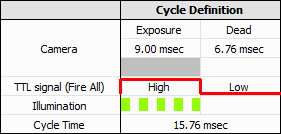
Figure 1034.
The settings defining the illumination pattern itself are represented by tabs at the bottom of the dialog window. Three possible illumination modes are available:

Figure 1035.
This mode uses the exposure signal as a pattern for illumination. Thus, illumination is performed only during exposure. This is indicated by a full color in the preview area in the center of the dialog window and in each cell using this illumination mode. Start by selecting for how many frames will the illumination be repeated (Repeat for).
Illumination pulsing can be performed over the defined illumination interval. Simply check Pulsed Illumination [Min Pulse Width ~ 10 msec], specify the Pulse Width, whether its a Single pulse or it contains a Period (gap between pulses). You can also set the Count (number of pulses) or Fill the whole Exposure.
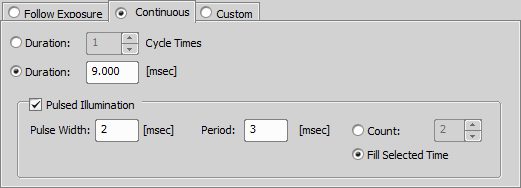
Figure 1036.
This mode illuminates over the whole camera period (Exposure + Dead). You can set its Duration in Cycle Times or in time units.
Illumination pulsing can be enabled by checking the Pulsed Illumination [Min Pulse Width ~ 10 msec] check box. Then you should specify the Pulse Width and Period (time gap between pulses). Now set their Count or use Fill Selected Time to fill the whole illumination interval with the previous settings. After adjusting your illumination, click . Elements using the Continuous mode will be indicated by a wavy line.
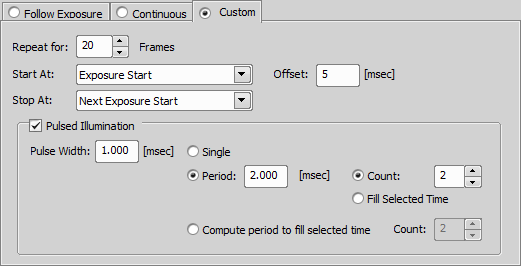
Figure 1037.
Custom mode is the most complex mode which combines both previously mentioned modes. Start by selecting for how many frames will the illumination be repeated (Repeat for). Choose at which point will the illumination Start/Stop - Exposure Start/End, Dead Time Start/End or Next Exposure Start. The current illumination setting is always displayed in the preview section (Cycle Definition) of the dialog window. Time offset from the Start At point can be set in the Offset edit box.
Illumination pulsing uses the same features as the Continuous mode (see above). If you have set the exact Pulse Width and you know the number of pulses you want to use, check Compute period to fill selected time and enter their Count. After adjusting your illumination, click . Elements using the Custom mode will be indicated by the “Custom” text.
For IS examples, please see Usage Examples.